SIR-GM1 in 2006 Pontiac Torrent.
This may possibly work in a 2006 Chevrolet Equinox as well, but I have not tried it.
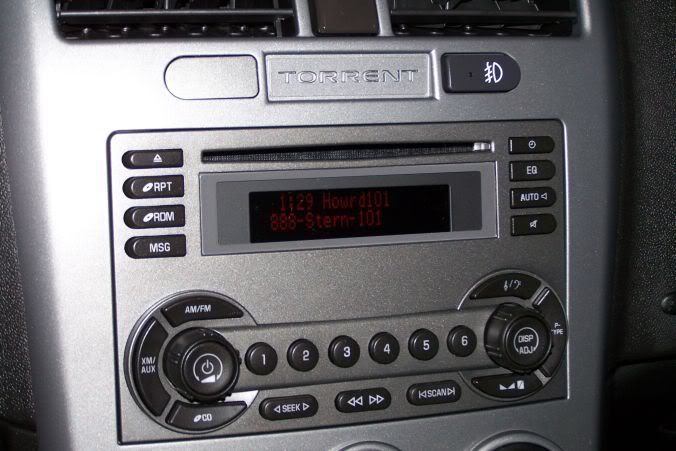
The SIR-GM1 is NOT originally compatible with the head unit in the 2006 Pontiac Torrent, even though the connectors all fit. The head unit has the XM/AUX button, and not the BAND button, and has 1 disk CD player. I do not know if it will work with other option head units, but if you follow the color codes, you may be able to get it to work.
To make this work, we will need to make some modifications to the connectors, both the SIR-GM1 “T” Cable, and the factory connectors, because GM was nice enough to change some pins around for unknown reasons. I’ve written this, so no wires have to be cut, so it will be quite easy to put things back the way they were if needed. If you have On-Star, I have no idea if this will have any affect on that, but if you try it, please report results.
Quirky incompatibilities:
When you turn the vehicle off, the radio stays on until you open a door. For some reason the Sirius decides to change channels when this happens.
Sometimes when you first turn the vehicle on, it automatically goes to the weather channel. And sometimes it says “Check XM” or “Not Available” You may need to turn the radio off and on to get it to come on. If that doesn’t work, try turning the vehicle off and back on. Out of over a dozen starts, this has only happened once.
The preset button on the steering wheel does not work, but the channel up and down still does. You’ll have to use the buttons on the radio for your presets.
It is not that difficult to do, but you should be comfortable working with wires. As always, do this at your own risk, and I won’t be responsible for any outcome.
For safety to prevent shorting out your electrical system, you may want to disconnect the battery before getting into moving wires around.
Tools Needed:
Small Flat Jewelers Screwdriver
7mm socket and ratchet.
Padded two sided sticky tape.
Step 1
Remove Factory Head Unit.
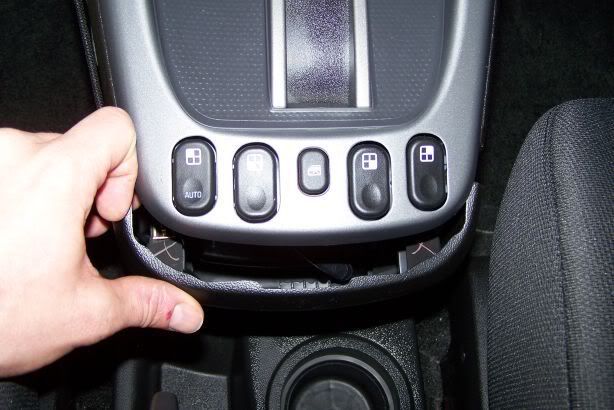
Not too difficult, all the plastic around the radio just pops out, and is held on with clips. Just be careful not to use too much force as to break things. I started with the piece under the window controls, then went to the big piece starting from the bottom where the window controls are, just gently, but firmly lift. Unplug all the wires for the power windows, heater controls, fog lamps, etc. You may need to put the vehicle into Neutral, to be able to move the gearshift out of the way so you can pull it out. If you do this, be sure to engage the emergency brake. Once you get it off, lay it aside, and out of the way.
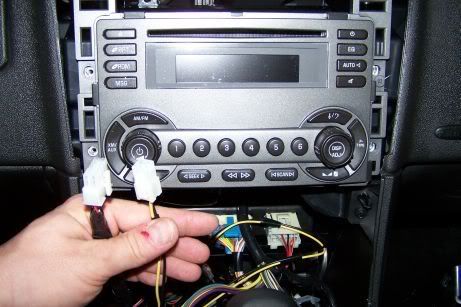
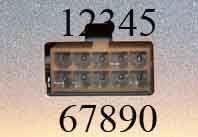
The radio itself is held in with 4 screws, 7mm I believe, Remove them, then pull the head unit out. Disconnect the radio antenna, and the two connectors that plug into the radio. There should be a 12 Pin connector, and a 24 Pin connector. Remember which end of the connector is “Up” so when you look at the pinouts, it makes sense.
12 Pin Connector:
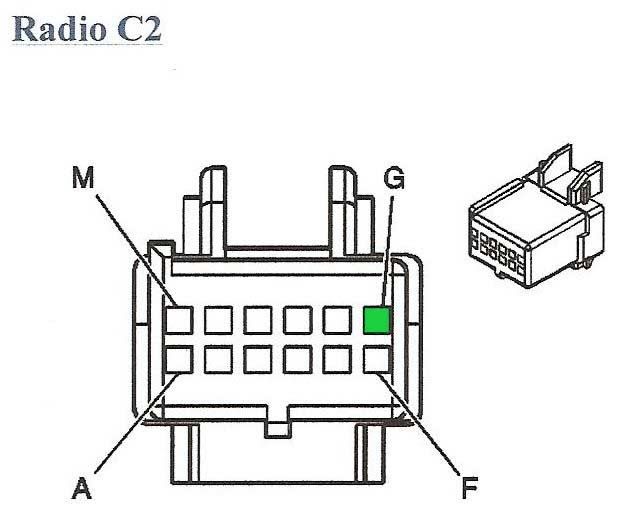
24 Pin Connector:

Step 2
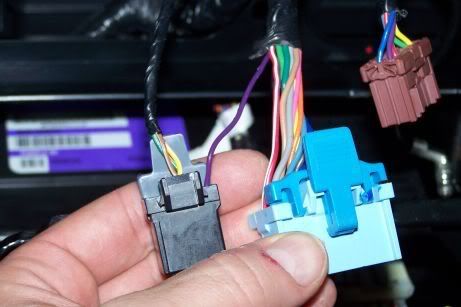
Prepare Factory Connectors.
The GM Class-II Serial Data wire is in the wrong place, so we need to move it, so it properly routes into the SIR-GM1 to the DATA IN pin.
Referencing the above pinout diagrams, we need to move the wire from the 24 Pin connector ( Pin B9 / Solid Purple Wire ) to the 12 pin connector ( Pin G / Currently No Wire ). To do this, we first need to remove some retaining clips on the connectors. We need to take off the top clip on the 12 pin connector, and the bottom clip on the 24 pin connector. Use your jewelers screwdriver to pry the tabs back a little, so it slides out then off.
Now to remove the wire, we need to insert the jewelers screwdriver into the larger of the two hold for pin B9. Move it around a little, while pulling lightly on the purple wire from the back, and it should slide right out.
Once that is out, place the wire into pin G for the 12 pin connector, it will only go in one way, and will snap into place. Then replace the retaining clip only on the 12 pin connector.
Step 3
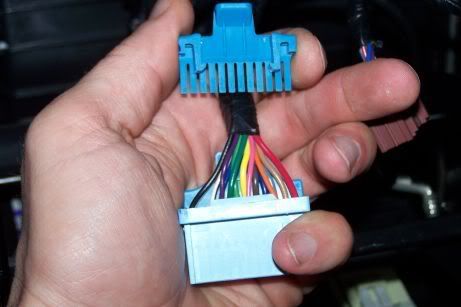
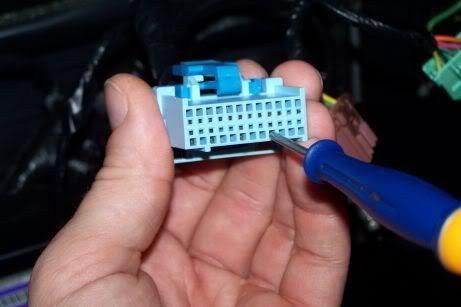
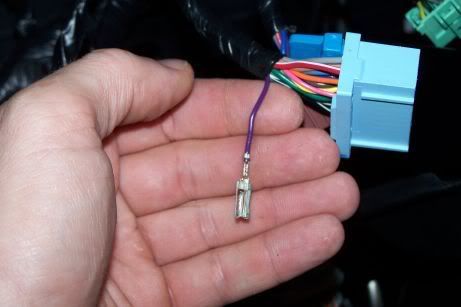
Prepare The “T” Cable Connector.
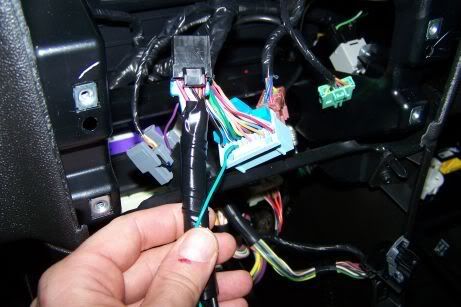
The connector that will plug into the head unit, you will want to remove the solid green wire from pin G in the same manner as we did above. You will also want to separate it, by either removing the tape, and pulling it through, or just cutting off the thick black plastic. Your end result should look like this:
Place that wire into pin B9 of the factory 24 pin connector. ( the place we removed the purple wire )
Now replace all retaining clips you have.
Step 4
Hooking it all up.
Connect the factory 12 pin connector into the SIR-GM1 “T” cable.
Connect the SIR-GM1 “T” cable 12 pin connector into the head unit.
Connect the factory 24 pin connector into the head unit.
Connect the AM/FM antenna wire back into the head unit.
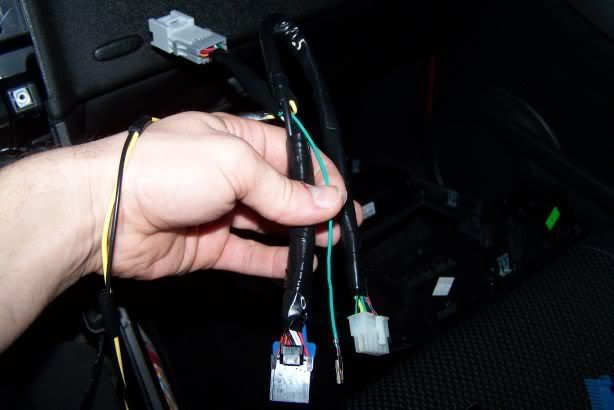
Now the fun part, Getting the wires arranged, so you can push the head unit back into place. This will take some moving things around, and possibly removing some of the tape from the factory harness so you can get that pushed back. Once you get it, make sure you still have access to the “T” cable connector that will plug into the SIR-GM1, and the connector for 12V power.
Step 5
Antenna
Now for a change of pace, run the antenna from wherever you decide to put it, making sure you get the antenna connector up behind the head unit. I won’t get much into installing the antenna, if you’ve gotten this far, I’m sure you can figure out getting the antenna installed.
Step 6
Connecting the 12V wires.
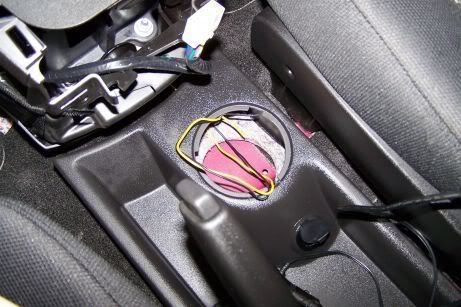
The Yellow and Black wires need a 12V constant source. The best place I found is tapping into the cigarette lighter wires. You can easily access these by prying out the cup holder.
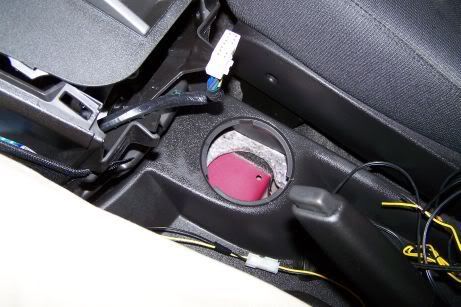
Run the yellow and black wire until you get the ends where the cup holder is.
I used crimp connectors, Simply, yellow to red, and black to black.
The noise filter that is on this line, it’s a box that the wires go through, I wrapped my in a cloth, and tucked it in there somewhere, so it won’t make noise as the vehicle is driven.
Now plug in the little square connector for the power. .
Go ahead and connect the the “T” cable to the SIR-GM1, and connect the antenna now.
Step 7
Testing
Before mounting, it would probably be best to make sure everything is hooked up, and give it a test, and make sure it’s working.
It seems as though if you press the XM/AUX button, and get “Not Available” something is wrong with the purple and green wire. Double check everything.
If you get “Check XM” First try turning everything off and back on, if that doesn’t fix it, it could be because the 12V is not properly connected.
Step 8
Mounting.
See the picture to see where I decided to mount the unit.
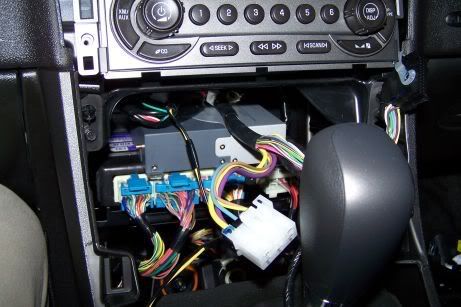
I used a couple pieces of 3m double sided sticky pads to hold it in pace, so it doesn’t vibrate and make noise. I just pushed it back as far as I could, and pressed it down so the pads would stick.
Step 9
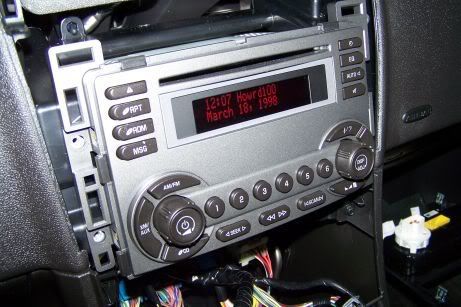
Put everything back together. Double check your work.
Just do opposite of what you did to disassemble everything. Double check your connections on the front bezel, so you heater and everything work correctly. Check your rear window defogger button, it’s on that connector that has the lever on it, it can be tricky to get back in place properly.
If all went well your end result should look like this:
What we actually did was take the GM Class II Serial data from the vehicle, and put it to the Data Input on the SIR-GM1, then took the Data Output and put it on the proper data pin of the head unit.
Special thanks to Thiggin2 for helping with the pinouts of the head unit. Without that information, this would not have been possible.
Enjoy! There are a few quirky things that happen that I mentioned above, but so far doesn’t seem to serious.
It’s late, and I’m tired, so there is the possibility I missed something while writing this, feel free to post any questions, or any improvements. I’ll be out of town for the rest of the weekend, but will check messages upon my return.
I hope this helps someone out who has been wanting to do this.
Also, let me know if this works in an equinox, or any other GM vehicle.
This may possibly work in a 2006 Chevrolet Equinox as well, but I have not tried it.
The SIR-GM1 is NOT originally compatible with the head unit in the 2006 Pontiac Torrent, even though the connectors all fit. The head unit has the XM/AUX button, and not the BAND button, and has 1 disk CD player. I do not know if it will work with other option head units, but if you follow the color codes, you may be able to get it to work.
To make this work, we will need to make some modifications to the connectors, both the SIR-GM1 “T” Cable, and the factory connectors, because GM was nice enough to change some pins around for unknown reasons. I’ve written this, so no wires have to be cut, so it will be quite easy to put things back the way they were if needed. If you have On-Star, I have no idea if this will have any affect on that, but if you try it, please report results.
Quirky incompatibilities:
When you turn the vehicle off, the radio stays on until you open a door. For some reason the Sirius decides to change channels when this happens.
Sometimes when you first turn the vehicle on, it automatically goes to the weather channel. And sometimes it says “Check XM” or “Not Available” You may need to turn the radio off and on to get it to come on. If that doesn’t work, try turning the vehicle off and back on. Out of over a dozen starts, this has only happened once.
The preset button on the steering wheel does not work, but the channel up and down still does. You’ll have to use the buttons on the radio for your presets.
It is not that difficult to do, but you should be comfortable working with wires. As always, do this at your own risk, and I won’t be responsible for any outcome.
For safety to prevent shorting out your electrical system, you may want to disconnect the battery before getting into moving wires around.
Tools Needed:
Small Flat Jewelers Screwdriver
7mm socket and ratchet.
Padded two sided sticky tape.
Step 1
Remove Factory Head Unit.
Not too difficult, all the plastic around the radio just pops out, and is held on with clips. Just be careful not to use too much force as to break things. I started with the piece under the window controls, then went to the big piece starting from the bottom where the window controls are, just gently, but firmly lift. Unplug all the wires for the power windows, heater controls, fog lamps, etc. You may need to put the vehicle into Neutral, to be able to move the gearshift out of the way so you can pull it out. If you do this, be sure to engage the emergency brake. Once you get it off, lay it aside, and out of the way.
The radio itself is held in with 4 screws, 7mm I believe, Remove them, then pull the head unit out. Disconnect the radio antenna, and the two connectors that plug into the radio. There should be a 12 Pin connector, and a 24 Pin connector. Remember which end of the connector is “Up” so when you look at the pinouts, it makes sense.
12 Pin Connector:
24 Pin Connector:
Step 2
Prepare Factory Connectors.
The GM Class-II Serial Data wire is in the wrong place, so we need to move it, so it properly routes into the SIR-GM1 to the DATA IN pin.
Referencing the above pinout diagrams, we need to move the wire from the 24 Pin connector ( Pin B9 / Solid Purple Wire ) to the 12 pin connector ( Pin G / Currently No Wire ). To do this, we first need to remove some retaining clips on the connectors. We need to take off the top clip on the 12 pin connector, and the bottom clip on the 24 pin connector. Use your jewelers screwdriver to pry the tabs back a little, so it slides out then off.
Now to remove the wire, we need to insert the jewelers screwdriver into the larger of the two hold for pin B9. Move it around a little, while pulling lightly on the purple wire from the back, and it should slide right out.
Once that is out, place the wire into pin G for the 12 pin connector, it will only go in one way, and will snap into place. Then replace the retaining clip only on the 12 pin connector.
Step 3
Prepare The “T” Cable Connector.
The connector that will plug into the head unit, you will want to remove the solid green wire from pin G in the same manner as we did above. You will also want to separate it, by either removing the tape, and pulling it through, or just cutting off the thick black plastic. Your end result should look like this:
Place that wire into pin B9 of the factory 24 pin connector. ( the place we removed the purple wire )
Now replace all retaining clips you have.
Step 4
Hooking it all up.
Connect the factory 12 pin connector into the SIR-GM1 “T” cable.
Connect the SIR-GM1 “T” cable 12 pin connector into the head unit.
Connect the factory 24 pin connector into the head unit.
Connect the AM/FM antenna wire back into the head unit.
Now the fun part, Getting the wires arranged, so you can push the head unit back into place. This will take some moving things around, and possibly removing some of the tape from the factory harness so you can get that pushed back. Once you get it, make sure you still have access to the “T” cable connector that will plug into the SIR-GM1, and the connector for 12V power.
Step 5
Antenna
Now for a change of pace, run the antenna from wherever you decide to put it, making sure you get the antenna connector up behind the head unit. I won’t get much into installing the antenna, if you’ve gotten this far, I’m sure you can figure out getting the antenna installed.
Step 6
Connecting the 12V wires.
The Yellow and Black wires need a 12V constant source. The best place I found is tapping into the cigarette lighter wires. You can easily access these by prying out the cup holder.
Run the yellow and black wire until you get the ends where the cup holder is.
I used crimp connectors, Simply, yellow to red, and black to black.
The noise filter that is on this line, it’s a box that the wires go through, I wrapped my in a cloth, and tucked it in there somewhere, so it won’t make noise as the vehicle is driven.
Now plug in the little square connector for the power. .
Go ahead and connect the the “T” cable to the SIR-GM1, and connect the antenna now.
Step 7
Testing
Before mounting, it would probably be best to make sure everything is hooked up, and give it a test, and make sure it’s working.
It seems as though if you press the XM/AUX button, and get “Not Available” something is wrong with the purple and green wire. Double check everything.
If you get “Check XM” First try turning everything off and back on, if that doesn’t fix it, it could be because the 12V is not properly connected.
Step 8
Mounting.
See the picture to see where I decided to mount the unit.
I used a couple pieces of 3m double sided sticky pads to hold it in pace, so it doesn’t vibrate and make noise. I just pushed it back as far as I could, and pressed it down so the pads would stick.
Step 9
Put everything back together. Double check your work.
Just do opposite of what you did to disassemble everything. Double check your connections on the front bezel, so you heater and everything work correctly. Check your rear window defogger button, it’s on that connector that has the lever on it, it can be tricky to get back in place properly.
If all went well your end result should look like this:
What we actually did was take the GM Class II Serial data from the vehicle, and put it to the Data Input on the SIR-GM1, then took the Data Output and put it on the proper data pin of the head unit.
Special thanks to Thiggin2 for helping with the pinouts of the head unit. Without that information, this would not have been possible.
Enjoy! There are a few quirky things that happen that I mentioned above, but so far doesn’t seem to serious.
It’s late, and I’m tired, so there is the possibility I missed something while writing this, feel free to post any questions, or any improvements. I’ll be out of town for the rest of the weekend, but will check messages upon my return.
I hope this helps someone out who has been wanting to do this.
Also, let me know if this works in an equinox, or any other GM vehicle.
Last edited:
")