
What you see above is a top view of DIRECTV's AIM meter. It's a great tool for working with DIRECTV dishes, and in fact it's the only tool I recommend. Why? Because it's the only meter that reads every kind of DIRECTV signal. It also has a guided mode which can help even the greenest novice get the dish perfectly aimed.
However, there have been some folks over the years who say that they can't get any results from their meters. Generally this boils down to two issues: either the meter isn't set for the correct dish type, or you're connecting to the wrong port. I'll go through both issues in this article, which should let you get moving quickly.
The simple answer is that, the line to the dish should always connect to "ODU." ODU is a DIRECTV term meaning "outdoor unit," in other words, the dish. "IRD" is an older term meaning "integrated receiver/decoder," in other words the satellite receiver.
Most of the issues I see with people using this meter come down to connecting the dish to the IRD port. I don't know why, maybe because it's the left side port. But more often than not, the biggest problem with the AIM is that people have the cable attached to the wrong connector.
A big mistake that a lot of people make is just turning on the meter and thinking that it will work. In order to aim a dish, you have to set some basic things up, and the most important thing is the dish type.
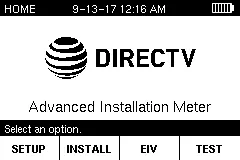
When you turn on the meter, you'll get this home screen. Before you go to INSTALL (first-time installation of a dish) or TEST (checking the dish setup) you should go to SETUP by pressing the leftmost of the four buttons. You'll see this screen:
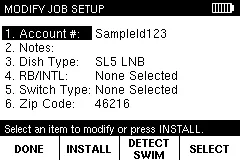
It's really really important that you set the dish type and the switch type. If these aren't set right, the meter won't work at all for you.
The dish type setting is easy. It's almost always SL3 LNB. The older SL5 LNB isn't sold anymore except for commercial use. If the front of your dish looks anything like this, with a single white feed horn:
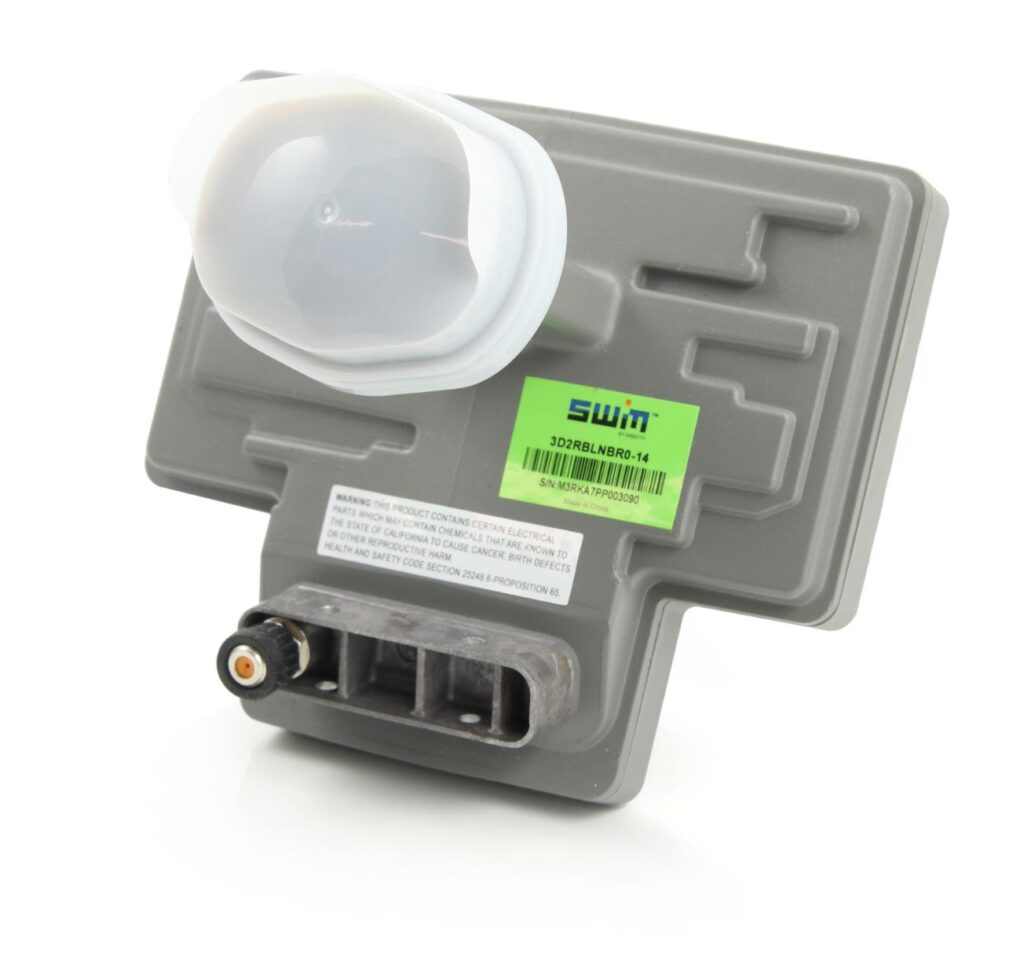
That's an SL3 LNB.
The choice of switch can be a little more confusing. You'll see this screen:
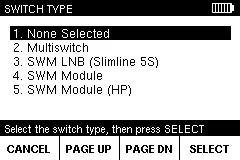
This is where you need to make the right choice. If there is one wire coming out of the dish, choose 3. SWM LNB. If there are four or six, choose 4. SWM Module. The other settings are really for older or commercial installations.
When everything is set right in this screen, you can press HOME to go back to the main menu. If you are putting up the dish for the first time, choose INSTALL. Otherwise choose TEST. If you are doing a first-time install and you've set the ZIP code, you'll get basic aiming instructions. If you are testing an install, you can enter Guided mode which will take you through the process. From there, it's pretty easy.
With a lot of other test equipment, you sort of hook it up and it just works. That's not true of the AIM meter. The AIM meter is designed for experienced technicians to help them get their work done faster. Yes, it does take a little bit of learning and you have to do the steps in order, but once you do, the process is very easy. If you're moving your dish from place to place (for example in an RV) you only need to set the dish and switch type once and then just change the ZIP code to get aiming instructions. If you're testing your own installation from time to time, you don't need to change anything once it's set up.
The post Which port on an AIM meter connects to the dish? appeared first on The Solid Signal Blog.
Continue reading...
However, there have been some folks over the years who say that they can't get any results from their meters. Generally this boils down to two issues: either the meter isn't set for the correct dish type, or you're connecting to the wrong port. I'll go through both issues in this article, which should let you get moving quickly.
IRD or ODU?
The simple answer is that, the line to the dish should always connect to "ODU." ODU is a DIRECTV term meaning "outdoor unit," in other words, the dish. "IRD" is an older term meaning "integrated receiver/decoder," in other words the satellite receiver.
Most of the issues I see with people using this meter come down to connecting the dish to the IRD port. I don't know why, maybe because it's the left side port. But more often than not, the biggest problem with the AIM is that people have the cable attached to the wrong connector.
The other problem: dish type is wrong
A big mistake that a lot of people make is just turning on the meter and thinking that it will work. In order to aim a dish, you have to set some basic things up, and the most important thing is the dish type.
When you turn on the meter, you'll get this home screen. Before you go to INSTALL (first-time installation of a dish) or TEST (checking the dish setup) you should go to SETUP by pressing the leftmost of the four buttons. You'll see this screen:
It's really really important that you set the dish type and the switch type. If these aren't set right, the meter won't work at all for you.
What are the right settings?
The dish type setting is easy. It's almost always SL3 LNB. The older SL5 LNB isn't sold anymore except for commercial use. If the front of your dish looks anything like this, with a single white feed horn:
That's an SL3 LNB.
The choice of switch can be a little more confusing. You'll see this screen:
This is where you need to make the right choice. If there is one wire coming out of the dish, choose 3. SWM LNB. If there are four or six, choose 4. SWM Module. The other settings are really for older or commercial installations.
Moving on to the actual work
When everything is set right in this screen, you can press HOME to go back to the main menu. If you are putting up the dish for the first time, choose INSTALL. Otherwise choose TEST. If you are doing a first-time install and you've set the ZIP code, you'll get basic aiming instructions. If you are testing an install, you can enter Guided mode which will take you through the process. From there, it's pretty easy.
Why does DIRECTV make it so hard?
With a lot of other test equipment, you sort of hook it up and it just works. That's not true of the AIM meter. The AIM meter is designed for experienced technicians to help them get their work done faster. Yes, it does take a little bit of learning and you have to do the steps in order, but once you do, the process is very easy. If you're moving your dish from place to place (for example in an RV) you only need to set the dish and switch type once and then just change the ZIP code to get aiming instructions. If you're testing your own installation from time to time, you don't need to change anything once it's set up.
The post Which port on an AIM meter connects to the dish? appeared first on The Solid Signal Blog.
Continue reading...