Installation of the GeoSatPro 1.2 M antenna

Status
Please reply by conversation.

AcWxRadar

SatelliteGuys Pro
Original poster
Apr 26, 2006
4,575
4
40 miles NW of Omaha. Omaha?
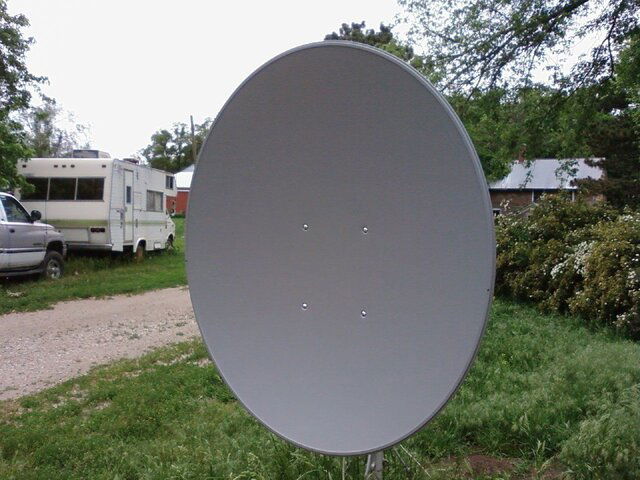
I wasn't feeling too well today, but I just had to start this project as my new 1.2 M dishes arrived early this morning. The delivery man called for specific instructions to get to my home, so after I provided that, he showed up within 20 minutes. Pretty good time as you almost have to speed to make it here in that time when you know where you are going!

Anyway, I just couldn't resist the temptation to set up this new dish to test it, regardless of my nasty bugger of a cold.

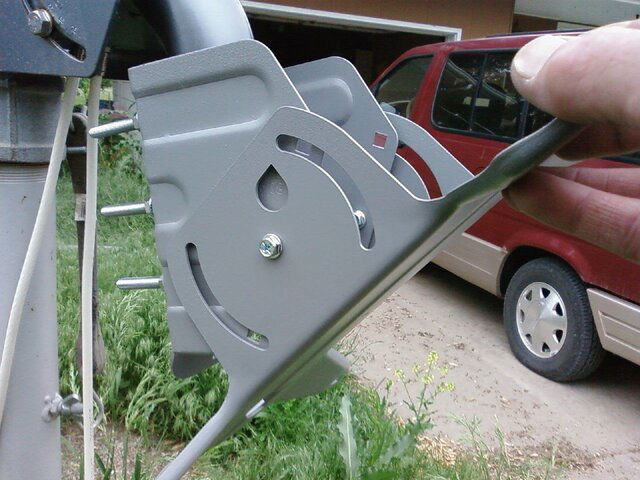
I took some pictures as I went along. I made a couple of mistakes in this process, but I found my errors in quick time and corrected them as I went along. So if you see something incorrect in my photos, there will probably be an explanation upcoming in one of my following posts.

The rest of this thread will be devoted to the installation of this dish. I have to stop with the photos now as it is growing too dark outside.

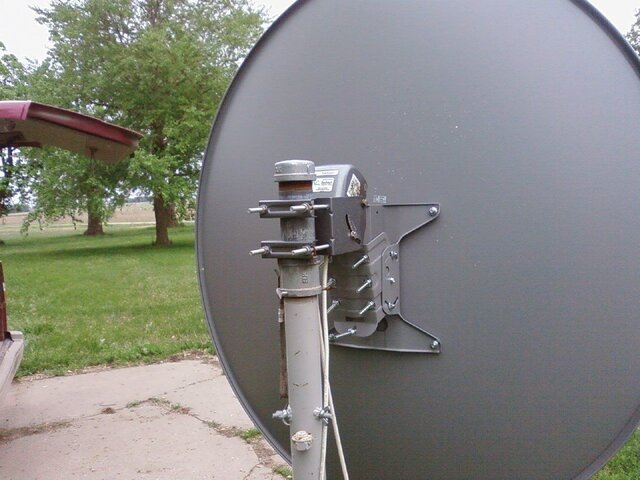
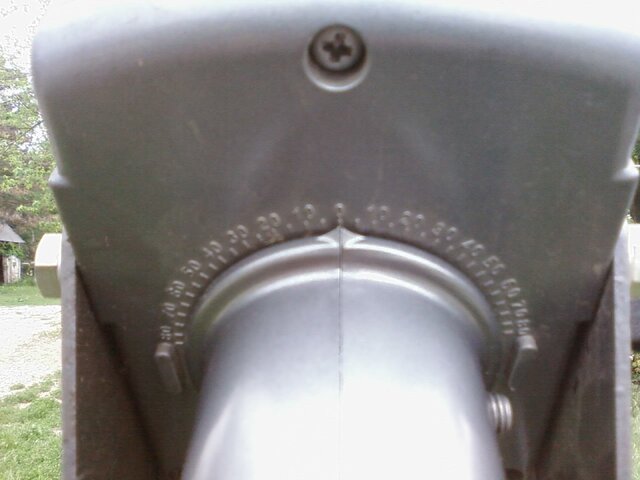
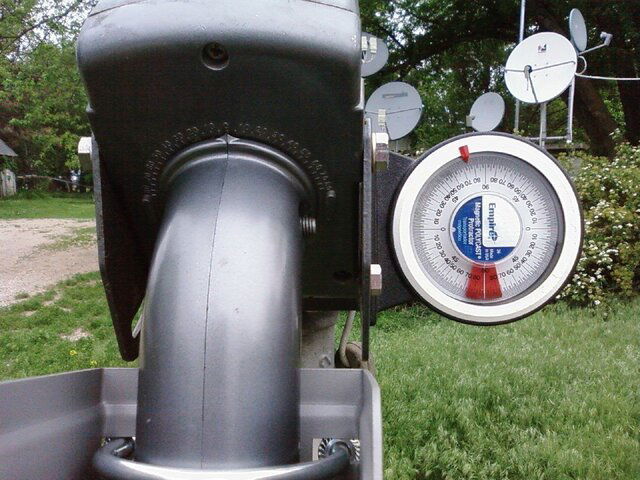
I still have some work in the alignment area to make this setup perfect, but I am quite close already. It won't take long to peak it to perfection, but that will have to wait for a day when I am feeling a little more up to par.

RADAR
 
Removing the Old

The first order of business was to remove the old dish - the Winegard DS-2076 76 cm dish.

This was a short episode. I unscrewed the LNBF from its clamp and set it aside with the cables still attached. I then unbolted the old 76 cm dish from the motor tube. This was an easy step.

The next process was to remove the 42 mm motor tube and install the 55 mm tube on the DG-380 motor.

You need a set of metric tools for this. A 5 mm metric hex wrench and a 13 mm socket for the nut.

Remove the nut first and then unscrew the bolt.

Then you have to wiggle the motor tube off of the motor stem.

I then attached the new motor tube and re-installed the bolt and nut in the reverse order.

I did not wish to alter the motor alignment (azimuth or latitude angles) so I drove the motor to a far degree satellite so that I could access the bolt and nut in order to perform this operation. Otherwise, the side brackets for the motor are in the way.

When I finally had the new larger 55 mm motor tube installed and secured, I drove the motor to the zero degree or reference position.

Picture attached below.
 

Attachments

  • 1.2 M dish installation 004.jpg
    1.2 M dish installation 004.jpg
    86.7 KB · Views: 325
Installing the dish backet on the motor tube

The mount for the dish doesn't fit properly on my motor as it is upside down. you will observe that I have to flip this mount for an installation on a motor tube which points downward.

There is a flange or angled portion of the dish bracket which would interfere with the motor bracket during rotation and it physically will not mount on the motor tube in that position.

This makes the elevation scale incorrect (upside down) for my installation. The instructions which came with this dish explain how to correct for the variance in the angle if you have to install it in an inverted position.

Being rather fuzzy headed today, I opted to ignore this instruction and just depend upon trial and error alignment procedures. This is what I have always been accustomed to anyway, so I just followed my own instincts here. You end up at that point regardless, to make your fine tuning adjustments.

I just noticed, looking at this picture, that my dial inclinometer is hanging off of the side of the motor bracket. There was no legitimate reason for placing it there. I just slapped it up there to have someplace to keep it handy for later. I wasn't measuring anything with it in this position, it was just storage. :)
 

Attachments

  • 1.2 M dish installation 003.jpg
    1.2 M dish installation 003.jpg
    280.3 KB · Views: 486
Last edited:
Securing the dish bracket to the motor tube

Now the dish bracket has to be affixed to the motor tube and secured in-line with the axis of the tube.

Each antenna is supplied with two "U-bolts" to clamp the dish bracket to the motor tube. Here is where I found a problem.

Even though the motor tube on the DG-380 motor is 55 mm in diameter and the specs for the GeoSat Pro 1.2 M dish state that it can attach to a 55 mm mast or motor tube, this is a little inaccurate.

You will be able to snug the U-Bolts up fairly well without crushing the motor tube, but it will not be very tight on the tube. You can easily rotate the assembly on the tube by hand with little effort.

Since I did not want to spend too much time and effort to compensate for this, I opened the hardware box from one of the other 1.2 M dishes and pulled out an extra U-bolt and two nuts.

There are three slots for three U-Bolts on this attachment, so you can install an extra U-bolt to help secure the bracket to the motor tube. This helps, but more is required as the threads on the U-bolts are not sufficient to secure the dish to the motor tube completely.

This will require further investigation. Maybe a pair of shims (not washers) but a 1/4 inch sleeve on the U-bolt will add that extra bit of grip and allow the threads to snug the assembly down on the motor tube.

Note how it appears with three U-bolts installed instead of two in the picture below.
 

Attachments

  • 1.2 M dish installation 006.jpg
    1.2 M dish installation 006.jpg
    265 KB · Views: 348
Each antenna is supplied with two "U-bolts" to clamp the dish bracket to the motor tube. Here is where I found a problem.

Even though the motor tube on the DG-380 motor is 55 mm in diameter and the specs for the GeoSat Pro 1.2 M dish state that it can attach to a 55 mm mast or motor tube, this is a little inaccurate.

You will be able to snug the U-Bolts up fairly well without crushing the motor tube, but it will not be very tight on the tube. You can easily rotate the assembly on the tube by hand with little effort.

This seems to be the one of the main weaknesses of a stock Geo 1.2/DG-380 combo. I took a section of 2" schedule 40 PVC and sliced it lengthwise to use as shims (both pieces). This helped, but there was still mild slippage during high winds. I picked up some narrower 3/8" U-bolts, and they provide a much better grip.
 
Finishing the dish bracket installation

The next step was to attach the elevation bracket of the dish to the motor bracket on the motor tube. This was easy, but the cheater bolt for fine adjusting the dish elevation is proving to be a problem.

Actually not the bolt itself, but the flange that the bolt attaches to.

Because I am installing this dish assembly on a motor which has a tube facing downwards, the flange where this bolt attaches to is bent in the wrong direction because it was meant to be used with the dish mounted in the opposite direction.

This is not anything major, we all know how to improvise in situations like this. However, my personal opinion is that there should be a rotating swivel joint here instead of a flat plate.

My brother fabricated a device to attach to our DS-2076 dishes to provide the same scheme of elevation adjustment (sort of copied upon the elevation adjustment of the old Channel Master dishes).

GeoSat could have done something better here in my opinion. Pay particular attention to the fourth and fifth picture in this series.
 

Attachments

  • 1.2 M dish installation 008.jpg
    1.2 M dish installation 008.jpg
    233.3 KB · Views: 416
  • 1.2 M dish installation 010.jpg
    1.2 M dish installation 010.jpg
    154.3 KB · Views: 343
  • 1.2 M dish installation 011.jpg
    1.2 M dish installation 011.jpg
    181.7 KB · Views: 402
  • 1.2 M dish installation 012.jpg
    1.2 M dish installation 012.jpg
    195.1 KB · Views: 379
  • 1.2 M dish installation 007.jpg
    1.2 M dish installation 007.jpg
    195.6 KB · Views: 348
Ready to Install the Dish Reflector

Installing the dish reflector was easy, but a bit awkward by myself. It would have been a lot easier with two people, but one person can do it if you don't mind a few curse words during the process and dropping the nuts or bolts in the grass once in a while! LOL.

For as large as this dish panel is, it isn't as bad as you think. I did it myself in a short amount of time, but it sure would have been nice to have an extra hand here. I had to retry this three times because I kept dropping the nuts and bolts.

You might have laughed your butt off watching me, but applauded when I finally got it right! :)

No pictures of me cussing and being mad... Just the final installation.
 

Attachments

  • 1.2 M dish installation 014.jpg
    1.2 M dish installation 014.jpg
    204.5 KB · Views: 409
  • 1.2 M dish installation 015.jpg
    1.2 M dish installation 015.jpg
    185.6 KB · Views: 374
Attaching the LNBF support arms

Ok, here I got a little confused and had to wake up a bit and look at the instructions.

First off, what I found is that the side support arms are marked R and L for Right and Left. However, they are reversed. The support arm marked R goes on the left side of the dish and the arm marked L goes on the right side of the dish if you are standing in front of the dish and facing the reflector panel.

You will know you are wrong pretty quickly here as it becomes fairly apparent when you try to attach the LNBF bracket.

The bottom support bracket that extends out from the center of the bottom perimeter of the dish can be installed two ways. Upside down or upside right. I installed it with the bend which attaches to the perimeter of the dish as the manual displays it. It works as they have drawn it there in the pictorials, but they do not address it in writing.
 

Attachments

  • 1.2 M dish installation 016.jpg
    1.2 M dish installation 016.jpg
    106.9 KB · Views: 505
LNBF attachment

Here is one of the drawbacks of this dish.

Because of the manner in which they fabricated the LNBF bracket, you must loosen and remove the one single bolt that holds all three of the LNBF support brackets together at the focal point in order to rotate the LNBF, position it in or outwards or to replace it.

I don't like this design very much at all. It is ok, and it sure holds the LNBF right where you placed it, but it is certainly difficult to experiment with it if you need to. The LNBF is so secure that it will never move.
 
Taking a look back

I need to reflect backwards in time for just a moment and show you something.

I live near Omaha, Nebraska USA and my longitude is 96.4 degrees west. This means that my true due south satellite is Galaxy 19 @ 97.0 degrees west.

In order to ensure that my motor was dead center at its zero degree position, I simply told it (lied to it) that this satellite was at 96.4 degrees west instead of 97.0 degrees west.

I lost the signal from this satellite by doing so (mostly), but when I looked at my motor, it was perfectly positioned at zero degrees.

I can use the "GO TO REFERENCE" command, but for some reason I just don't trust this, so I have done it this oddball way, which works.
 

Attachments

  • 1.2 M dish installation 004.jpg
    1.2 M dish installation 004.jpg
    86 KB · Views: 237
I have a tripod

Now that I was assured that my motor was at dead center, I can check my angles to ensure that everything is plumb...

So, I first ensure that my motor bracket is plumb. In my pictures, I am only showing how I check the sides (east and west or left and right) of the motor and of the dish bracket.

I am sure to check the mast plumb in the north-south direction as well.

My pictures only show me checking the R/L or E/W plumb, but I am sure that you will take heed and check the mast plumb in the other axis as well.It is important that you check the plumb of your mast in all directions.
 

Attachments

  • 1.2 M dish installation 001.jpg
    1.2 M dish installation 001.jpg
    253.3 KB · Views: 398
  • 1.2 M dish installation 002.jpg
    1.2 M dish installation 002.jpg
    264.4 KB · Views: 385
It is all assembled and aligned

Within an hour or two I had the old dish removed and this new 1.2 M dish installed and aligned. The alignment process required about 5-10 minutes as I already had the motor set and kept it aligned. I just needed to get the dish elevation set and ensure that the dish bracket was centered on my motor tube.

I am now quite close to a good alignment, but I have some more work to do to be perfect.
 
The Value of the Winegard DS-2076 dish

With the exception of a few minor alignments to tweak my new dish, I have to admit that the difference between the dish sizes is greatly exaggerated. Either that or the DS-2076 dish is extremely exceptional.

Certainly this has been a very good learning experience.

I have improved my quality readings on many channels, especially WSTV on 129.0W Galaxy 27. It is now up at 98% Q and I can detect a great difference in the audio quality just from listening. I am surprised that it made this difference.

However, I do not detect a fantastic improvement between my old Winegard DS-2076 (76 cm) dish and this new 1.2 meter dish.

I will give it more opportunities before I judge it completely, but I can certainly say that the Winegard DS-2076 dish must be an exceptional dish as there has been only a few improvements that I can detect so far. I need more time to evaluate this GeoSatPro 1.2 M dish before I give you my final analysis. I may need to tweak it a little to find some other channels.

Thanks for listening so far, I am going to watch TV now and experiment with this new dish to get to know it better and align it more refined before I make a final judgment.

RADAR
 
Looks Good! Nice details
I was about to buy one, but held off after see the shipping cost...
I was impressed by the way the mount bolts to the dish, but what's your opinion on the dish to motor mount.... looks kind of cheap. Do the smaller ubolts really make a solid connection? i looks like you may be able to slide a 3rd in the middle? what do you think?
 
However, I do not detect a fantastic improvement between my old Winegard DS-2076 (76 cm) dish and this new 1.2 meter dish.

don't have a spectrum analyzer, huh?

Changing out my FS90 for FS120 was like night and day. The signal strength was quite a bit better (even better than my 8.5' orbitron dish on most signals) and on my spectrum analyzer, I could see I had perfect 2 deg spacing separation, not like on the 90cm where I could be on G18 and see very weak but present stuff sometimes from AMC-21, or vice versa.

Congrats on your install, i'm working on redeploying my 90cm in another part of my yard on a dg-380 motor I just got. I hate that motor because of its downward facing tube - makes installation harder because gravity wants to pull the dish off the tube unlike the stab with the upward facing tube where gravity helps you in the installation.

I'm trying now to figure out and fix how to square up the dish axis with the dg-380 zero position axis because I think that's why I get off the arc about 20 deg each side of zero pos. It looks crooked to me so I have to figure out something to help me line that up - i'm thinking a clear plastic slab with a line on it, attach it to the fs90 mount, and line that up with the marking on the dg-380 tube and both should be in sync I would think. I can't just loosen the ubolts and play with it because the dish starts to slide off the tube due to gravity and the slickness of that tube that doesn't create much friction. If this were my stab, the ubolts could be loosened and gravity would keep the dish on the tube while I worked on the adjustment.

Back to working on getting things set up with what I call the man's phallus motor because of how it looks when installed on a post before one puts a dish on it. :D
 
I was impressed by the way the mount bolts to the dish, but what's your opinion on the dish to motor mount.... looks kind of cheap. Do the smaller ubolts really make a solid connection? i looks like you may be able to slide a 3rd in the middle? what do you think?

Gopher,

It is not cheaply made, but it could be made better in my opinion. If you compare the SG-2100 motor brackets with the Sadoun PowerTech DG-280 or -380 motors you will witness the difference in the gauge of the metal that is used. I think they should adopt this in the construction of this dish, for its bracket.

The dish itself is really good and sturdy. The perimeter rim of the dish has some extra folds and bends that provide it with a really nice structure. It is very rigid, which is what we desire.

The bracket attachment to the motor tube has to be the least desirable for the DG-380 motor's 55 mm tube.

They either need to thread the U-Bolts a bit further or we need to put some spacers in there so that we can tighten the clamps just a bit more. Installing the third U-bolt is a definite advantage, but even more grip is required here.

I can understand why some have recommended drilling a hole and inserting a bolt to hold it or retain it where you want it.

This is not my style, however. I want to be able to move it at will in case I made a mistake.

RADAR
 
don't have a spectrum analyzer, huh?

:D

Sky,

I wish I did. But, I think that I can get by without one. Sometimes extra equipment is just unnecessary when you just need to get the job done. Having this equipment doesn't help when doing an installation, but it does teach you a lot about what is going on. So it is a great tool to use when playing and investigating at home. Then you take what you have learned and apply it.

RADAR
 
I'm working on redeploying my 90cm in another part of my yard on a dg-380 motor I just got. I hate that motor because of its downward facing tube - makes installation harder because gravity wants to pull the dish off the tube unlike the stab with the upward facing tube where gravity helps you in the installation.


I understand you here, Sky. This is something that I also battle, so you are not alone. When you get to using these larger dish antennas, they often seem to be designed to fit over a post (mast) or a motor tube which faces upward.

Because the DG-380 motor tube faces downward, it does pose a problem. However, if you assemble it correctly, you will avoid this.

Personally, I feel that I could design a dish bracket that everyone would be very proud of and would work very well, but at this time, no manufacturer is all that interested.

They are offering us "slap it together" dishes and not the good stuff that we want. When they begin to realize the market availability, they will begin to provide better equipment for our needs.

Let us hope that I am right. I would sure like to be! :)

RADAR
 
Another great write-up there Gordy! Looks like a fine job there my man! Waiting on more quality numbers you get on other birds there in your area!

Nice looking dish too! Great Pictures! :up

K E V I N
ftabman0_avitar-cordoba.gif
 
Status
Please reply by conversation.

F/D Ratios, splain this to me.

Some new guy Q's

Users Who Are Viewing This Thread (Total: 0, Members: 0, Guests: 0)

Who Read This Thread (Total Members: 4)

Latest posts