New Roof...same location

bobinchico

SatelliteGuys Family
Original poster
Dec 20, 2006
101
0
I looked at some prior threads and the following is closest to what I will be experiencing:
?
Assuming the mast is plumb now, reinstall it plumb and you should be able to align the dish easily by turning it slowly until you get a strong signal. Use the meter in the receiver/dvr and you will be fine.

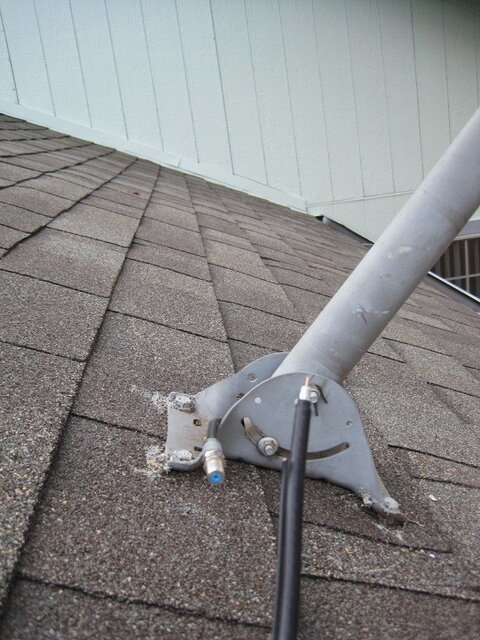
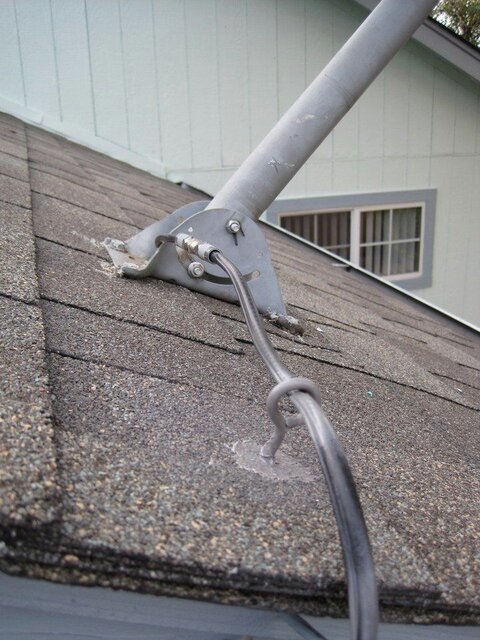
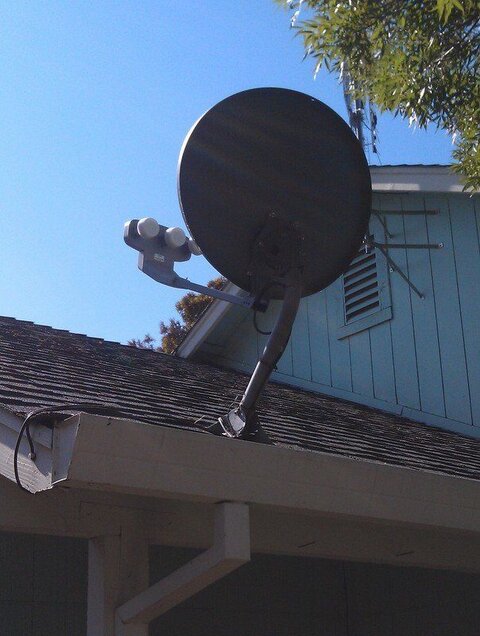
The big screws now go through roof and decking. My plan, after new roof, is to drill small holes back up through existing holes in roof decking and remount. The thickness of the new architectural shingles are basically the same as the old ones. I believe this will at least get the dish pointed almost perfectly. At that point if it's not kosher I can try the suggestion in the above quote. Although I will only be able to move it up or down and not sideways.

Sound like a plan?

?Thanks.
 
You are only securing the foot in the same exact spot. The dish is attached to the arm and if you do not loosen the nuts and bolts on the dish it should get you close. If you remove the dish from the arm all bets would be off unless you mark the arm and dish so you can align it back up.
 
This worked for us. The roofers unscrewed the dish, removed the old shingles, installed new ones, and reinstalled the dish. We didn't have to do any tweaking. The signal was as good as ever.

Agree with the comment on screwing to the decking only. I had two lags that were into the rafter for sure, so I didn't worry.
 
If you are only securing to the decking be leary of the holding power of the used holes.

I took a closer look and they punched machine screws through the decking. I'll get some lock washers and nuts.

As a backup I will schedule an appointment for a couple of days after my roof should be done so I could cancel if not needed. I'll have to see how long average time is for my area from initial call to appointment.

I'm assuming I can watch my DVR's and I have an OTA with the cable splitting to Dish Receiver and to TV.

Thanks for the suggestions and comments.
 

Attachments

  • Machine_Screws.jpg
    Machine_Screws.jpg
    76.3 KB · Views: 176
I took a closer look and they punched machine screws through the decking. I'll get some lock washers and nuts.

As a backup I will schedule an appointment for a couple of days after my roof should be done so I could cancel if not needed. I'll have to see how long average time is for my area from initial call to appointment.

I'm assuming I can watch my DVR's and I have an OTA with the cable splitting to Dish Receiver and to TV.

Thanks for the suggestions and comments.

How could they have possibly missed that stud?

There should be two center lags into the stud and the other four through the roof decking.
 
If it were me, I would use this as the perfect time to move the mount over so that the center bolts could go into that stud. Looking at the picture it would appear that if you used the current holes for the other side of the mount, the free holes on the other side of the mount would perhaps hit the stud and would pretty much insure that no realignment would be necessary.

If you use the current holes, I agree you should use machine bolts long enough to add washers and nuts. I think I would go with stainless steel ones.
 
If it were me, I would use this as the perfect time to move the mount over so that the center bolts could go into that stud. Looking at the picture it would appear that if you used the current holes for the other side of the mount, the free holes on the other side of the mount would perhaps hit the stud and would pretty much insure that no realignment would be necessary...I think I would go with stainless steel ones

Your suggestion will work. It's 3 1/2" to the edge of rafter and the outside mounting holes are 4" oc. I could slightly angle the screws into the rafter and put some silicone around the head so no moisture leaks in because of the slight angle. I'll use stainless steel also.

?It's been like it is now for I believe around 10 years. Previously it was higher up the gable end and when a dish was upgraded they moved it down close to the bottom of the roof. It is more convenient and I don't mind where it is. I just wish they had moved it over to the edge of the outside rafter as the previous installation had been. Then the cable from the dish wouldn't be so funky. After writing about this I think this is what I will do as I never had a problem when it was anchored into the outside rafter before. If it doesn't align good enough I'd be willing to pay for the tech visit to re-point it if I can't get it good enough. I think I read it is only $50 to have that done.
 

Attachments

  • Dish.jpg
    Dish.jpg
    77 KB · Views: 121
After thinking about it some more this afternoon I've slightly modified my plan.

I will move the mount over to the left and upwards (viewed from above) so it will be secured with at least three lags into blocking between outermost two rafters. I will then disconnect cable at connection (see photo) and route up to Dish so the cable isn't so funky.

This will probably guarantee having to have a tech call, but it will be worth it. It should be completed within a couple of weeks and I'll return to show photos and tell you if I needed the tech or not.
 

Attachments

  • Mount to blocking.jpg
    Mount to blocking.jpg
    68.2 KB · Views: 133
  • Disconnect Pt.jpg
    Disconnect Pt.jpg
    49.5 KB · Views: 122
For it to be correct, the mount should have two 3" lags in center holes down into the stud, and four 2" lags into the corner holes. The problem for you with that is that you have to adjust the mast to get the center lags in, then it has to be leveled again. Plus once you move it laterally on the roof it won't be peaked anymore.
 
I did the same thing years ago with a Dish 500.

I drilled up from the attic thru the new roof with a drill sufficient to just clear the minor diameter of the old screws.

Then I sistered a couple of 2x4's on the attic side of the drilled holes.

Then drilled a pilot (clearance hole if you are going to use bolts) hole down from the roof into the center of the old holes into the 2x4's.

Then mounted the dish foot which was still attached to the pole and dish (undisturbed settings) with lags or bolts, nuts and large washers.

The satellite signal was the same as before even though I tried to peak it.
 
For it to be correct, the mount should have two 3" lags in center holes down into the stud, and four 2" lags into the corner holes. The problem for you with that is that you have to adjust the mast to get the center lags in, then it has to be leveled again. Plus once you move it laterally on the roof it won't be peaked anymore.
Good point. I can live with where it is now and clean up the cabling.

I had some 2x6 con common redwood in my garage so tonight I cut it at 28" (will cut to actual length later). I rpped it, after measuring, into 3" and 2 5/16" widths and primed it. I will paint this blocking to match house color tomorrow night. I will then install, flat, after the roof has been torn off between the two rafters. I will then drill down from the decking through the 2x's with a bit a quarter inch smaller than the lag screws. After the roof is installed I will drill up through the blocking with the same bit, then install from above. We'll see how this works.
 
Update

Well, I had a 21+ year old roof and a big bad hail storm in October 2011 did damage to thousands and thousands of homes in North Chico. In summer and fall of 2012 roofers from all over were congregating in Chico to replace a multitude of roofs. My house qualified for a new roof for the price of my deductible. They also paid me $120 to re-mount the dish so I had it moved and cost was $50.

You will see in the photo how I dislike the way the installers some times bend the cable right over the edge of the roofing and run it flat along the roof to catch leaves, etc. After the installer left I attached two eye-bolts, one of top trim on the barge rafter and another on the roof to keep it away from the new roof. There was not enough cable to just split at the connector so I wrapped it around the vertical arm and taped it with some Duct tape in three places. Much neater for my tastes.

They worked around the dish and the morning they unmounted it the guy who installs them for my roofer was there to install in the afternoon. What service. The roofers don't like them mounted on roofs but I didn't want it mounted on my barge rafter, which would be more visual walking down the walkway from the outside gate to the back yard area.

I think my original plan of just remounting would have worked. Oh, it's rock solid even without the bottom center lag, which I can add at anytime. I also suppose I could find someone who can cut the cabling and add a good end. I'd do it myself, as I have many moons ago, but I don't really know if it's as easy now as it was and I don't want to degrade the quality with a poor connection. Then I'd be really happy with the neatness. :)

New Location.JPGCabling.JPG
 
I just looked at some YouTube video's and I'll do the cable myself. Too many things going on today getting ready for new paint beginning tomorrow.
 
You should have a tech come out. That dish is not up to code, they will make sure all signals are passing and remove that barrel connection at the dish.
 
You should have a tech come out. That dish is not up to code, they will make sure all signals are passing and remove that barrel connection at the dish.

Agreed. Looks like a horrible job. And why they would wrap the cable around the mast like that is beyond me as well.
 
I installed two RG-6 connectors and removed the excess cabling. There is no way the barrel connection will be removed. House was just painted last week. All cabling underneath was painted over. The cabling goes underneath, runs up the first inside rafter, where another barrel connection is located from a previous dish installation further up the roof, then into the attic and down through a hole in the double top plates to attach to a wall plate.
I will call the technician and have him come back and replace the connectors I installed and slightly re-point the dish. I did a check switch and my signal strength is 53. I can't tell the difference when looking at any program. Although, I didn't do a check switch until after I installed the two RG-6 connectors.

What are RG-6Q connectors? I saw those at Lowe's and wasn't sure if I should have purchased those.

Code? Please enlighten me. Or should I just remember an appropriate line in Blazing Saddles..."Badges? We don't need no stinking badges!"
 

Attachments

  • IMG_4237.JPG
    IMG_4237.JPG
    148 KB · Views: 84
  • IMG_4238.JPG
    IMG_4238.JPG
    134.3 KB · Views: 78
***

Users Who Are Viewing This Thread (Total: 1, Members: 0, Guests: 1)

Who Read This Thread (Total Members: 1)

Latest posts