Fortec 1.2M dish elevation mod

Status
Please reply by conversation.
my fear of "dish squishing" appear unfounded.

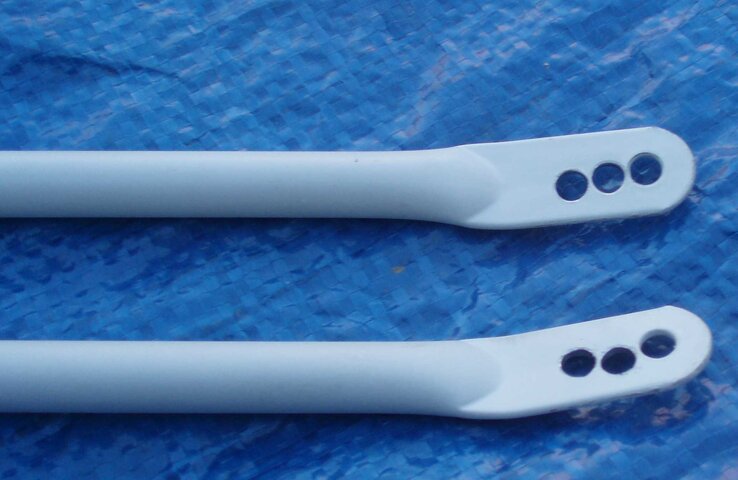
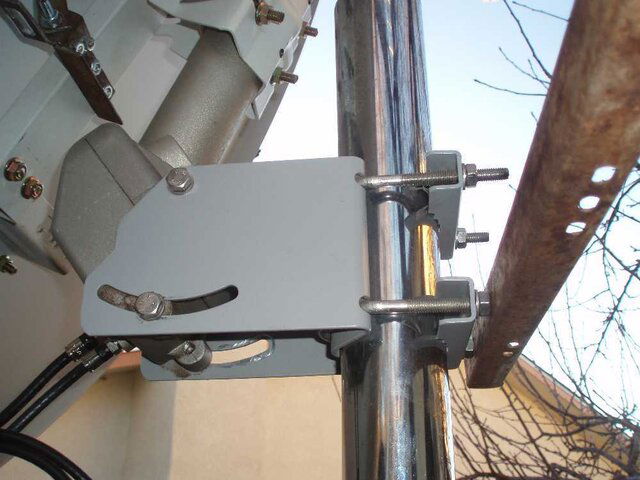
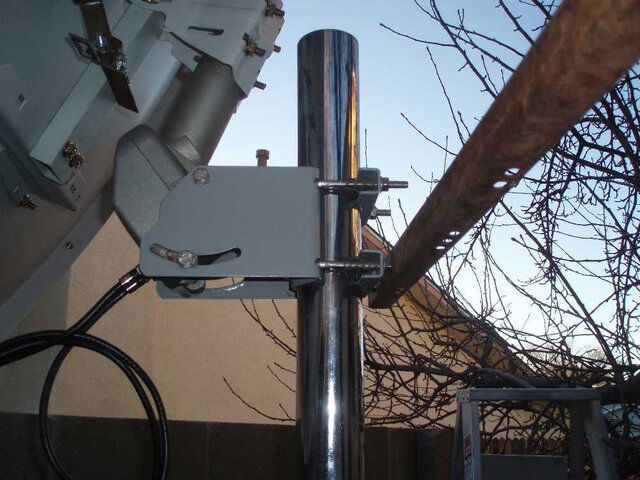
I decided instead of threaded rods for now, I'd drill a couple more adjustment holes in each arm, with a sliver of metal between them so that they wouldn't turn into adjustment slots.

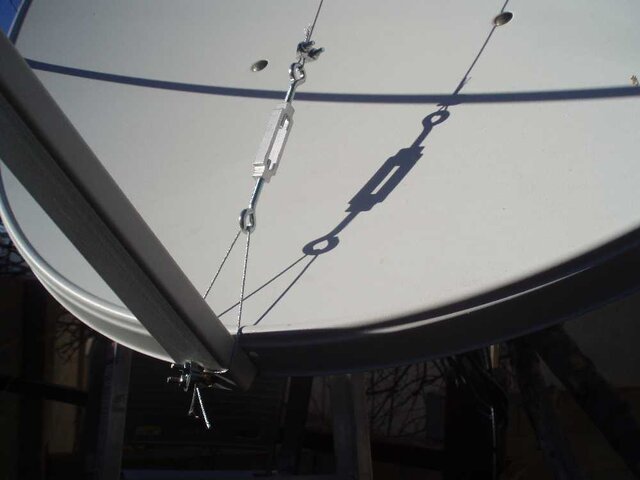
I started with the factory holes and had 11.4 db s/n on my peaking signal at mid-arc (AMC-15). Going to the next adjustment hole on each side, I got to 12.2 db s/n and when I did my zero position dish push test (push slightly on the lnb holder arm channel metal), I only got .2 db more signal, not .5 to 1 db more signal like when using the factory holes, so I"m as close as I can get with the second adjustment hole unless I did threaded rods to squeeze out that last .2 db s/n.

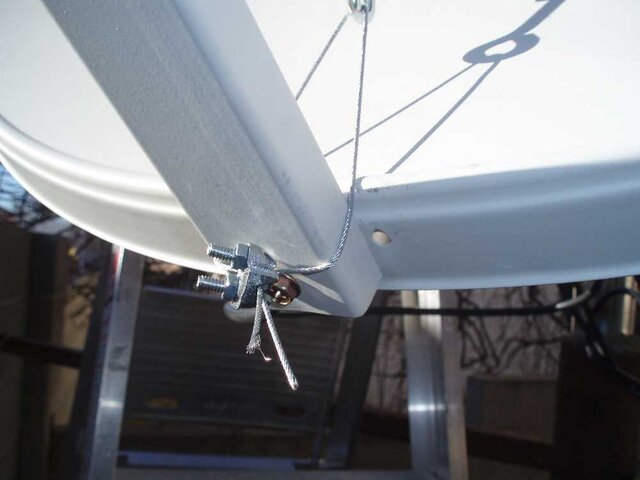
I went to the third hole and got to 10.9, so I know that's worse than the factory hole or my second hole. I"m going to keep my holder at the second adjustment hole (12.2 db) and not worry about threaded rods since I'm only going to gain about .2 db more signal maximum.

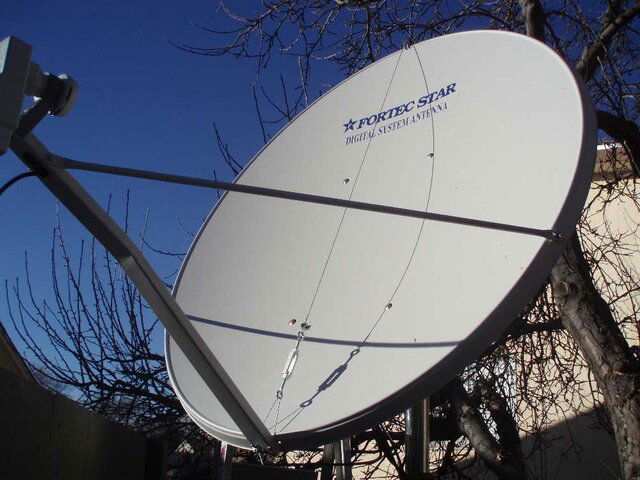
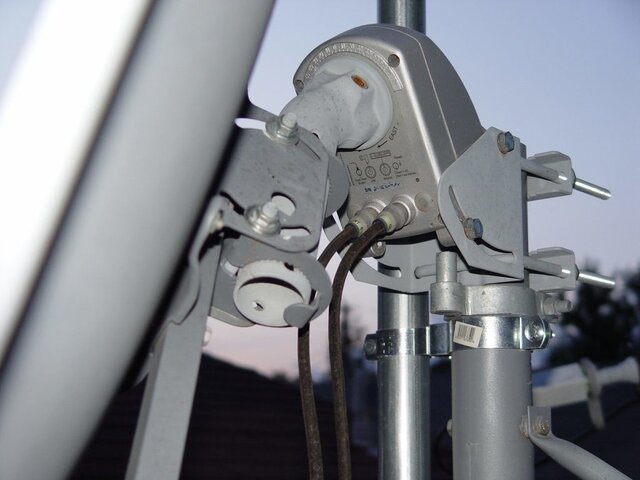
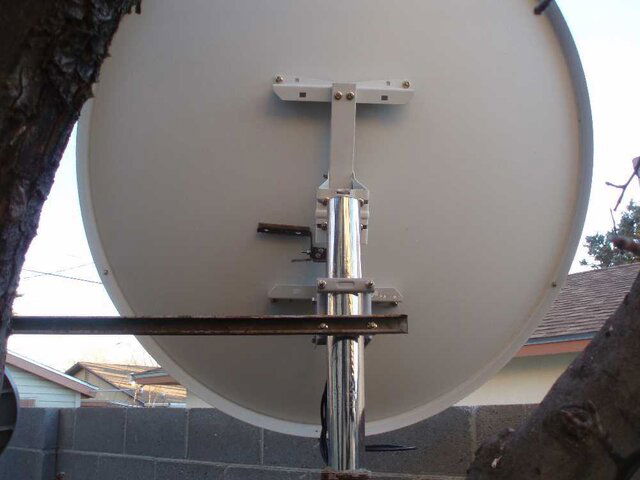
So I've fixed the invacom weight issue to satisfaction - .8 db s/n more signal, not much more significant room for improvement - and it's back to getting the arc tracked right. I'm falling off about SM5 on the west and about G26 on the east, so I have to figure out what moves to make (rotate dish/hh120 about the mounting pole or rotate the dish on the hh120 post - or both) that will get the arc dialed in. I never had this much problem with the 90cm. The 120cm is giving me fits -- probably because it's bigger and more sloppier than the 90cm so its more delicate to tune to the arc right -- but I'll get it dialed in at some point. I"m think I"m about to pretend like I'm doing a c-band alignment and use extreme sat/south sat procedures. I know where south sat is (zero position) but I have to reason out a way to determine how much hh120 movement to the east would correspond to the extreme sat (AMC-5) position since I'm too far off the arc at AMC-5 right now to even see a small hint of AMC-5 signal on a spectrum analzyer or signal meter.
 
Good info, how about a pic of your newly drilled support arms, when you get a chance. Sounds like something for me to try, when the damn snow melts.
:)

guess I shouldn't mention how awesome of winter I've had here! ;) 50's or better pretty much every day all winter it seems - making it nice to get my hour or so of dish work in just about every day since the fs 120cm showed up.

I'll see if I can get pics up tomorrow night of the non-threaded rod mod. ;)
 
ok, here is a pic of my non-threaded rod mod. It's the dish end of the arm - one of the three holes is the factory drilled hole, I added the other two on each arm. The attachment on the LNB arm (that end not shown) stays the same, so it's bolted to the LNB arm using the factory hole.
 

Attachments

  • nonthreadrodmod.JPG
    nonthreadrodmod.JPG
    104 KB · Views: 110
I couldn't leave well enough alone. I've documented how the LNB holder rods in the factory drilled hole position gives 11.4 db s/n on my AMC-15 peaking signal. I have documented how drilling some extra adjustment holes and using the second one bumped up the s/n to 12.2 . Today, I decided to see if my push test was in fact not related to the side LNB arms but rather a deformation in the up/down axis of the dish.

I took some guy wire, clamps and a turnbuckle that I purchased for use in de-warping a 10' dish (haven't gotten around to that project yet). I used the hole already in the top of the FS120 cm dish to attach one end of the guywire. I put a turnbuckle in-inline towards the bottom (to keep it from blocking too much signal plus to make it easier to adjust while standing on the ground) and I put a loop around the LNB arm at the bottom to the bottom part of the turnbuckle.

I adjusted the turnbuckle and got to 13.0 s/n, a .8 s/n improvement. I did my push test and got no further improvement, so I think I've done all I can now to get the most signal possible. The LNB arm thing appears to have moved the LNB part into the sweet spot instead of being just low of the sweet spot and the mod I did today appears to have fixed whatever warp or issue existed in the up/down axis of the dish.

Now all I have to do is get the dish perfectly on arc by figuring out what things to rotate and this dish should perform better than if I just used all the factory setup instructions. ;)

It should be great weather this week to continue working on my arc alignment adjustments - mid 50s to low 60s and sunny all week, just like last week except for one day where the high was 43 deg and sunny but with a cold wind and I didn't get much done since my hands got cold in a hurry.

pictures of the dish, of the turnbuckle/lower dish, and the clamp showing how I attached the lower end of the modification.
 

Attachments

  • dishaxis1.jpg
    dishaxis1.jpg
    67.6 KB · Views: 142
  • dishaxis2.jpg
    dishaxis2.jpg
    25.8 KB · Views: 121
  • dishaxis3.jpg
    dishaxis3.jpg
    30.9 KB · Views: 131
and here is a quick and dirty mod for a azimuth cheater bar to give one more leverage and precise control when rotating the hh120/fs120cm combo about the mounting pole.

I am off on the arc quite a bit (getting down to about 93 deg W to the east and satmex 6 to the west before my arc really falls off, when my center is 105). I did tests on G26/G25 K and SM6 K and found out I was high on one side, low on the other. I read the hh120 fine tuning instructions and it told me I didn't need to move the dish about the hh120 pole, but rather move the hh120/dish combo about the mounting pole to try to fix the misalignment I was experiencing.

I don't like to loosen the U bolts too much, since the dish/motor is top heavy (and thus looks at a slightly lower elevation when the u-bolts are too loose). With the bolts barely loose to avoid elevation issues as best as I can, the hh120/dish is really hard to move with any kind of precision. I don't want to grab the dish and rotate because I'll probably break the hh120 motor from the stresses of doing that.

I figured I would build a cheater bar to help me with more leverage and to be able to rotate the combo about the mounting pole in finer increments. I found I should be able to run the bar across the bottom u-bolt holes so I took a piece of channel and drilled a pair of holes so I could mount it. I found the nuts on my yet-to-be-reinstalled fs90 fit the ubolts perfectly so I used those to secure the bar to the extended lower ubolt part.

It seems to work great. I hold the signal meter with one hand, hold the bar with the other, and it doesn't seem to take much effort to pull or push on the bar to get the dish rotated just where I want it and then tighten down the upper ubolt. When I grabbed the motor with one hand, held the ubolt extension lengths in the other, and rotated it, I would get jumps of several db s/n or lose signal easily by moving things too much too quick. With the cheater bar, I am able to make moves within a tolerance of 1 db, so definitely it is much more finer control as I dial in the highest s/n signal that I need. After I tighten down the top ubolt, I remove my cheater bar and tighten down the lower ubolt and I'm at the configuration I want at the time.

It got dark before I could readjust the elevation at zero position with my fine elevation mod and then see if I had more arc accessable and repeat the process using a satellite further east until I get the arc dialed in just right.

pics:
 

Attachments

  • cheater-az-bar1.jpg
    cheater-az-bar1.jpg
    36 KB · Views: 167
  • cheater-az-bar2.jpg
    cheater-az-bar2.jpg
    55.3 KB · Views: 156
  • cheater-az-bar3.jpg
    cheater-az-bar3.jpg
    72.7 KB · Views: 138
cheater bar:

Makes perfect sense.
I like it - :up
Just hope I remember to do the same next time I'm out there fighting a motor!
 
Great idea, Skysurfer, I'll add that to my motorized dish next time I'm working on it! Here's something you can add to make adjusting a motorized dish assembly even easier: A gate hinge. Get a 2 3/8" gate hinge from your local DIY outlet and bolt it under the motor bracket. This keeps the motor/dish assembly from slipping down the pole while you're turning it :)
 

Attachments

  • SG2100onNPRM.jpg
    SG2100onNPRM.jpg
    74.4 KB · Views: 181
This keeps the motor/dish assembly from slipping down the pole while you're turning it :)

I didn't realize sliding down a pole was an issue. With my setup, I don't loosen the u-bolts too much (because of the forward-heavy part of the motor/dish, the elevation gets affected so I loosen just enough to brute force rotate the thing about the pole).

Even if I did go really loose on the u-bolts, they woudl get out of plane and the teeth of the clamp would bite into the post, keeping it from slipping.

It was a PITA moving the whole assembly up the pole when I changed out the 90cm with the 120cm (and needed to avoid interference at one point with the dish's movement on the hh120 due to the larger dish). The PITA was because the ubolts were loose yet off their normal plane and the back side of the pole clamps with the teeth kept digging into the post as I slide the whole thing up the post far enough and I had to do a lot of wiggling to break the teeth clamp free momentarily while I inched the assembly up the post little by little.

I'll keep the gate hinge in mind if I come across a setup on a pole where gravity could make the whole thing slip down the pole when loose and I need something to keep the level of the dish where it is at.
 
spank me now:

Get a 2 3/8" gate hinge from your local DIY outlet and bolt it under the motor bracket.
I'd seen this fine idea before, thanks to the Tron. - :up
But today, I was rushed at Home Depot, and while making the decision between 6' for $15, or 8' for $16, I forgot the gate hinge. :(
You try bringing home eight feet of post in a 4-door sedan!
 
Get a 2 3/8" gate hinge from your local DIY outlet and bolt it under the motor bracket. This keeps the motor/dish assembly from slipping down the pole while you're turning it :)

Is that two conduit clamps bolted together holding the other mast, or is that a single piece clamp? The photo makes it look like a single piece, but I don't remember seeing a clamp like that at the local warehouse store.
 
Status
Please reply by conversation.

Users Who Are Viewing This Thread (Total: 0, Members: 0, Guests: 0)

Who Read This Thread (Total Members: 1)