Retrofitting a Phase III for Ku (maybe)

Status
Please reply by conversation.
I currently use a Phase III dish and use it to hit 91 and 110 with the stock 3 head lnb. I strapped on 2 more circular lnbs to each side of the stock lnb to get 119 and 82. So with the correct skew, you can hit 82, 91, 110, 119. The center lnb of the stock head is pointed to 101, but I don't have Direct TV service. I am working to modify the bracket to mount 5 lnb's to get 82, 91, 110, 119, and 129 on this same dish. I believe the footprint is large enough to get all of them. Will let you know if I can get that extra bird. With that gap in between 91 and 110, I might even try to throw in a linear lnb to try for 97, and one at 123 for g10. Look out T55 dish! Would have said T90, but the surface area is just to small for reliable linear signal. Circular is another story!!!!
 
I too have one of these channel master phase III dtv dishes. Am I correct that I can receive 110, 119 and 129 with the stock 3 lnb head? If so how find the skew and elevation?
 
circular

No, one of the LNBs on one side is fully functional, the one to the other side is partly functional, and the one in the middle is useless.
So, you could aim it at 110/119/129, but the best you'd get would be 110, and some of 129 (maybe)
 
Let's talk linear on a Phase III

I took a look at a DirecTV 18" dish, compared it to a Phase III dish, and my favorite Phase II.
I was under the impression that the Phase II was quite a bit larger than the Phase III
I was also under the impression that the height of the Phase II and III were much more than the old 18".
Wrong on both counts.
Yea, both Phase II and III are wider, but not really taller. I was disappointed.
Now, I wasn't expecting that big boost in the gain department, over a lowly 18".

Based on size, I decided the Phase III might be the one to experiment with... and besides they're probably easier to find.
I didn't have a square-based LNB that'd mount directly to the end of the arm, as shown in my earlier picture.
After seeing an amazing idea for a LNB bracket in another thread, I bought some parts and decided to make one.
Along the way, it got improved quite considerably, and is still easy to make out of stock parts.

The only linear LNB I had laying around was an Invacom SNH-031
The only mast-space I had on the eaves was my 148º subscription, but it was off-plumb by maybe 20º to the south. :)
Ripped the 148 dish off the pole, and put up the modified Phase III.
I set the Satpros receiver to 22khz on, and used my $10 meter to aim the LNB at 129ºW for Whitesprings.
That was far easier than is suggested.

Not sure how 61 signal and 59 quality ranks on the meter of the Satpros 500, but reception is fine.
Far better than is deserved by that station. :rolleyes:
Man, Whitesprings sure didn't spare any expense on bandwidth nor their movie library, did they?

Well, that's my story, and I'm sticking to it.
Since it almost never rains around here, I don't expect to see any fade.!. :D
 
Phase III pictures, linear on Whitesprings

Stilll didn't find my camera, but the cell phone does fair, especially out doors in daylight.
Here are a couple of shots of the Invacom on the Phase III dish (how do you spell overkill?)
And a close-up of the improved bracket.
Now, featuring independent locking of angle vs skew. :eureka

I took a bunch of pix and tried to whittle it down to just enough to do the job.
 

Attachments

  • LNBandDishLookingWest_04-26-07_1647.jpg
    LNBandDishLookingWest_04-26-07_1647.jpg
    129.8 KB · Views: 1,083
  • LNBcloseEastCrop_04-26-07_1653.jpg
    LNBcloseEastCrop_04-26-07_1653.jpg
    106.8 KB · Views: 1,099
Very Nice !!!

For the independent angle / skew did you add an extra nut to the clamp-bracket ??

I figured that out on mine after a little experimentation to put an extra nut in to lock the top clamp to the bottom one, and then to insert lnb and clamp it in.
 
For the independent angle / skew did you add an extra nut to the clamp-bracket ??

Parts list:
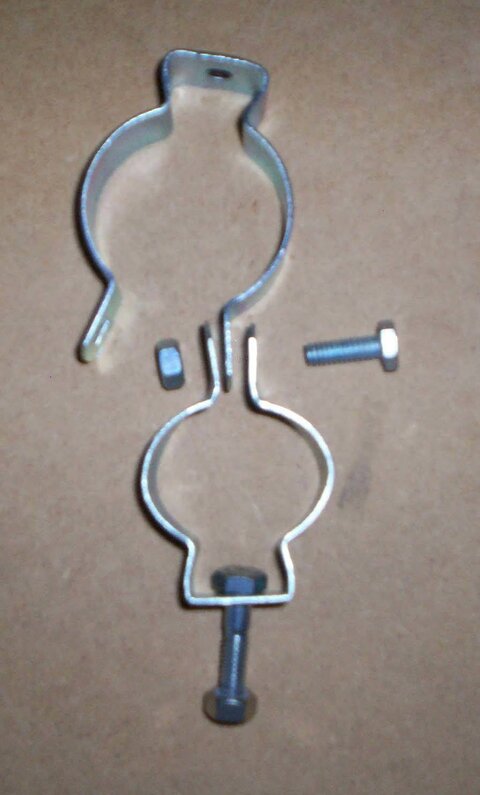
2 x 1 & 1/4" conduit hanger brackets @ 68¢ ea
2 x 3/4" spacers to take 1/4" bolt, not threaded @ 69¢
(no washers)

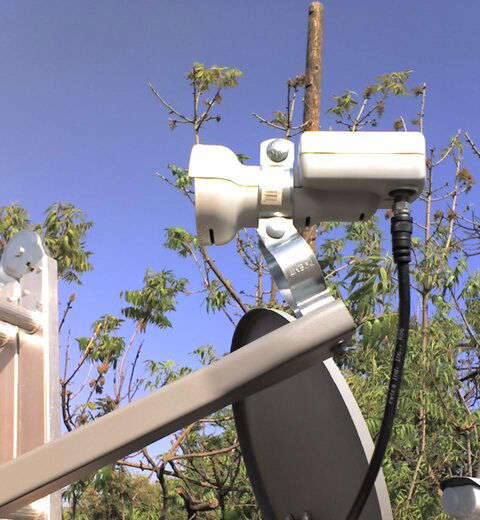
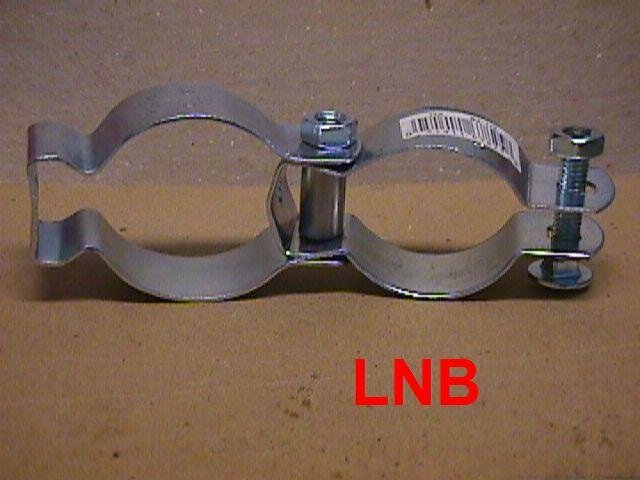
I turned the top (LNB) bracket around so its bolt is at the top , too.
To do so, I had to drill two holes in the bottom of the upper bracket, near its base.
Then, a supplied bolt was put through the lower bracket (the one mounted to the dish arm), then through the bottom of the upper bracket, and also through a 3/4" spacer.
By tightening the screw, the upper bracket crushes a bit, but that is acceptable.
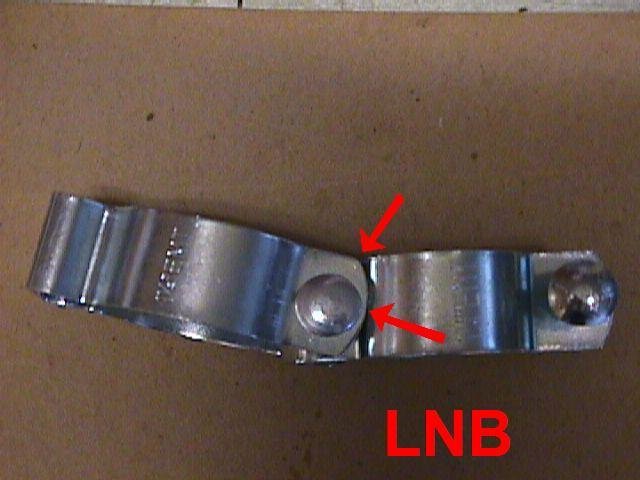
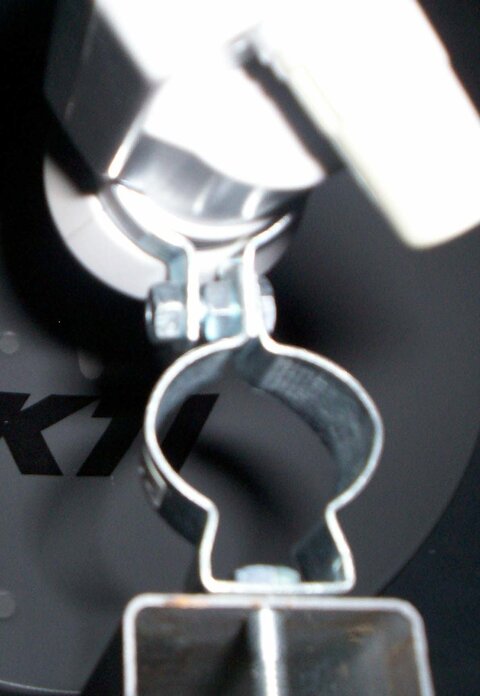
Get the proper angle between the two brackets (I wanted 29º) and cinch that sucker tight!

To get the brackets misaligned by 29º, I needed to grind a bit off the lower bracket.
See picture with two arrows. About 1/16th inch needed to be taken off between the arrows.
Depends on how low on the upper bracket you drill the hole :rolleyes:

My fat necked Invacom required the upper bracket be stretched open quite a bit to get the LNB in.
Then, the bolt was replaced, and snugged as required.

With the lower (pivot) bolt rock-solid-tight, you can tweak the top LNB-holding bolt all you want and never suffer for your mistakes.
You can even replace the LNB without losing alignment.

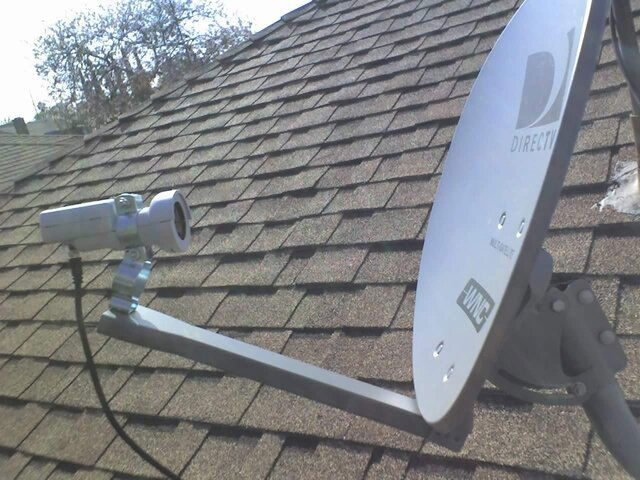
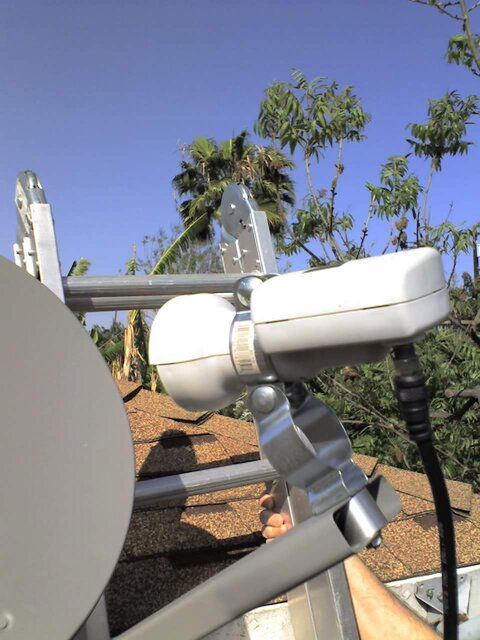
In the last picture, you can see a home-made 3/4" spacer in the end of the LNB arm, where the bracket is secured.
The spacer prevents the arm from crushing, when you snug down the bracket on it.
A commercial spacer would work as well.

I know if the actual height of the LNB horn isn't perfect , and the angle perfect, it'll throw off the elevation of the dish.
I'd tell you how much error I had, but unfortunately, I mounted the whole thing on a pole that was off-plumb by around 20º to the south.
It was all I could do to aim the dish high enough to get Whitesprings. :)

You may see two kinds of brackets in the pictures.
They came from different home building stores.
The one shown for the LNB is actually from Home Depot, and I recommend it over the lower one from OSH (Sears version of Home Depot).

Hopefully, by being long-winded and supplying sufficient pictures, anyone could do a similar bracket.
Thanks a bunch to z4ccamaro for his inspired bracket idea , without which this one would never have come about.
 

Attachments

  • MVC-004FarrowsLNB.JPG
    MVC-004FarrowsLNB.JPG
    34.3 KB · Views: 514
  • MVC-006F-LNB.JPG
    MVC-006F-LNB.JPG
    35.5 KB · Views: 683
  • LNBcloseup_04-26-07_1641.jpg
    LNBcloseup_04-26-07_1641.jpg
    98.5 KB · Views: 722
Here's how I did mine:

I clamped one leg of the upper clamp between the legs of the lower clamp and tighten for the angle.

Then insert LNB in upper clamp, adjust your skew and tighten the outer nut.

The clamping of the LNB is independent of the angle adjustment ( so you can replace the LNB or skew it without messing up the bracket angle)

To get the correct position for the LNB I tried different size clamps to find the correct ones.

Clamps came from Home Depot. Upper is a 1-1/2" EMT clamp to fit my Extreme LNB (40mm neck). Lower is a 1-1/4" EMT clamp. To get the correct height, I had to "squeeze" the lower clamp to make it shorter. A vise works great for doing this. I just compared my clamp assembly to the old DTV lnb until it looked pretty close in height and angle.
 

Attachments

  • clamp1.jpg
    clamp1.jpg
    63.9 KB · Views: 311
  • clamp2.jpg
    clamp2.jpg
    52.5 KB · Views: 281
  • clamp3.jpg
    clamp3.jpg
    99.2 KB · Views: 439
tip my hat !

Great job, z4ccamaro.
Quite inspired.
Right off the top, I'd say you win!
Congratulations on a job well done. :up

Expecting some Sky Mexico LNBs early next week.
Will have to build one your new way, and give it a try.

That's the power of a lot of people thinking about a problem.
 
Like Elvis would say...... "Thank you very much....."

I tried different ideas and this was the best I could come up with using store bought parts.

Amazing how different people approach a problem and find different solutions. I've learned a lot here myself to say the least !
 
with every step it gets better

I noticed the LNB is a little off-center with your new trick.
I shared full-page pictures of all this amusing stuff with a couple of friends at lunch today, and got more input.
Will whip out a picture with a new variation in a day or so, to center it.
Have some LNBs arriving Tuesday, so that'll be a good excuse.

Was going to use more hanger brackets to mount the wing LNBs on an original Phase III LNB (just to make some people happy)
Should at least be worth a good picture. :)

This thread has really given me a lot of pleasure, and a few head-scratching moments.
Keep up the brainstorming.
By the time we're done, all it'll take is a gum wrapper and a paperclip! :cool:

That's one of the many things I like about this hobby. Lots of time for McGuyvering. :D

Just yesterday I saw what I think is a 1m Primestar 20 feet in the air on a pole. I been passing that area three times a week and never saw it until then. My wife couldn't understand my excitment. :D
 
Status
Please reply by conversation.

Users Who Are Viewing This Thread (Total: 0, Members: 0, Guests: 0)

Who Read This Thread (Total Members: 1)