Line Of Sight/Trees!

Status
Please reply by conversation.

Blindowl1234

SatelliteGuys Pro
Original poster
Dec 16, 2008
2,035
94
SouthWest Ohio
Ok guys I've been thinking on this one for a while and well here's the big question. The rental property next to me just had a bunch move out. I'm trying to sneak over and cut a tree limb so I can attempt to get 30W.
If I can get this one limb (about 5" around and 20 feet long) out of the way I might have it done. The limb is about 30 feet straight out from the top of the dish. It's gotta go! There's another large tree about 150-200 feet from where the dish will be at too. I'm thinking at some point in the line of sight aren't we bound to hit a tree? or something....building...mountain etc.. Especially at an elevation of 18-19 degrees! I realize if a tree is 20-50 feet in front of the dish forget it, but at some point aren't we bound to have something blocking the line of sight?
I'm curious what distance is a safe distance to say it no longer affects your line of sight? Is 150 feet a safe distance? Dishpointer says 163 ft and 55ft if thats accurate. Those lucky enough not to be surrounded by trees I admire you! Thanks Blind
 
Last edited:
I have trees way off in the distance on top of a hill interfering with 30W. I'll try again this fall during the solar outage to see if there is any one spot in my yard that has the most sunshine punching through and try there but I'm doubtful. I have thus far failed to get any indication of a signal on the simple squawker box. Pathetic. One question I have is -- can some tree branch interference be overcome with a big enough dish?
 
I'm curious what distance is a safe distance to say it no longer affects your line of sight? Is 150 feet a safe distance? Dishpointer says 163 ft and 55ft if thats accurate.

It's not a fixed number.

distance * tan(a) = height of object
where a = elevation angle (deg)

You can trust Dishpointer. I believe they also take into account the mounting height of the dish, so they will be a little more accurate if inches start to matter.
 
thanks for the info. 163 feet is no problem. 55 feet is doubtful though. These trees have been here for probably 55 years lol....Blind
 
I originally used this cheap and easy way of figuring my line of sight when I purchased my home last year. It is easy to build and can tell you if any part of the tree might be in the way. Give yourself some margins as this is not professional equipment.

Math Explorer: How High? Making Your Inclinometers


I was able to discover that I had line of site from 15W to 140W, with this inclinometer. I factored in some extra margins and was surprised to find that in reality I had from 10W to 145W.
If you have an Iphone/Blackberry there is also an application that shows the satellite arc and if there would be any obstacles in your viewing area. There is a post I did on this previously. Good luck.
 
I forgot to mention a quick way of using the inclinometer for your sat in question. Look up your elevation angle at your location for the intended sat. Lets say it is 25 degrees off the horizon for Hispasat 1C/D. Go to your dish location, and point the inclinometer in the intended spot of were the sat is/obstacles while looking through the inclinometer. Allow a little room for errors. While holding it in the direction of the intended sat and the angle require, note if there is any obstacles in the way. It should give you a good idea of the sat elevation angle and any obstacles in the way when you look through it.
 
Nycrich, Thanks for the info. I set up the dish again tonight and tried for 30W and 43W....no luck. Even if I cut that one big limb there are loads of trees to the left and right. There's not much margin for error there, it's like aiming thru a forest. I guess I could always watch the friday and saturday movies on Cubavision on the net. Thanks Blind
 
Blindowl,

I recently made a nice little gadget to help me with such projects.

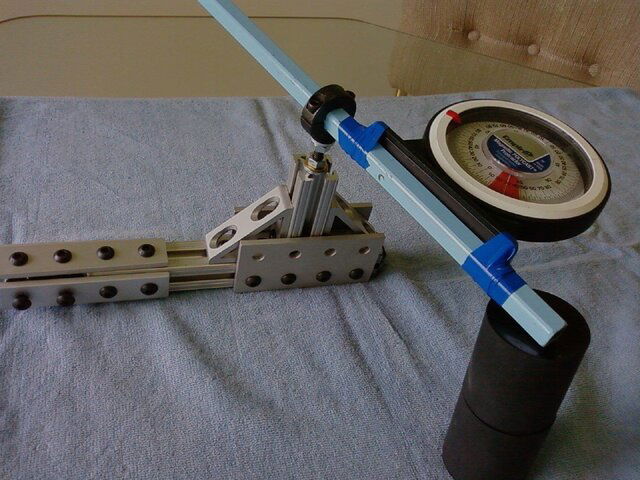
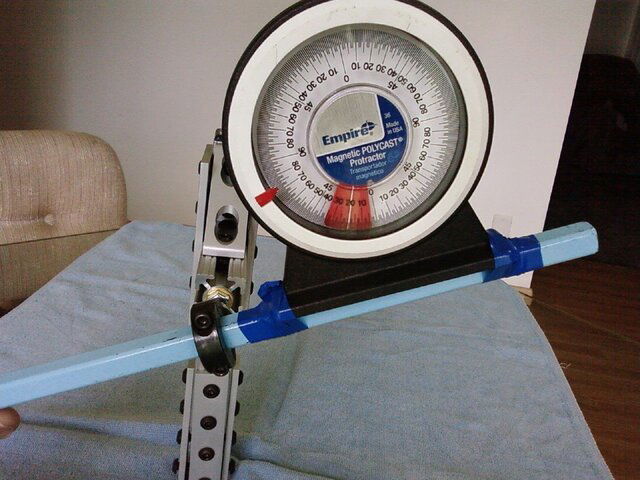
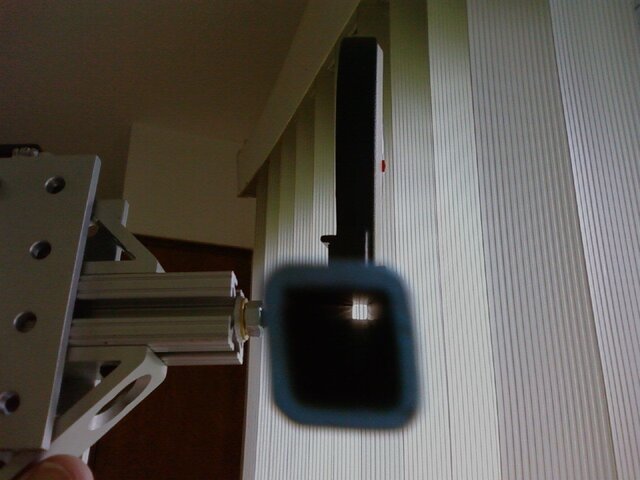
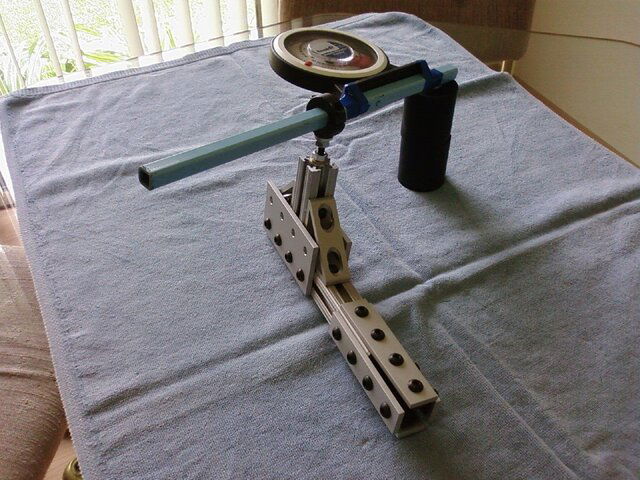
I used a 16-18 inch long square, steel tube to which I attached my magnetic inclinometer. I found that taping it in place along the top of the square tubing was a better idea than using the magnetic base to hold it in place, especially in windy conditions.

Then, I cut a 6' length of 1" 80/20 structural extruded aluminum to make a vertical staff. At the bottom of this staff, I tapped the center (round hole in the tube) to accept a 1/4-20 threaded piece of all-thread about 18"-24" in length. That all thread section is what I shove into the ground to anchor this vertical staff.

At the very base of the 6' x 1" vertical staff, I added some little "wings" to help support and stabilize the staff on the ground with more 80/20 structural items.

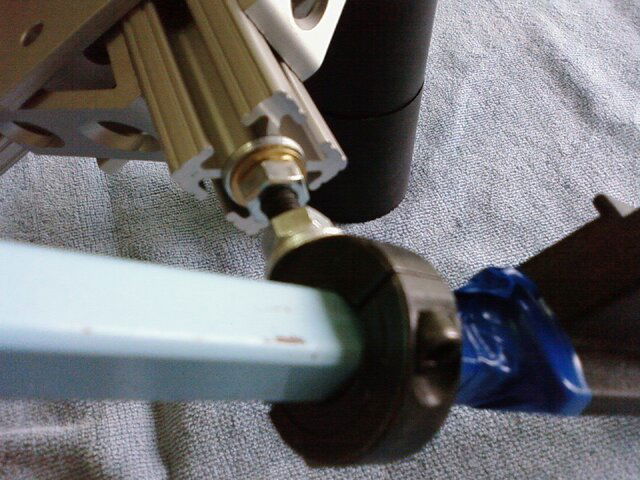
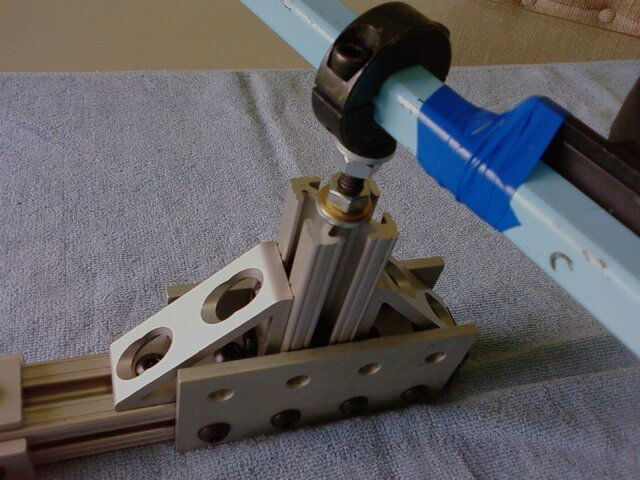
I then used more 80/20 componets to attach a 3"-4" length of 1" 80/20 bolted at a right angle to the vertical 6 foot staff. I also tapped the center hole of this piece to accept a short 1/4-20 piece of all-thread. This makes my pivot point for adjusting the elevation.

I then found a two-section collar clamp that fit around the roughly 1/4"square metal tubing and tighten down on it very snug.

I drilled and tapped a 1/4-20 hole in the center of one half of the clamp so that I could screw it on to the all thread and using flat and lock washers and nuts, was able to set the angle of the collar to any position.

With the square tubing secured in the center of the collar, and the whole staff stuck in the ground at a desired test point, I was able to adjust the verticality of the staff and raise or lower the 3"-4" extension to a desired height (to match my eye level) and adjust the elevation angle of the square metal tube.

As I peered through the square tube at a possible obstruction, lets say a tree top that was 350 feet away. I could lock the tube in position with the nuts on the all-thread and then step to the side and read the angle displayed on the inclinometer.

KInowing the angle and the distance, you can determine a lot of things without waiting for the next seasonal solar alignment.

If you want to know the hieght of a tree, simply take the tangent of the angle and multiply it by the distance to the tree and then add the height of the bottom of the square tube (site tube).

If you know the elevation of the satellite, You can simply set the tube to that angle and pan the whole assembly around in the general direction of that site and peer through the site tube to see if you any obstructions are in the way.

This works great if you are certain of your azimuth direction.

Obviously, using the solar outage / solar alignment calculator is much simpler, since you simply have to calculate the sun's position at the appropriate time of day for the appropriate sat and just look at the sun's position from your proposed dish location. But, you have to do this at the right times of the year and if you miss that, you have to wait about six months to try again.

You can build something like this without using 80/20, but I find that really slick to use as you can develope the instrument to be adjustable in many ways. 80/20 is special construction material which is extruded, square aluminum tubing. Kind of like an industrial erector set.

You can simply use the square metal tube and the inclinometer taped to it, but you will need a helper to read the angle on the inclinometer for you so you get it most accurate.

RADAR
 
I don't have all of the components I use in these pictures. I took these pictures inside since it is windy and rainy and chilly outdoors, so the ~6 foot staff that this sits on is not included in the pictures so that I can take the pix inside.

This piece shown in the photos slips right over the top of the staff and with an allen wrench, it tightens down securely to the staff. Makes it a little easier to transport in two pieces.

These structural components (80/20 brand name extruded aluminum) can be purchased from Fastenal outlets. They may be a little pricey. I get them from work as salvage materials when we disassemble a bench or some gizmo that we don't use anymore. Rather than incurring the labor cost to disassemble the pieces, they just recycle the whole thing. If we like, we can buy it cheaply and disassemble it at home for our own uses. It's a nice perk.

With some salvage materials, metal tubing or PVC pipe, a drill and a tap and a few nuts and bolts, you can make a really slick and durable piece of equipment that will really benefit you in the hobby. Find the height of a tree or building, locate the sat in the sky, locate a window to view the sat through some tree branches, etc!

RADAR
 

Attachments

  • 0507105519.jpg
    0507105519.jpg
    228.6 KB · Views: 183
  • 0507104950.jpg
    0507104950.jpg
    166.1 KB · Views: 213
  • 0507105025.jpg
    0507105025.jpg
    226 KB · Views: 187
  • 0507104904.jpg
    0507104904.jpg
    226 KB · Views: 187
  • 0507105439.jpg
    0507105439.jpg
    212.5 KB · Views: 185
  • 0507105131.jpg
    0507105131.jpg
    213.3 KB · Views: 184
  • 0507105351.jpg
    0507105351.jpg
    146.5 KB · Views: 172
  • 0507105251.jpg
    0507105251.jpg
    226.6 KB · Views: 207
  • 0507104751.jpg
    0507104751.jpg
    273.3 KB · Views: 187
Last edited:
Nice Job! Cool "Radar Gun" !!!... :up

I'll take one! How much is shipping??? ;)

LOL!

Thanks Dan, but this model is not ready for production or the retail market. ;)

I just slapped this item together as a quicky tool to help a neighbor set up his dish. I can usually "eyeball" the LOS pretty well, but he had so many trees and I wanted to be really sure for him, so I conjured up this little tool to help me.

In essence, it is extremely basic, regardless of the materials that I used. I think it looks swell, but the most important part is that it works exceptionally well for the intended purpose, and all you need to make it work is a little simple math and a good eye and good weather! ;)

RADAR
I think it's pretty neat and your a smart dude, I'm impressed. Father O'Reilly
 
Thanks for the pictures... Now it make sense! Often I can visuallize, but this one lost me.
POP

RV1pop,

You are welcome.

I tried to describe it as well as I could w/o pictures, but even as simple as it is, it is difficult to describe the construction with words alone.

I hope that you can imagine how useful this simple device can be. When I run into an installation where there are many trees or outbuildings that I am unsure of of the LOS, I can check it easily and quickly with this gizmo created from mostly scrap materials.

It is a very simple idea that others have used for years. I simply used the materials that I had at hand to create my own version of this "clinometer".

I can determine the height of of tall tree with reasonable accuracy using this device and simple math. I use a 100' tape measure to define the distance from the base of the tree. The further away I am, the more accurate I will be. In one instance, I measured off 350 feet. Then, I set up this gizmo and aimed it at the very top of the branches on the tree and recorded the angle which was 18.0°.

Taking the tangent of that angle (18.0°) = 0.3249 and multiplying that by the distance to the tree or the adjacenct side of the triangle (350 feet), I could determine that the opposite side of the triangle was 113.72 feet.

Since my reference point was eye level (looking through the end of the blue tube of my sight finder gizmo) I have to add that height to the total height of the tree. That additional elevation was 64 inches. So, 113.72 feet or 1,364.7 inches + 64 inches = 1,428.66 inches or 119.06 feet. It's a very tall tree!

Using the calculated height of that tree and the tools available from Dishpointer.com, I was able to discern that from my intended dish installation site, that that specific tree had to be shorter than 143 feet for the LOS to clear it for the satellite. So I actually had about 21 feet to spare!

From the intended installation site of the dish antenna, the elevation angle to the satellite was 40+ degrees. So I could double check that I was aiming over that tall tree by checking the angle to the tops of the limbs which turned out to be approximately 37.5°.

Using three methods (my own calibrated eye/personal judgement and two true scientific / mathematic calculations) I was able to tell my friend that it was acceptable to plant his dish antenna at that location and be able to clear the tree line.

I consider my "calibrated eye" to be quite trustworthy in most cases, but I find that I am most often over-exaggerating the limits. I always lean to the judgement that more clearance is required. I have never erred in the wrong direction, but with this gizmo, I can cut it tighter and provide my friends or customers with better installation possibilities. More options in questionable locations.

Yes sir, using a tool like this provides a definite advantage.

RADAR
 
I was at Harbor Freight and saw one of these old fashion transits!

I am not all that handy at making little gizmos and thought hmmm...

It lists for $24.95 and says it can be used for measuring or just display.
 

Attachments

  • transit.jpg
    transit.jpg
    6.8 KB · Views: 187
I was at Harbor Freight and saw one of these old fashion transits!

I am not all that handy at making little gizmos and thought hmmm...

It lists for $24.95 and says it can be used for measuring or just display.

That would be right up our alley, Dishman! For $25, you can't beat it. Mount that on a camera tripod of something and you'll have a nice little tool!

RADAR
 
That would be right up our alley, Dishman! For $25, you can't beat it. Mount that on a camera tripod of something and you'll have a nice little tool!

RADAR

Great! But do not forget the 20% off discount coupon! ;)
The coupons are in sunday newspapers and many popular magazines dealing with cars, tech and farm magazines. :cool:
 
Radar,

You made a suggestion of using the Harbor Freight transit on a tripod. Do you hold your gizmo or do you support it on something? I just had a flashback when my brother-in-law was putting up his Radio Shack system. They provided a little paper line of site gizmo tool that help setup his BUD back then and he held it like a little telescope.
 
I went back to Harbor Freight and bought one of those "transit & alidade" gizmos! :D

It is really neat and after the 20% off coupon the price was $20.79 and after adding 6% PA sales tax the total was back to $22.04. The original price was $25.95 not $24.95 as I originally posted. The thing is made of brass in India (Wow NOT China!) and has a 10x scope on it along with a built in compass. This thing should work to make sure my LOS is clear especially for those low flying birds I want to try to get!!! ;)
 
Status
Please reply by conversation.

Users Who Are Viewing This Thread (Total: 0, Members: 0, Guests: 0)

Who Read This Thread (Total Members: 2)

Top