new 1.2 meter dish and 12 footer
- Thread starter WhiteBeard
- Start date
- Latest activity Latest activity:
- Replies 250
- Views 30K
Make one,grind down an old 7/16 socket till it fits.Since I can't find the right tool locally or online to repair my SG9120, I'll have to buy a new HH motor for my 1.2 meter.
I have both a normal and deep well 7/16 socket but they need to be a thinner wall. I don't have a grinder so eiether way it'll cost some bucks for either a grinder or new motor. The motor might not be in stock though.Make one,grind down an old 7/16 socket till it fits.
I have both a normal and deep well 7/16 socket but they need to be a thinner wall. I don't have a grinder so eiether way it'll cost some bucks for either a grinder or new motor. The motor might not be in stock though.
Got a Harbor Freight nearby,for 10 or 15 bucks you can get a 4 1/2 inch angle grinder.With all the fab work you've been doing lately,really handy to have around,and a lot cheaper than a new motor.I have both a normal and deep well 7/16 socket but they need to be a thinner wall. I don't have a grinder so eiether way it'll cost some bucks for either a grinder or new motor. The motor might not be in stock though.
Not enough clearance for that either. I'm going to put my 90cm back up until I can get this fixed. Or I might wait for an Stab HH120 to become available again instead of trying to fix this thing. I don't know if the XCruiser XH240 H-H Motor at TEK2000 is a decent motor but the price isn't too bad.I succeeded once with one of those:
View attachment 149555
Did you try that too?
(I didn't read the whole thread back)
Re: your ancient quote from Madison: That is really of the old days.
The modern way of course is: Flood the zone with sh*t, and demonize the fact-checkers.
Greetz,
A33
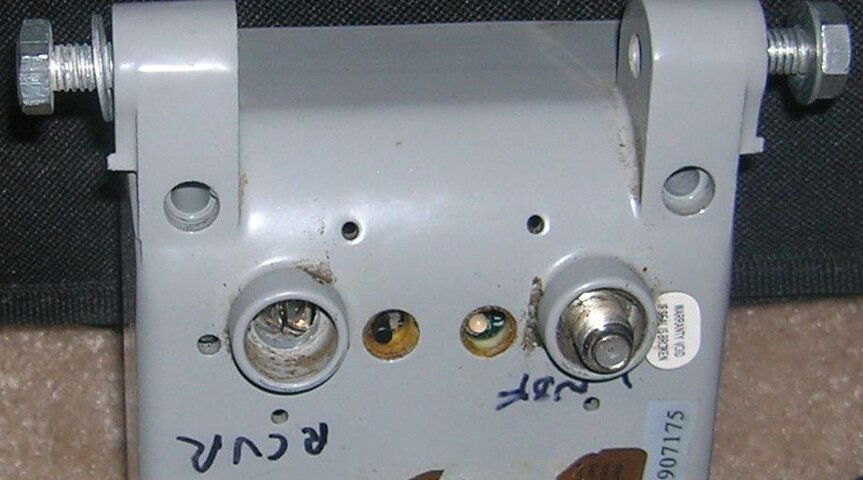
Is it possible to desolder and get the board out of the way and try loosening it from the back?I got a F connector removal tool today but it won't fit down inside of the well where the nut is recessed by 1/4 inch. There's probably a tool to get down in there but I'm going to try removing the nut the hard way.
I'll have to look closer to see if that can be done but upon a brief look it doesn't appear so. Too bad I don't have a maintenance manual that would give me instructions so that I don't mess it up.Is it possible to desolder and get the board out of the way and try loosening it from the back?
Just throwing it out there as I have no idea what the other side looks like.
Actually, it is not nut from outside....it is all body of the connector should be unscrewed. So, as waylew has said, you better desolder the wire from inside and then unscrew whole connector. Put some WD40, that might help.I'm going to try removing the nut the hard way.
I was thinking it might be one of those,but it doesn't look like there are any threads in the other hole with the missing connector.Actually, it is not nut from outside....it is all body of the connector should be unscrewed. So, as waylew has said, you better desolder the wire from inside and then unscrew whole connector. Put some WD40, that might help.
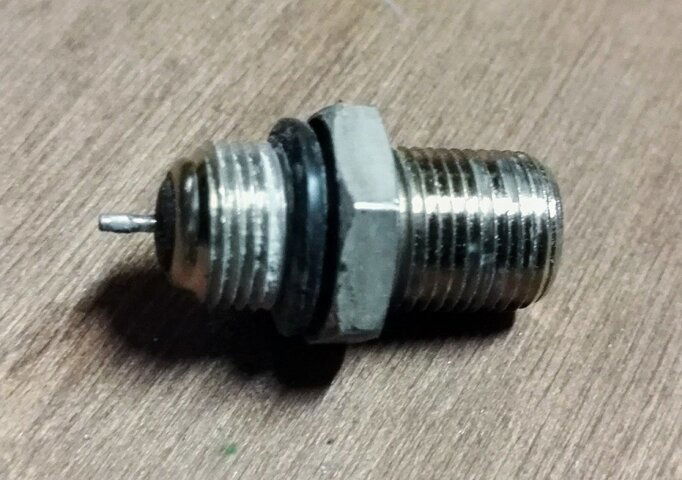
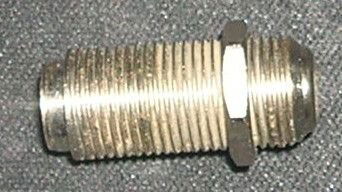
That how the connector look like , no nut there.
There's a nut on both the inside and outside that holds a barrel F connector in place. I can see a nut on the inside. As for desoldering, there's nothing to desolder because the F connector is a barrel connector. See attached image of the F connector that fell out from the right side. Two of the attached images show the loose inside nut for the right connector. Near as I can tell, that board won't slide out until the outside nut on the left connector is removed.Actually, it is not nut from outside....it is all body of the connector should be unscrewed. So, as waylew has said, you better desolder the wire from inside and then unscrew whole connector. Put some WD40, that might help.
That how the connector look like , no nut there.
Can not unscrew it.... drill it out.Near as I can tell, that board won't slide out until the outside nut on the left connector is removed.
Not enough clearance for that either.