
DSR-920 Maps how-to
- Thread starter wallyhts
- Start date
- Latest activity Latest activity:
- Replies 23
- Views 5K
You are using an out of date browser. It may not display this or other websites correctly.
You should upgrade or use an alternative browser.
You should upgrade or use an alternative browser.
- Status
- Please reply by conversation.
Yeah, it scared the crap outta me too!Good video except your mic audio is way low, so if you turn up the volume to hear you, and then the windows sounds blow out the speakers and my ears.

Sorry about that. I will get it fixed.
hold off please !
This is not totally correct....
It will work but I am not sure if you do it this way all the time there won't be a problem.
It seems there may be a step missing here.
I have sent the info to the programmer and he is going to look at it .
I can not do anything till tomorrow so please hold off..
After listening to the video I realized there are one or 2 steps I do that was not listed.
Evidently after so many edits of the instructions something may have been left off it.
- Apr 24, 2008
- 3,219
- 448
hold off please !
This is not totally correct....
It will work but I am not sure if you do it this way all the time there won't be a problem.
It seems there may be a step missing here.
I have sent the info to the programmer and he is going to look at it .
I can not do anything till tomorrow so please hold off..
After listening to the video I realized there are one or 2 steps I do that was not listed.
Evidently after so many edits of the instructions something may have been left off it.
10-4 (I think your right because it would not read ever time)
Also can you ask if theirs a way to open a 128k nvram file from a dsr-410?
I have uploaded new instructions right now it is as a word document.
I am not at the proper computer to do the pdf file but here is the list of changes.
I am not sure how this changed from my original files but it had to be in the editing by three of us looking it over way too many times.
-----------------------------------------------------------------------------------------------
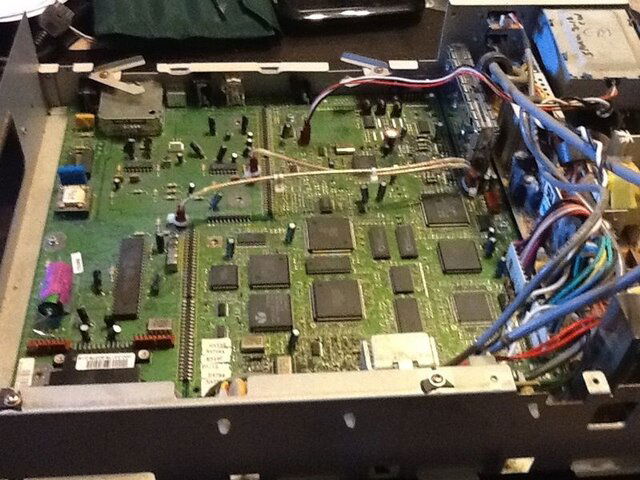
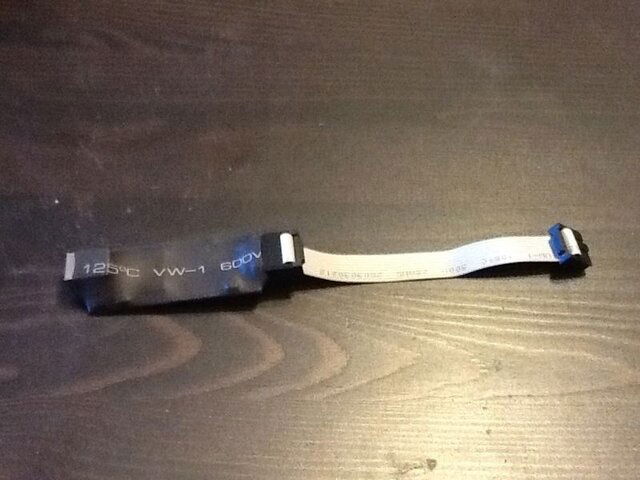
11. Power off your receiver (unplug from wall) and open up the box by removing the screws on the side of the box. You might as well remove the VCII module also, as it is not needed anymore. Locate the 10-pin BDM header. Looking from the front, the 10-pin BDM header is on the right side near the front, and pin 1 is toward the front. Plug the BDM cable onto the 10-pin header and make sure everything is lined up correctly. The red wire (pin #1) on the BDM ribbon cable should point to the front to line up with the header pin #1. On the DSR 920, this is pretty tough to do if you have big fingers and do not remove the VCII cage. Always make sure the receiver is powered off when connecting/unconnecting the cables. That means UNPLUG FROM THE WALL, not the power button. Otherwise you might end up with a boat anchor(s). The standard 10-pin cable is only about 5" long so you have to leave the top off of the receiver to plug in the USBBDM. Mouser sells longer ones (about 18") that will allow you to leave the cable connected with the receiver closed. Just snake it out through the card opening on the left front of the unit. See the section on "Connecting USBBDM Cable to 4DTV" for pictures and more detail.
12. Plug the USBBDM device into the BDM cable, again making sure pin #1 on the BDM cable aligns with pin #1 on the USBBDM device. The USB cable should still be connected to the USBBDM device.
13. Start the USBBDM NT program. Make sure the configuration is still category 'DishIrd' and the Target is 'DSR9XX' or 'DSR922'.
14. Plug in the power cable on the receiver
Then Plug the USB cable connected to the bdm board into the computer.
15. The USBBDM NT software should have several tabs across the display. The software must also say "TestingSR9XX (DSR922) Activated" across the top. Select the 'Output' tab and in the bottom box and type "reset 1" (without quotes) and you should see the status in the bottom right corner of your PC screen display BDM ON. If nothing happens, something is not connected right yet. Unplug and check everything.
16. Type in "g". This will start the receiver running at full speed. The status should go to BDM OFF. When you see the 4d display show "WM-UP" then...............
17. Type in "bk" to the program. This will stop the receiver. The status should be BDM ON. You are now ready to dump the nvram from the receiver.
18. Select the Nvram tab. Hit F2 key or select the icon with R on it to read the nvram into the PC. After reading is complete, select the Save icon (floppy disk) or Ctrl-S to get the save dialog. Save the file someplace as nvram.bin. This is your unmodified master nvram file. Save a copy of this file somewhere so you do not lose it. It can be used to restore your receiver to the current state if you cause your receiver to master reset or you trash your receiver maps.
19. Type reset 1 enter (reset space 1 enter)
type g enter (wait till front panel display says "WM-UP" then
when it shows on your screen it will then go to the clock
display....
Wait till the clock comes up then push the power button on the
receiver to make sure the channel comes up .
Once you see the sat channel on your display then
Exit the Jtag Program completely and close it out.
20. Then unplug the receiver
21. Now safely remove the BDM board from the PC by right clicking
the icon on the lower right corner of your pc and choose safely
remove hardware. When you see safely remove hardware then...
22. Remove the printer cable now from the computer.
Always remember step 21 to remove the BDM device from the computer
23. Then remove the BDM Board from the extension cable that is
connected to the 4DTV motherboard.
24. Now you can plug in the 4DTV receiver.
This leaves the ribbon cable connected to the receiver so we can use
it later.
---------------------------------------
I believe I have it correct but quite frankly I am dog tired right now.
I am not at the proper computer to do the pdf file but here is the list of changes.
I am not sure how this changed from my original files but it had to be in the editing by three of us looking it over way too many times.
-----------------------------------------------------------------------------------------------
11. Power off your receiver (unplug from wall) and open up the box by removing the screws on the side of the box. You might as well remove the VCII module also, as it is not needed anymore. Locate the 10-pin BDM header. Looking from the front, the 10-pin BDM header is on the right side near the front, and pin 1 is toward the front. Plug the BDM cable onto the 10-pin header and make sure everything is lined up correctly. The red wire (pin #1) on the BDM ribbon cable should point to the front to line up with the header pin #1. On the DSR 920, this is pretty tough to do if you have big fingers and do not remove the VCII cage. Always make sure the receiver is powered off when connecting/unconnecting the cables. That means UNPLUG FROM THE WALL, not the power button. Otherwise you might end up with a boat anchor(s). The standard 10-pin cable is only about 5" long so you have to leave the top off of the receiver to plug in the USBBDM. Mouser sells longer ones (about 18") that will allow you to leave the cable connected with the receiver closed. Just snake it out through the card opening on the left front of the unit. See the section on "Connecting USBBDM Cable to 4DTV" for pictures and more detail.
12. Plug the USBBDM device into the BDM cable, again making sure pin #1 on the BDM cable aligns with pin #1 on the USBBDM device. The USB cable should still be connected to the USBBDM device.
13. Start the USBBDM NT program. Make sure the configuration is still category 'DishIrd' and the Target is 'DSR9XX' or 'DSR922'.
14. Plug in the power cable on the receiver
Then Plug the USB cable connected to the bdm board into the computer.
15. The USBBDM NT software should have several tabs across the display. The software must also say "Testing
SR9XX (DSR922) Activated" across the top. Select the 'Output' tab and in the bottom box and type "reset 1" (without quotes) and you should see the status in the bottom right corner of your PC screen display BDM ON. If nothing happens, something is not connected right yet. Unplug and check everything. 16. Type in "g". This will start the receiver running at full speed. The status should go to BDM OFF. When you see the 4d display show "WM-UP" then...............
17. Type in "bk" to the program. This will stop the receiver. The status should be BDM ON. You are now ready to dump the nvram from the receiver.
18. Select the Nvram tab. Hit F2 key or select the icon with R on it to read the nvram into the PC. After reading is complete, select the Save icon (floppy disk) or Ctrl-S to get the save dialog. Save the file someplace as nvram.bin. This is your unmodified master nvram file. Save a copy of this file somewhere so you do not lose it. It can be used to restore your receiver to the current state if you cause your receiver to master reset or you trash your receiver maps.
19. Type reset 1 enter (reset space 1 enter)
type g enter (wait till front panel display says "WM-UP" then
when it shows on your screen it will then go to the clock
display....
Wait till the clock comes up then push the power button on the
receiver to make sure the channel comes up .
Once you see the sat channel on your display then
Exit the Jtag Program completely and close it out.
20. Then unplug the receiver
21. Now safely remove the BDM board from the PC by right clicking
the icon on the lower right corner of your pc and choose safely
remove hardware. When you see safely remove hardware then...
22. Remove the printer cable now from the computer.
Always remember step 21 to remove the BDM device from the computer
23. Then remove the BDM Board from the extension cable that is
connected to the 4DTV motherboard.
24. Now you can plug in the 4DTV receiver.
This leaves the ribbon cable connected to the receiver so we can use
it later.
---------------------------------------
I believe I have it correct but quite frankly I am dog tired right now.
The new pdf files were just posted to the web site and and additional 4DTV BDM single page printout is now available at the web site. I hope this corrects the few steps left off the old instruction file.
- Apr 24, 2008
- 3,219
- 448
The new pdf files were just posted to the web site and and additional 4DTV BDM single page printout is now available at the web site. I hope this corrects the few steps left off the old instruction file.
I am going to remove the old video and make a new one tonight.
My plan is to make videos for the following.
DSR-920
DSR-922
Using MM
Installing all the software.
So hopefully if you hate to read like me it will be helpful to some.
I got the audio problem fixed.
Sorry but it needs to be changed again folks.
Once more some things were change by the programmer and I am just now getting that info sorted.
In a discussion today we talked about trying to get everyone on the same page here and there were ways I have always done things that the programmer did differently. We just never knew this till today.
So the single page document was redone and posted to the web site tonight.
The full instruction document will be done tomorrow and uploaded.
Evidently this is needed for some things coming out in the future so everyone is doing things the same way.
I have a question, my second receiver a 922 also, is displaying cannot find channel continuing to search. channels in the clear it plays fine. such as G4 16/17, I believe a master reset was done prior to my getting it, what should I do to fix this
Thank you
Thank you
I have a question, my second receiver a 922 also, is displaying cannot find channel continuing to search. channels in the clear it plays fine. such as G4 16/17, I believe a master reset was done prior to my getting it, what should I do to fix this
Thank you
This should be easy to fix. I had this problem. I pointed my dish to 105w. Logged into my Websams account and entered my receiver number into the account and when the receiver is on that satellite ask for a rehit. You can watch it work. The instructions of what channel to tune are on the programming center website I think. There is probably a way to fix this using the map program but I don't know how. In one of the diagnostic screens it shows the emm provider. After a MR it no longer has one that will open some of the dc2 open channels.
another questions guys what are some channels that have the ratings bug, I did the fix and would like to know if it worked
Thanks
Many ask this same question.
If you show the firmware code as A4 on Diag screen A then you do not have to worry about the ratings ceiling gray screen any more since it is not in that firmware code.
As to which channels , well that depends on what they do to any channel they put into FP mode from time to time.
The easiest way to put it is this, you should no longer ever see that ratings ceiling gray screen again.
- Status
- Please reply by conversation.
Similar threads
- Replies
- 37
- Views
- 4K
- Replies
- 6
- Views
- 1K
- Replies
- 0
- Views
- 533
- Replies
- 2
- Views
- 696
Users Who Are Viewing This Thread (Total: 0, Members: 0, Guests: 0)
Who Read This Thread (Total Members: 1)
Latest posts
-
L
-

-

-
THinge CEO Leaves Company to Launch Overtone, an AI Dating App
- Latest: TWiT Tech Podcast Network
-
