Wanted motor for 24" Venture ball-screw actuator

primestar31

SatelliteGuys Master
Original poster
Lifetime Supporter
Mar 15, 2005
13,397
13,601
Beta Omicron Delta III
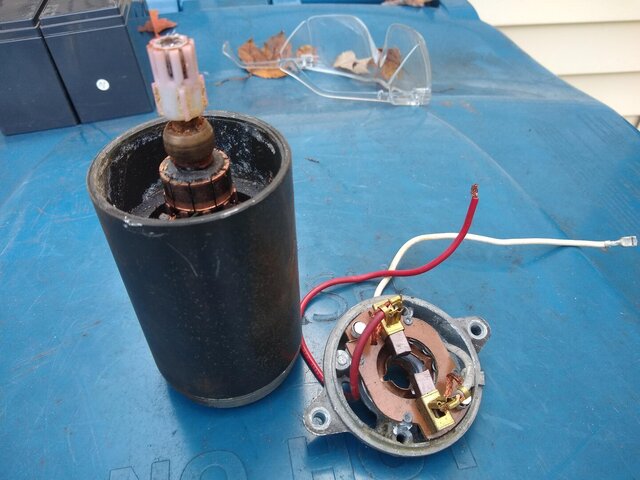
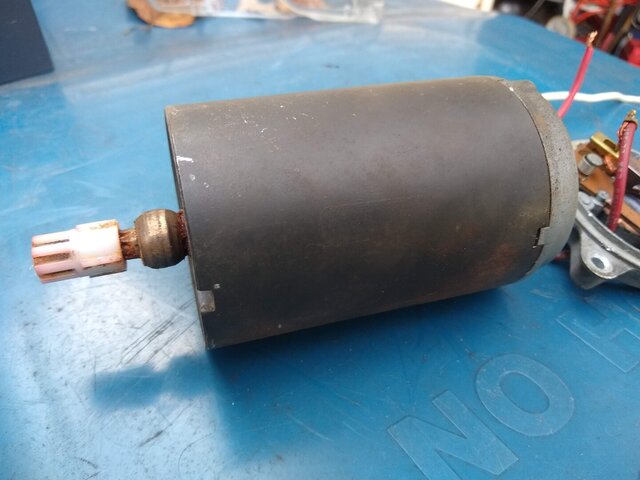
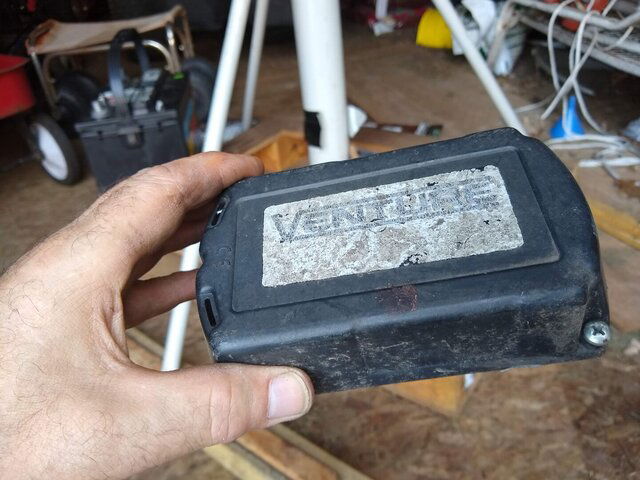
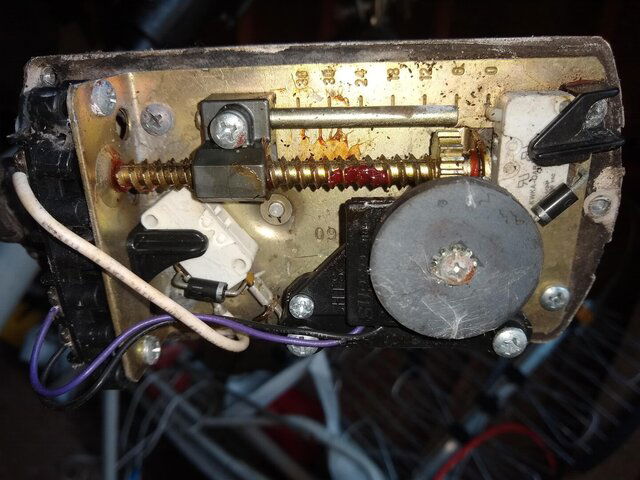
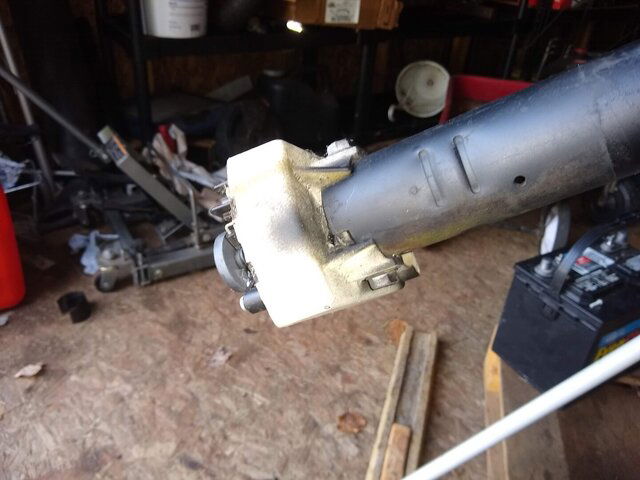
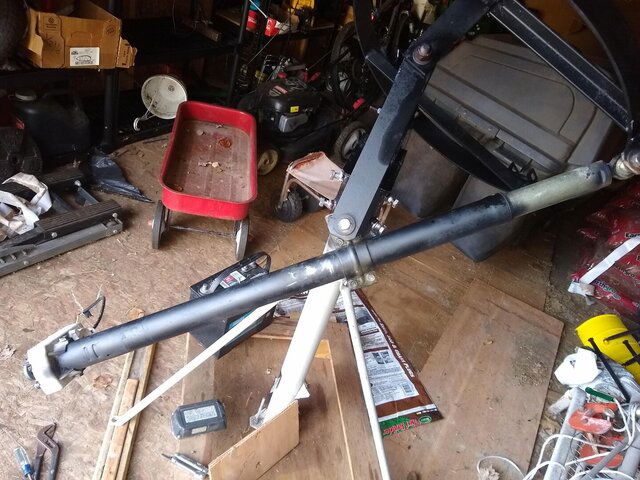
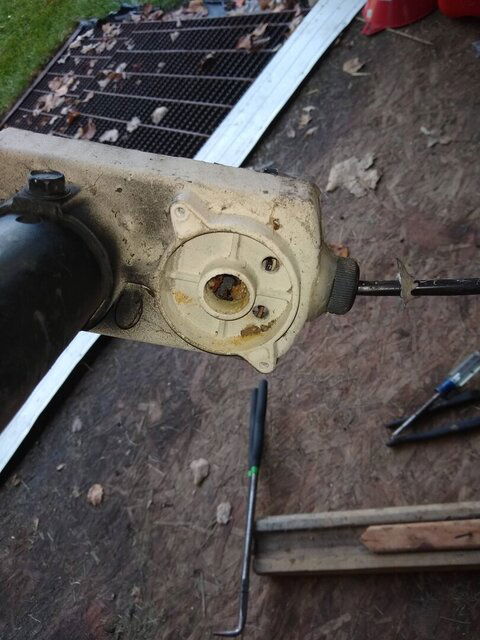
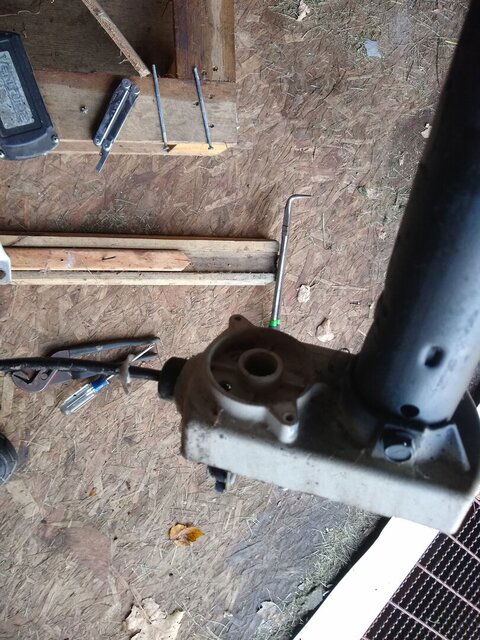
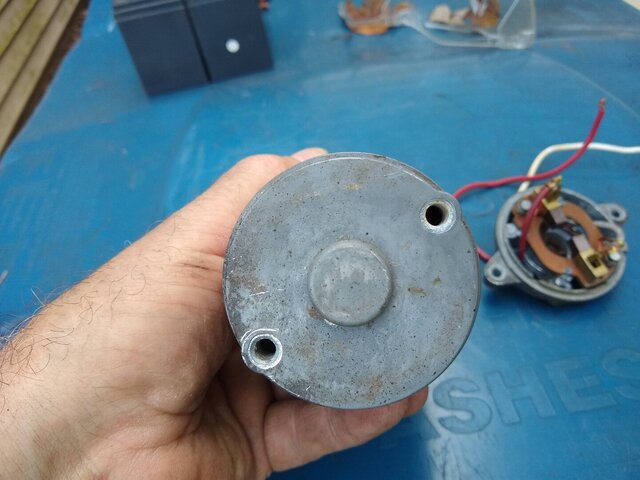
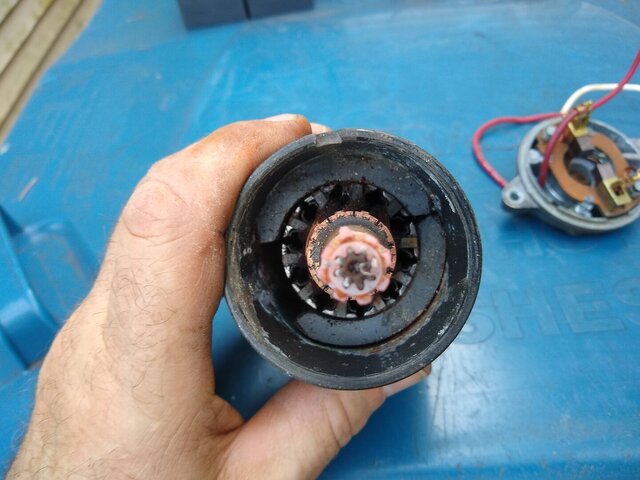
The motor on my Perfect-10 10 foot dishes 24" Venture actuator is damaged after storage. Looks like some water may have got inside, and froze. I'm rehabbing the dish and mount etc, to replace the 7.5ft SAMI dish I'm using right now. One of the magnets broke away from the wall inside, it's seized up, and I don't think it can otherwise be safely repaired. Anybody got a usable one I can have? Not sure what model this is, IF there's different motor models. I'd say this is at least 20+ years old. I'm including some photos, maybe others that have actually had to work or rebuild these motors have some input as to which one it is, and maybe have a replacement? Please let me know, thanks!

If you also need additional photos of something to better identify the motor, let me know.
 

Attachments

  • IMG_20211020_160857364.jpg
    IMG_20211020_160857364.jpg
    240.5 KB · Views: 136
  • IMG_20211020_161255260.jpg
    IMG_20211020_161255260.jpg
    171.9 KB · Views: 115
  • IMG_20211020_161149996.jpg
    IMG_20211020_161149996.jpg
    248.9 KB · Views: 115
  • IMG_20211020_161047208.jpg
    IMG_20211020_161047208.jpg
    281.1 KB · Views: 110
  • IMG_20211020_161029032.jpg
    IMG_20211020_161029032.jpg
    165.1 KB · Views: 112
  • IMG_20211020_161018285.jpg
    IMG_20211020_161018285.jpg
    320.5 KB · Views: 121
  • IMG_20211020_161002534.jpg
    IMG_20211020_161002534.jpg
    150.8 KB · Views: 118
  • IMG_20211020_160952858.jpg
    IMG_20211020_160952858.jpg
    235 KB · Views: 128
  • IMG_20211020_160912467.jpg
    IMG_20211020_160912467.jpg
    204.7 KB · Views: 134
  • IMG_20211020_160906079.jpg
    IMG_20211020_160906079.jpg
    211.4 KB · Views: 133
If you can possibly salvage it and the windings arent borked, commutator is still good. Bronze bushings aren't egg shaped and worn. Cool!
As for bonding the magnets I think the only stuff I found is 2 part urethane automotive body panel bonding adhesive. The stuff that Camaros are stuck together with.
Epoxy, JB has failed for me. I live in carbon brush manufacturing territory and if you're good at snapping good macro's and have a little bit of micrometer or caliper skills I could probably hook you up.
I might even have some old parts in my junk bin.
The motor brushes are fine, in fact they look barely used. I've never used a micrometer or caliper, sorry. I think if I could re-bond the magnet, and get the motor rotor loosened up from the end bushing, it might work again.
 
The motor brushes are fine, in fact they look barely used. I've never used a micrometer or caliper, sorry. I think if I could re-bond the magnet, and get the motor rotor loosened up from the end bushing, it might work again.
They are most probably sintered bearings. A few drops of 3 in one, automatic tranny (is that still PC?) fluid should get them freed up.
Sintered means they have a carbon content designed to soak up and retain oil. So over age they get varnished and sealed up. Wash them really warm with lighter fluid, kerosene, with Q-Tips. Until the gook stops coming out. Then use some hot 30W synthetic oil. Put a Soaked Q-Tip in the bore and let 'er soak in.
Oh yeah. Sharpie the magnet(s) on the end so you dont get the N-S poles mixed up and put them back in the same exact position they came out of.
 
  • Like
Reactions: primestar31
They are most probably sintered bearings. A few drops of 3 in one, automatic tranny (is that still PC?) fluid should get them freed up.
Sintered means they have a carbon content designed to soak up and retain oil. So over age they get varnished and sealed up. Wash them really warm with lighter fluid, kerosene, with Q-Tips. Until the gook stops coming out. Then use some hot 30W synthetic oil. Put a Soaked Q-Tip in the bore and let 'er soak in.
Oh yeah. Sharpie the magnet(s) on the end so you dont get the N-S poles mixed up and put them back in the same exact position they came out of.
Is the rotor supposed to come OUT of the end bearing? Or does the whole thing spin with the rotor? Because that bearing appears to be brass, and is "gimble-like". Meaning the whole thing is kind of like a ball, and if you try to turn the rotor, the whole captured ball part moves, but is very tight. I don't seem able to pull the rotor out of it. Almost seems like it's locked in somehow with a C clip?
 
Is the rotor supposed to come OUT of the end bearing? Or does the whole thing spin with the rotor? Because that bearing appears to be brass, and is "gimble-like". Meaning the whole thing is kind of like a ball, and if you try to turn the rotor, the whole captured ball part moves, but is very tight. I don't seem able to pull the rotor out of it. Almost seems like it's locked in somehow with a C clip?
You're right. The bearing is supposed to gimbal in its fitting and the armature spins inside of the bearing just like the brush end. It has obviously siezed and just needs some soaking in penetrating oil. It's like it is now because it's been like that for a long time. Oil, light taps on the end shaft to work it in. Patience. Walk away and eventually it will break free. You could also try gentle heat on the protruding shaft with a Bic. Not too much though.
 
  • Like
Reactions: primestar31
I would epoxy the loose magnet back in place. Also make a couple wooden sticks for spacers to slide between the magnets and hold them apart. Glue those in place. Free up that bushing like arlo indicated and you should be good for another twenty years ;)
 
  • Like
Reactions: primestar31
I emailed Venture last night right after posting this thread, and they emailed me back early this morning. However, we were gone all day. Here's the info they gave me about this actuator, and I CONFIRMED it's correct, it's a belt drive gear box! It also explains WHY this one was always so exceptionally quiet. I did find a new motor on Ebay with the part number they quoted below, and it's cheaper than Venture quoted so I ordered that.Can't find the gear, so going to order that directly from Venture. I also am working on rebuilding this borked one, if that's possible.:
-------------------------------------------------------------------------------------------------------------------------------
Quote:

Mike,

This is an old 36v motor for a belt driven gearbox that we do not have anymore. You will need a 8532-01 (electric motor) and a 58:1 reduction gear to replace the old belt drive gears.

P/N: 8532-01 (electric motor only) Price: $82.50 ea. Ex-Works Dayton OH

P/N: 8504-00 (58:1 first reduction gear) Price: $12.10 ea. Ex-Works Dayton OH

/Quote
 
  • Like
Reactions: FTA4PA
You're right. The bearing is supposed to gimbal in its fitting and the armature spins inside of the bearing just like the brush end. It has obviously siezed and just needs some soaking in penetrating oil. It's like it is now because it's been like that for a long time. Oil, light taps on the end shaft to work it in. Patience. Walk away and eventually it will break free. You could also try gentle heat on the protruding shaft with a Bic. Not too much though.
arlo Just how "loosely" should that rotor be able to turn in that end piece gimbal bearing? I have it cleaned at the point where I believe I've got most, if not all "gunk" out of it. I can turn the rotor by hand now while holding the end piece, and trying to spin the rotor with my other hand. So it's not completely seized up tight anymore. However, it doesn't spin REAL freely like say an induction type fan motor does. There's still friction there. Then again, that's all freed just from soaking the bearing in bicycle chain chain cleaner, and scraping a little around it with a sharp wooden stick. It's not been soaked in oil just yet.

Is it supposed to turn freely enough, that IF you gave it a little spin, it should coast a little by itself?
Were you able to pull the armature shaft completely out of the bearing to clean it?
It should spin closely to how the bearings in an induction fan does. Is the armature shaft really clean too? No sandpaper on it unless you have 1500 grit or finer. A Scotchbrite pad works.
Are you able to examine the bearing with a magnifier to make sure there's not an old grease or oil varnish coating on it? The bore of it should look "brassy" with tiny carbon pits or just like a piece of bronze. And a Scotchbrite texture on the shaft will help retain oil better than a mirror polish.
Interesting project, huh?!

Edit:
Apologies. I just gandered your photos. So the belt pulley is keeping you from pulling the bearing out. It's pressed on, right? Can you gently coax it off the shaft to get everything apart proper?
I would say the motor gets refurbed. Put back together, battery tested, and then when it's 100%, press the belt pulley back on. Maybe with a dab of blue Locktite to keep it in place.
That bearing shouldn't spin in the bore of it's housing at all. That would be a bad thing.
 
  • Like
Reactions: primestar31
Were you able to pull the armature shaft completely out of the bearing to clean it?
It should spin closely to how the bearings in an induction fan does. Is the armature shaft really clean too? No sandpaper on it unless you have 1500 grit or finer. A Scotchbrite pad works.
Are you able to examine the bearing with a magnifier to make sure there's not an old grease or oil varnish coating on it? The bore of it should look "brassy" with tiny carbon pits or just like a piece of bronze. And a Scotchbrite texture on the shaft will help retain oil better than a mirror polish.
Interesting project, huh?!
No, I didn't pull the armature shaft completely out of the bearing as of yet. I was scared that might damage it. I did scrape some oil varnish gunk off of it with that wooden stick. IF you think it's supposed to come out, maybe it'll now come out because it's cleaner and freed up some?
 
No, I didn't pull the armature shaft completely out of the bearing as of yet. I was scared that might damage it. I did scrape some oil varnish gunk off of it with that wooden stick. IF you think it's supposed to come out, maybe it'll now come out because it's cleaner and freed up some?
Or just do the best you can. I have Saginaw and Von Weise and variants of actuator drives in my junk box but nothing like yours. Maybe the motor section is designed to be pulled with the pulley and bearing in place. Kind of strange because usually the bearings are captive with metal retainers in the end housings. Like the brush end of yours might be.
 
  • Like
Reactions: primestar31
Edit:
Apologies. I just gandered your photos. So the belt pulley is keeping you from pulling the bearing out. It's pressed on, right? Can you gently coax it off the shaft to get everything apart proper?
I would say the motor gets refurbed. Put back together, battery tested, and then when it's 100%, press the belt pulley back on. Maybe with a dab of blue Locktite to keep it in place.
That bearing shouldn't spin in the bore of it's housing at all. That would be a bad thing.
arlo I didn't see your edit until just now, those don't re-notify via email
IMG_20211022_120126729.jpg
IMG_20211022_120145311.jpg
IMG_20211022_120203250.jpg
IMG_20211022_120210061.jpg
IMG_20211022_120234182.jpg
IMG_20211022_120249911.jpg
IMG_20211022_120300665.jpg
IMG_20211022_120314423.jpg
IMG_20211022_120324851.jpg
.


I've been talking about the brass gimbal bearing on the END of the motor, opposite from the brushes. It's completely captured, and I can't pull it out without likely damaging it.

The belt pulley is off, it came off pretty easy. Here's some additional photos. Not sure how I'll get it all back together, and also get the brushes on the rotor. Hopefully that won't be hard. I have also cleaned and re-epoxied the magnet into position, waiting for it to dry/harden over 24 hours minimum. The rotor now spins much easier in that end bearing, though it still isn't loose enough to actually coast when you try to spin it, I don't think it ever was, but I have no real reference to prove that. I'm still letting it soak in oil, and I have it sitting on an old C-pap humidifier heater to lightly heat it up.

See that bit of rust 'staining' on the armature laminations? Should I also try to clean that off with a Scotchbrite pad?
 
I tore two motors down last night. Just for giggles and a little crud under my finger nails. Funny. I have a box of mechanics gloves 2 feet away!
Anyway both gear housings had pressed in sleeve bearings and gimbal bearings in the brush ends.

Your front bearing has to come off. Maybe nudge it back as far as you can towards the armature and see if you can't lightly sand the gook off that's keeping it from coming out. It went on. It has to come off.
Me....I'd want it off the shaft so I could clean out the old lube from the bore.

Yeah getting the rust off would be a great thing to do. Just be careful of the windings. Tape them up if you need to. Shine the commutator with Scotchbrite too. Don't take off much copper. Just burnish it nicely. If it's undercut (between the copper contacts) get the crud out from between them too. Brush carbon tends to short when accumulated between the contacts.
The motor will draw less amps and spin faster.

My suggestion too would be to take the front bearing and put it in the gear housing bore it goes into and check for wobble and slop. If it is worn perhaps right before putting it back together put some hot glue or even some silicone sealant carefully in the cleaned bore so it can keep the bearing from spinning in the bore. That wouldn't be cool if it did.

The motor looks in great shape and I've refurbed ones much nastier and they work like new. If the end gaskets are damaged.....silicone sealant to the rescue. Keep any moisture out of it.
It would be a good idea to check and lube the gear train at this time too.
You know that.
I haven't worked on a belt drive actuator motor nor ever seen one before.

But my dad. A career USAF aircraft maintenance chief (they called him Chief) led me to believe until I got older that alternators and starters were always rebuilt and replacing them was the last resort.
I think the term was "Scrounge". He would come home with bushings, brushes, solenoids, Bendix and a can of MEK...haha....and I'd fetch tools.
And I got to put them away too. Believe you me!!
 
  • Like
Reactions: primestar31
I tore two motors down last night. Just for giggles and a little crud under my finger nails. Funny. I have a box of mechanics gloves 2 feet away!
Anyway both gear housings had pressed in sleeve bearings and gimbal bearings in the brush ends.

Your front bearing has to come off. Maybe nudge it back as far as you can towards the armature and see if you can't lightly sand the gook off that's keeping it from coming out. It went on. It has to come off.
Me....I'd want it off the shaft so I could clean out the old lube from the bore.

Yeah getting the rust off would be a great thing to do. Just be careful of the windings. Tape them up if you need to. Shine the commutator with Scotchbrite too. Don't take off much copper. Just burnish it nicely. If it's undercut (between the copper contacts) get the crud out from between them too. Brush carbon tends to short when accumulated between the contacts.
The motor will draw less amps and spin faster.

My suggestion too would be to take the front bearing and put it in the gear housing bore it goes into and check for wobble and slop. If it is worn perhaps right before putting it back together put some hot glue or even some silicone sealant carefully in the cleaned bore so it can keep the bearing from spinning in the bore. That wouldn't be cool if it did.

The motor looks in great shape and I've refurbed ones much nastier and they work like new. If the end gaskets are damaged.....silicone sealant to the rescue. Keep any moisture out of it.
It would be a good idea to check and lube the gear train at this time too.
You know that.
I haven't worked on a belt drive actuator motor nor ever seen one before.

But my dad. A career USAF aircraft maintenance chief (they called him Chief) led me to believe until I got older that alternators and starters were always rebuilt and replacing them was the last resort.
I think the term was "Scrounge". He would come home with bushings, brushes, solenoids, Bendix and a can of MEK...haha....and I'd fetch tools.
And I got to put them away too. Believe you me!!
SUCCESS on the end bearing anyway!! I went down and gave it yet another shot of PB Blaster, and tapped the end with a hammer a few times. The rotor suddenly unstuck from the gimbal bearing. So now I can clean that up properly, and get the remaining gunk out of the gimbal. When it finally came loose, you could feel a bit of suction holding them together. Here all this time, I though the gimbal bearing ball had to come out.

Now, you say the FRONT BEARING ball has to come off that shaft also? You mean the one on the end where the belt pulley goes on, correct?

Also, what kind of lube do you use on the gear train? I was thinking about using some Lucas #2 Red N Tacky Grease

IMG_20211022_143529447.jpg
IMG_20211022_143500337.jpg
 
Last edited:
Hey, this is really starting to look like it may work! I soaked that end brass gimbal bearing with a little PB Blaster around top and bottom of it. I then used a deep-well socket over the rotor shaft, and sitting on top of that stuck bearing. I then tapped lightly a few times with a hammer on the socket. The bearing went down a hair. I was then able to grab a hold of it, and PULL it off the rotor! Now I just need to clean it all up and scrape out all the remaining hardened gunk, buff it and the rotor shaft a bit, clean the laminations, and get ready to put it all back together once the epoxy on the magnet is completely set!

arlo Thanks for your help, it's much appreciated!
 
Yes sir. The front bearing comes off the exact same way. Look for a little ridge of rust or crud that keeps it from slipping off of the shaft. It has to!
I use Lucas for extreme low temperatures because I live where -20f is common. I drilled my actuator shaft very shallow and put a Zerk in to pump that same grease in also.
That's in another post here.

In the old days Sammy the sat service guy would just swap out actuators, give the bill, and toss the old ones in a pile. I ran across that pile one day and got curious. Some of them wanted a ride in the back of the pickup!

I've also used black molybdenum thin grease. I think I like that the best for gear trains these days. It sticks well and doesn't freeze very thick. "Remains viscous through extreme temperature ranges". I think it says. Keep it off of the belt though.
I even tried lubing the bearings with moly and so far, so good.
It's gonna' work like a peach when you get it all back together.
The brushes will be fun. Try a couple of bread ties around the copper braid to pull them back while you fenagle the commutator over them.
 
  • Like
Reactions: primestar31
I am way late to this thread, so this won't do you much good. But if anybody runs into this problem, check and see if you have a alternator/ starter shop around you. I used to work for one and we fixed all kinds of small motors also.
 
Motor has been reassembled, and I sealed around each end crack with a little bit of clear silicone caulk. That's drying/hardening now. I did test it on a 12 volt battery before sealing it, and it works fine again!

I haven't checked or re-done the gear box as of yet, that'll be next. I'll get it opened up and clean out the old grease, and re-grease it with the new grease. I also have to double-check the arm itself, to make sure everything on that is still fine, before bolting the gear box back onto it.

Maybe a mod can also MOVE this thread to the FTA forum for future reference for whoever needs it?
 
***

Users Who Are Viewing This Thread (Total: 1, Members: 0, Guests: 1)

Who Read This Thread (Total Members: 1)