As I mentioned in another thread, I managed to destroy one of the sort-of-U bolts (they're more like V-bolts) on my STAB HH120 motor. I thought I had somehow gotten a nut cross-threaded, but it turns out the bolt itself had been bent slightly. I didn't notice anything except that the nut wouldn't turn. I applied too much pressure and sheared the bolt clean off. Dammit!
As these are custom bolts, I couldn't just get another at Home Depot or anything. Since I didn't feel like trying to contact the manufacturer for a replacement, I thought I'd try to make my own from a piece of all-thread. A 1-foot piece would end up being almost exactly the same size as the original bolt, so I started with that.
My first thought was to simply bend the all-thread by hand. Nope! Bend it too far and it breaks. Dammit again! Back to the hardware store! This time I get two pieces.
My next idea was to put the piece in a vice, heat it with a blowtorch, then hammer it into shape and quench it in a bucket of water (to hopefully cause the metal to retain its strength). That didn't work out quite as well as I'd hoped. The hammering caused things to bounce all over on my workbench, for one. I'd also never done any metalworking before, so I was just basically winging it. I ended up with a lopsided deformed bolt of vaguely the right shape.
My next attempt worked out better. I carefully marked my bend points with black magic marker, using the original bolt as a template. I also gave up on hammering and decided to simply bend the bolt slowly using a hand-held block of wood to press on it. I started by marking the exact center, then heating and bending. I heated the metal until it was just starting to glow red, at which point moderate pressure from the wood block caused the all-thread to start to bend. The heat burned off the marker ink, but discolored the metal as well, so I could still see the center point and keep the torch in place. I then quenched the piece in water, dried it off, and marked the second bend point using the broken bolt as a guide. I repeated this process for the third bend, and ended up with a pretty reasonable replacement. I fine-tuned it a bit by hand when it was cool and it ended up fitting the bracket pretty well.
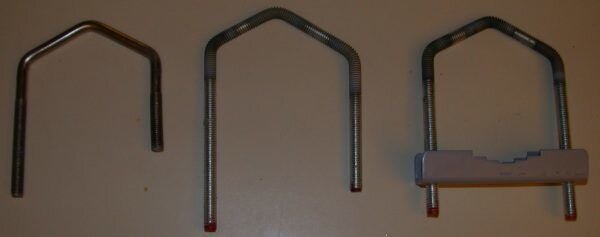
In the attached picture, the piece on the left is the original broken bolt, in the middle is my failed first attempt, and on the right is my final, successful attempt. The only question now is whether it'll be strong enough to hold up under stress, and whether it will rust over time, as I burned off the protective plating at the bends. I'm hoping a little WD-40 from time to time will keep it from rusting.
As these are custom bolts, I couldn't just get another at Home Depot or anything. Since I didn't feel like trying to contact the manufacturer for a replacement, I thought I'd try to make my own from a piece of all-thread. A 1-foot piece would end up being almost exactly the same size as the original bolt, so I started with that.
My first thought was to simply bend the all-thread by hand. Nope! Bend it too far and it breaks. Dammit again! Back to the hardware store! This time I get two pieces.
My next idea was to put the piece in a vice, heat it with a blowtorch, then hammer it into shape and quench it in a bucket of water (to hopefully cause the metal to retain its strength). That didn't work out quite as well as I'd hoped. The hammering caused things to bounce all over on my workbench, for one. I'd also never done any metalworking before, so I was just basically winging it. I ended up with a lopsided deformed bolt of vaguely the right shape.
My next attempt worked out better. I carefully marked my bend points with black magic marker, using the original bolt as a template. I also gave up on hammering and decided to simply bend the bolt slowly using a hand-held block of wood to press on it. I started by marking the exact center, then heating and bending. I heated the metal until it was just starting to glow red, at which point moderate pressure from the wood block caused the all-thread to start to bend. The heat burned off the marker ink, but discolored the metal as well, so I could still see the center point and keep the torch in place. I then quenched the piece in water, dried it off, and marked the second bend point using the broken bolt as a guide. I repeated this process for the third bend, and ended up with a pretty reasonable replacement. I fine-tuned it a bit by hand when it was cool and it ended up fitting the bracket pretty well.
In the attached picture, the piece on the left is the original broken bolt, in the middle is my failed first attempt, and on the right is my final, successful attempt. The only question now is whether it'll be strong enough to hold up under stress, and whether it will rust over time, as I burned off the protective plating at the bends. I'm hoping a little WD-40 from time to time will keep it from rusting.