old birdview

Status
Please reply by conversation.
I'll post a few pictures of the completed wheel and where I installed it, as soon as the rain quits. Yes, a CAD program works well for prototyping. Now, I wish I had a 3-axis CNC machine! Oh well...someday.;)
 
Congrats on your progress and please post some pics. I had considered tapping a hole in the end of the worm shaft myself but didn't do it. :up
 
sharing war stories:

I used the pvc because it is thicker and can take a punch mark for the magnet holes without cracking.
I used a white PVC (or maybe styrene?) endcap.
They're under a buck, and the black ones were $3 or $4 each.
(Get out of the sewer/plumbing department, and go look in lawn 'n garden, instead.)
Taped the paper guide onto it, and drilled right through, with a small drill press.
After the 24 holes were drilled, (good idea to make the holes snug) I got a piece of wax paper and put it on a piece of flat steel.
I didn't have enough sense to do that.
I had already marked one end of my 400 magnets with a red dot of nail polish.
So, then I manually forced the magnets into the holes with a spare piece of plastic.
My fingers were sore afterwards, and it took too long, so a better solution is warranted.
My magnets were quite snug, and I didn't bother with any further bonding.
Had to push out a couple where I got them backwards, and that impacted the production of unit-#1.
 
I used a white PVC (or maybe styrene?) endcap.
They're under a buck, and the black ones were $3 or $4 each.
(Get out of the sewer/plumbing department, and go look in lawn 'n garden, instead.)
Taped the paper guide onto it, and drilled right through, with a small drill press.
I didn't have enough sense to do that.
I had already marked one end of my 400 magnets with a red dot of nail polish.
So, then I manually forced the magnets into the holes with a spare piece of plastic.
My fingers were sore afterwards, and it took too long, so a better solution is warranted.
My magnets were quite snug, and I didn't bother with any further bonding.
Had to push out a couple where I got them backwards, and that impacted the production of unit-#1.

Didn't think of the styrene cap. Yes the black cap was over 4 bucks.

If I had had the paper guide, I would have saved time. by the time I saw it posted in that thread, I had already done all the calipering, punching and drilling.

Happy though with final product. Moves fast. stops reliably where I want it to.

I nominate myself for official female inspector of the BVOC
 
Photos

Sorry that these pictures are a little blurry, but here they are. The screw holding it to the end of the shaft is a 8/32" X 1 1/2". I drilled the entire length of threads on tap, which was about 1 1/4" deep. I probably could have gotten by with less depth, but oh well it works. Also, I took a picture of the oscilloscope showing a pulse. I took a 12 volt dc battery to run the motor and at the same time fed voltage through the sensor while monitoring it with scope. If you notice near the bottom of the square waves, there's noise. This is because there is no earth ground on the mount. They should be clean and fairly square. I was testing it on a trailer at the time and most scopes are sensitive enough to pick up extra attenuation coming from other sources. In my case, it was the 60hz at the power line used to power up the scope (extension cord with no ground).
 

Attachments

  • DSC02135.JPG
    DSC02135.JPG
    515.9 KB · Views: 169
  • DSC02136.JPG
    DSC02136.JPG
    542.3 KB · Views: 151
  • DSC02137.JPG
    DSC02137.JPG
    182.5 KB · Views: 142
  • DSC02139.JPG
    DSC02139.JPG
    273.8 KB · Views: 153
I think you are basically there. The reed switch needs to get its magnetic pulses regularly, and in a multitude of climate conditions. Your oscilloscope pattern looks stable, but I would be more comfortable with it if I could get the reed switch closer to the magnets.

Looks pretty good though. Nice job
 
.......If you notice near the bottom of the square waves, there's noise.....

I think, what you have shown frozen in time with the scope, are the points making and breaking. A small cap across the leads would clean it up, but it's not really needed.

My experience with the air gap between wheel and pickup is to minimize it with only enough gap to clear any wobble of the wheel plus 0.015".

Harold
 
I think the size of the magnets,
- the strength of the magnets,
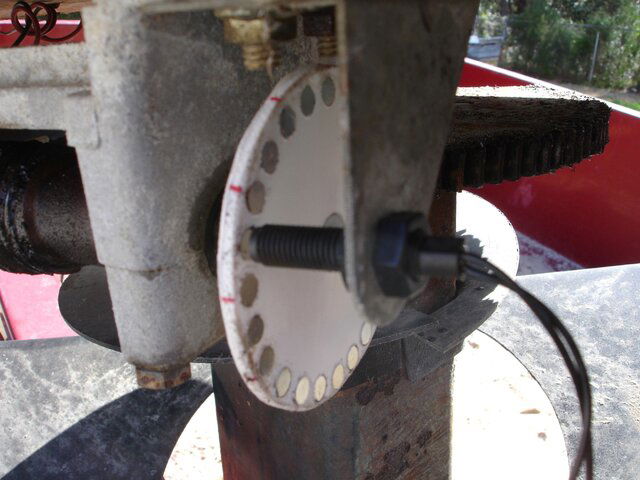
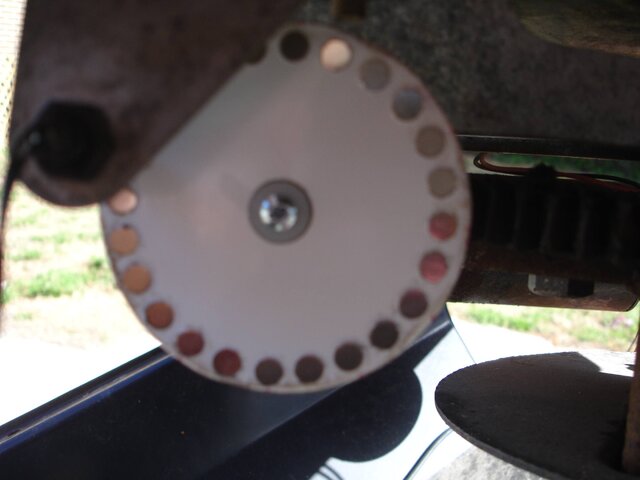
- the spacing between the magnets... which is determined by the wheel diameter....
- and the sensitivity of the reed switch,
...all are determining factors in proper spacing.
Oh, and if the circle of magnets is not concentric with the shaft, that's a bug, too!

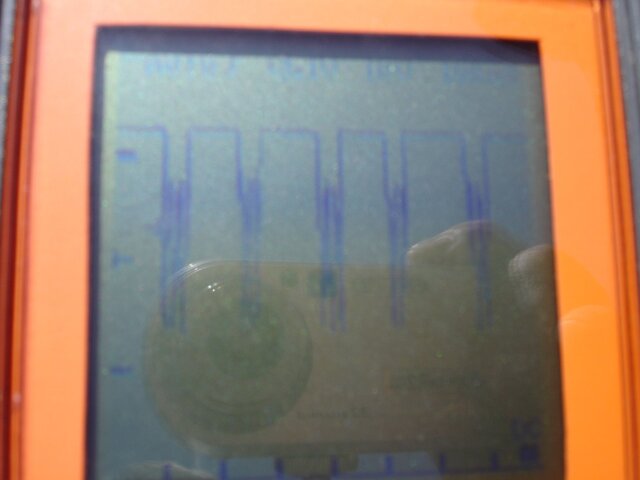
I'd shoot for a square wave with the drive motor hauling ... across the arc.

When Linuxman got his first conversion kit, it had some molded magnetic disc.
I think it had alternating layers built into it, not discrete magnets.
That one needed a spacing to the reed of about a business card, if I recall.
I'm guessing they were relatively weaker...?

When I shopped for magnets, I got seriously strong rare-earth devices, but very tiny.
Also, when I shopped for the reeds, they had listed various sensitivity for otherwise identical switches.
I took a conservative guess. :)

How you align the reed to the magnet affects range sensitivity, too.
Maybe even which end you use...?
 
Don't discount the importance, also of grounding the shield wire in the sensor cabling for accurate reporting back to the receiver of the counts. Noise can build up on that cable and be interpreted very oddly by your receiver. I know I have an extreme case, but my dish is installed at an AM radio station with above ground wiring and it made a world of difference to ground that shield. Some installers don't do this because its not "necessary"....but with Birdview, we always did it back in the 80's. It's like tracing down audio "hum" in circuits with ground loop issues.

Also of course depends on your choice of cables.......
 
Status
Please reply by conversation.

Users Who Are Viewing This Thread (Total: 0, Members: 0, Guests: 0)

Who Read This Thread (Total Members: 1)