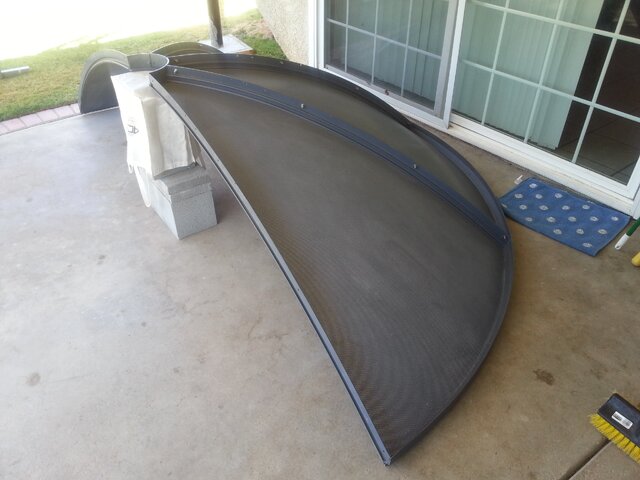
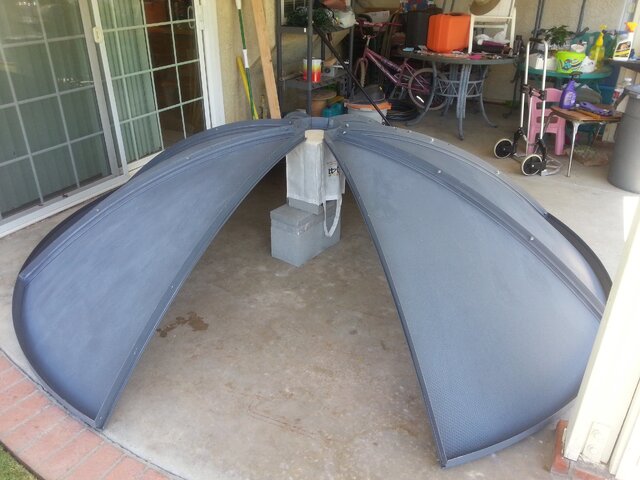
I thought I'd start a new thread to track the installation of my 10' Winegard Pinnacle. I've got 4 panels cleaned and de-dinged. I might dig a little on my hole later on this evening when it gets cool. My new actuator arrived today (24" powermax). Now I don't know anything about actuators, but this one looks to be "light duty" for something like my BUD. Maybe it's ok, but I already have reservations about using it. I think I'm gonna turn my attention to cleaning up the 24" Von Wise actuator that came with the BUD. The Von Wise is built like a tank. I tested it and it works great. I'm gonna clean it up and paint it. I'd have no reservations about it's ability to get the job done. I wonder if I can still get parts for it. I could use a new swivel mounting bracket and swivel end for it. I got my new polarization controller from Rick's satellite today. I have been warned that it causes allot of insertion loss. It's probably not the device, it's most likely that splitter/combiner that they're using with it. It should have been designed to have been mounted "inline" (just my opinion). Anyway when I get it hooked up and working I'll report back on that issue. Any comments you have would be appreciated!

Quest for C-Band (10' Winegard Pinnacle)
- Thread starter KJ6EO
- Start date
- Latest activity Latest activity:
- Replies 60
- Views 11K
You are using an out of date browser. It may not display this or other websites correctly.
You should upgrade or use an alternative browser.
You should upgrade or use an alternative browser.
SatelliteGuys Fund Raiser
100%
- Total amount
- $905.00
- Goal
- $350.00
Donation ends:
- Status
- Please reply by conversation.
the PMA24 actuator will not even come close to running that dish. I wore one out in a short time with a way lighter dish. The VonWeis I replaced it with is great. Very strong and almost silent operation ") I'm curious to see how you make out with that polarity control. I have a Corotor with a nice set of LNBs I would like to see back in use some day.
I'm curious to see how you make out with that polarity control. I have a Corotor with a nice set of LNBs I would like to see back in use some day.
I'm curious to see how you make out with that polarity control. I have a Corotor with a nice set of LNBs I would like to see back in use some day.""The Von Weise is built like a tank"" Mine is 20+ yrs pushing the USS Steel Bud about. Pretty sure parts are still available. I SHOULD put a new nut in mine, as the end play is getting to be borderline annoying, especially on Ku (lip mounted 30 inch)
Been saving these for the occasion. http://www.satelliteguys.us/threads...CTUATORS-is-Best-for-a-12-Ft-Dish#post1373673 and ?http://www.satelliteguys.us/threads/228286-Von-Weise-Actuator-Nut-Repair?highlight=actuator+nut
Been saving these for the occasion. http://www.satelliteguys.us/threads...CTUATORS-is-Best-for-a-12-Ft-Dish#post1373673 and ?http://www.satelliteguys.us/threads/228286-Von-Weise-Actuator-Nut-Repair?highlight=actuator+nut
swivel (Rod)end
Swivel clamp? dunno, but I may have one. somewhere???
If they are sensing the LNB voltage on the coax, and if 2 much loss, I'd be tempted** to make it sense the polarity voltage before it's introduced to the coax. Rewire the LNBF voltage introduction to something around 20 volts(something that's available in the receiver, LNBF voltage source before 'switching???) Maybe a panel jack for the inserter supply??
Then there's no need for anything 'inline' with the LNB's except the receiver. Maybe put a switch in there to easily 'go back' to standard LNBF usage???
**My Openbox S9 is WAY out of warranty. Thinking in the SSO's would be simple to do at the LNBF fuse. Should be similar with other boxes I would think.
Just thought of something. DISEQC, USALS, and 22 Khz may be disabled by this. Something else to 'fix'. A cap to pass the 22Khz??
I have one of these that I saved from being destoyed - - - I'm all the way in VA - - - but if you need something I might be able to get it to you somehow. Mine is a button-hook but that part is damaged. The rest of the dish is in good shape.
Send a pix or detailed description and I will send back a picture of what I have.
Send a pix or detailed description and I will send back a picture of what I have.
PLEASE LOG IN TO GET RID OF THESE ADS!
Latest Update!
Thanks for your replies ... they are appreciated. Latest news is that my hole is dug and my pipe has been delivered. I used a big steel bar to break up the dirt then removed it with a post hole digger. Once the hole got down around 4', I used my Rigid shop vac to suck up the dirt I couldn't get out with the post hole digger. Most likely I'll mix and pour the concrete tomorrow afternoon late. I'll let the concrete dry for about 7 days then mount the BUD. The finished hole size is 16" x 16" x 4 1/2".
On another subject (The Polarity Control from Rick's Satellite). I decided to hook it up on my MicroHD to see if there was any insertion loss. I did my testing on a weak transponder. I saw something like 10-15% signal loss. This wasn't being caused by the APC, it was being caused by the splitter/combiner that was supplied to be used with the APC. I went into the garage and got one of my old "Gold Series" Radio Shack splitter/combiners. Hooked it up in the place of the one supplied by Ricks and WA LA ... no signal loss. Since I can't receive any C-Band signals yet, I have no way to test it C-Band wise. I'll get back to you on that one. I only saw the signal loss on weak transponders. I didn't see any loss on strong transponders.
Did you make your hole slightly bell shaped like I mentioned should be done? The bottom NEEDS to be "belled-out", if you want to do a proper job of it.
Also, do not forget to drill a hole completely through the pole about 18-24" up from the bottom, and put some "all-thread" through it. This gets buried in the cement, and keeps the pole from turning due to wind load. Do not skip this step! That's also part of the reason why your hole shouldn't be a perfect cylinder, as the entire pole and cement can start spinning in a proper wind...
Also, do not forget to drill a hole completely through the pole about 18-24" up from the bottom, and put some "all-thread" through it. This gets buried in the cement, and keeps the pole from turning due to wind load. Do not skip this step! That's also part of the reason why your hole shouldn't be a perfect cylinder, as the entire pole and cement can start spinning in a proper wind...
From what I understand here (I don't have that type polarity controller, I just heard about it recently), The issue is low voltage to the lnbs causing the signal loss. I am presently using an old 4dtv receiver to aim the dish and control polarity (might be a good choice for you too until you get that dish peaked). According to Ricks ad, a power inserter is the answer. There were no specifics mentioned but I am sure you will get the support you need from him.
I am sure the issue differs depending on what receiver you are using. I know the dishpro switch 44 required a power inserter because the dish pro receivers couldn't power all those lnbfs and operate a switch too. I've heard norsat lnbs work very well on 13 volts (I think 20 volts is desired) but I don't know about the calamp's appetite for power.
You will see quickly in this hobby, that to get the gold you have to spend the gold ( or wheel and deal like a sombi**h). There are no shortcuts.
Last edited:
Latest Update!
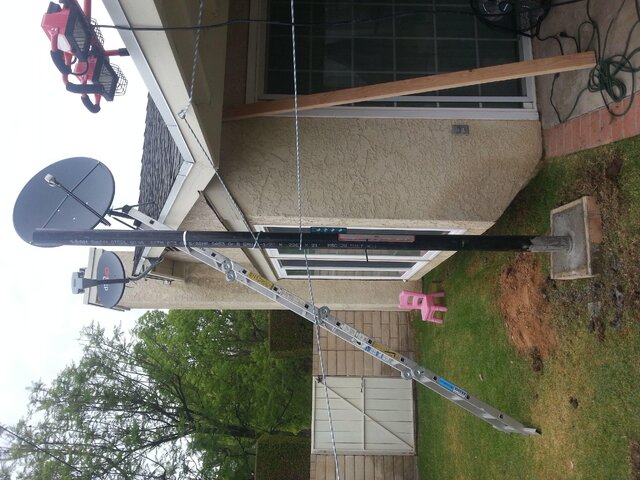
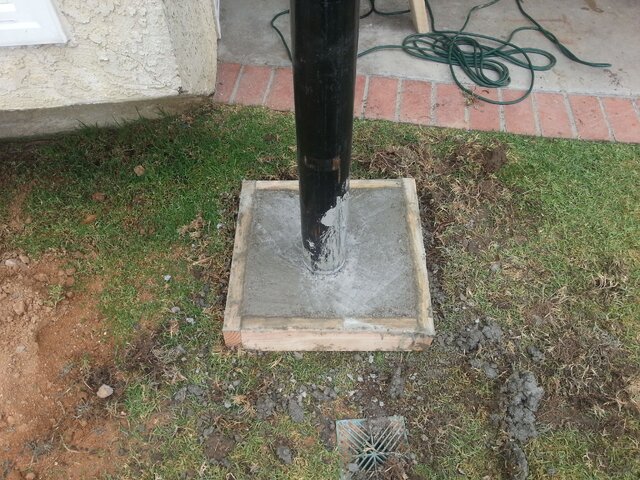
My pole has been installed! I don't have time to upload the pictures right now (but I did take some) to be uploaded later. The hole was 16"x 16"x 54" deep. The hole was bell shaped as suggested being larger at the bottom. There is 5" of pea gravel in the bottom of the hole with a patio paver laid on top of that. It took 12 60# bags of quickcrete to fill the hole. Initially the concrete was poured in with a shovel to keep the bottom of the pipe from moving. Once we had several bags in the bottom of the hole we then poured in the rest with a wheel barrow. I tied the pipe off with ropes to keep it plumb. I had levels on the pipe as we did the work to insure that it didn't move. This is all for now. I got allot of mess to clean up outside . The piece of 1/2" threaded rod was installed through the pipe 16" up from the bottom.
My pole has been installed! I don't have time to upload the pictures right now (but I did take some) to be uploaded later. The hole was 16"x 16"x 54" deep. The hole was bell shaped as suggested being larger at the bottom. There is 5" of pea gravel in the bottom of the hole with a patio paver laid on top of that. It took 12 60# bags of quickcrete to fill the hole. Initially the concrete was poured in with a shovel to keep the bottom of the pipe from moving. Once we had several bags in the bottom of the hole we then poured in the rest with a wheel barrow. I tied the pipe off with ropes to keep it plumb. I had levels on the pipe as we did the work to insure that it didn't move. This is all for now. I got allot of mess to clean up outside
. The piece of 1/2" threaded rod was installed through the pipe 16" up from the bottom.Did you check the level at the TOP of the pole, where the polar mount will be installed?
It's possible to have it level above ground where you are standing and checking for level, and to be off at the top a bit.
It only takes 1/16" inch to cause issues. More so if you also plan on using it for KU. IF the top of the pipe is slightly off level, you can shim the polar mount level, but it's a bitch to do that, and to be avoided if at all possible.
PLEASE LOG IN TO GET RID OF THESE ADS!
Did you check the level at the TOP of the pole, where the polar mount will be installed?
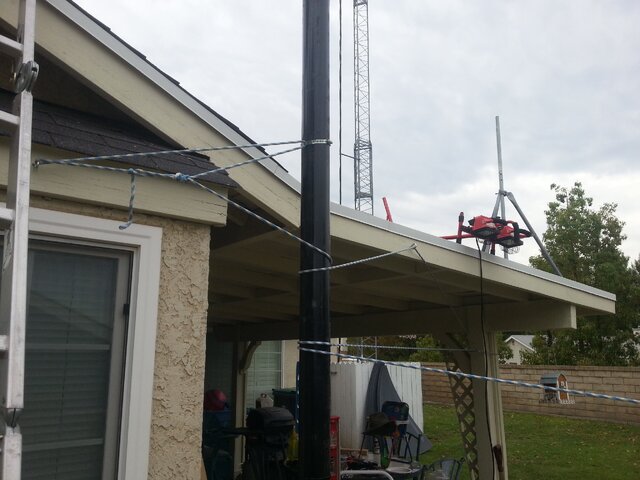
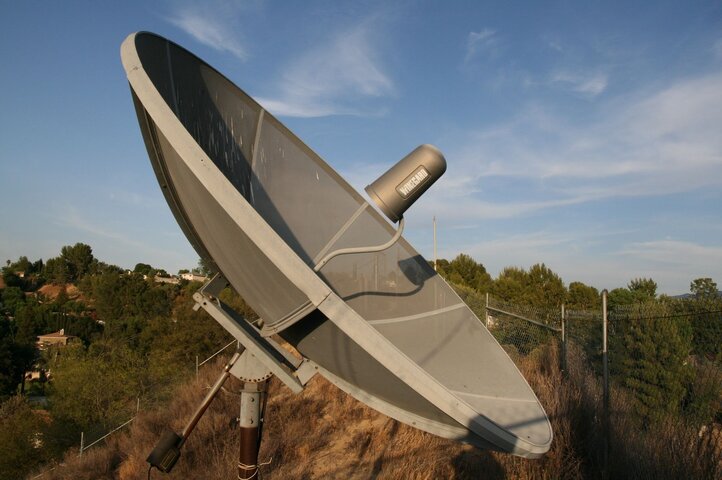
Yes I did ... it's perfectly plum. Now that the pole is in, it's possible that it might be too short. I'm gonna install the Polar Mount and put together the bottom sections of the reflector and mount them. I'll move the mount back and forth by hand to see if I'm gonna run into the patio roof. Due to the interference of nearby mountains, about the farthest East I can go is 60W. I'll attach a few pictures. I supplied a picture of the original dish elevation so you can see that it's tipped back a good amount at the center of the arc (34N here)
Attachments
You will need to bracket the post to the house. Too tall to be free standing. It will be swaying like a drunk sailor with a medium wind.
You've changed your mind several times, and I'm lost on exactly how tall the pole is from the ground.
Last I remember, you were using 3" schedule 40, which is 3.5 OD.
Is that correct?
?
I took down a dish & heavy HH mount on such a pole.
It was 9-10' feet free standing just fine.
Not sure how high your patio roof is.
If your pole is too tall for free standing, get some structural advice before attaching to the house.
..?or especially to the patio roof!
?Edit: if your pole is larger, I suspect it's just fine, unsupported.
But then, I don't have a lot of wind down here...
.
?You've changed your mind several times, and I'm lost on exactly how tall the pole is from the ground.
Last I remember, you were using 3" schedule 40, which is 3.5 OD.
Is that correct?
Master 0B1Anole ... Good Morning! The pole is 10' 9" from the ground. The top of the patio roof near where the pole is 8' 9"
tall. The pole is 3 1/2" schedule 40, which is 4.0 OD. Here in Santa Clarita, we don't get allot of windy days. If wind becomes
a problem, I can buy a commercial eve bracket to secure the pole to the patio or the roof. My original calculations put the bottom
of the BUD 6" above the patio roof at it's furthest E position (i.e 60W). I intentionally kept the BUD as close to the top of the roof
as possible. I did this for two reasons, (1) so that it's within reach to work on, (2) so that it doesn't become so noticeable when
the Neighbors look in this direction. We don't have any HOA's here. However, with a 60' tower and large HF Yagi's here already,
I'm not popular in the Neighborhood. I've still got maintenance to do on the Polar Mount, and a couple more panels to clean. My
wife is on vacation starting tomorrow and she'll want to go everywhere. So, I doubt that I'll make much progress on the BUD this
week! In October if my FM Radio Station Application is approved, I'll have to squeeze in a few more antennas
.
Polar Mount, Working on Von Weise Actuator!
The Polar Mount for my BUD is sitting on top of the pole. I'm also working on the Von Weise Acuator. I've cleaned it up and painted it with Rustoleum Hammered Grey. As soon as it's dry, I'll install it on the Polar Mount. I've got to figure out the easiest way to mount the reflector on the Polar Mount. I'll post details as soon as I have some additional information!
The Polar Mount for my BUD is sitting on top of the pole. I'm also working on the Von Weise Acuator. I've cleaned it up and painted it with Rustoleum Hammered Grey. As soon as it's dry, I'll install it on the Polar Mount. I've got to figure out the easiest way to mount the reflector on the Polar Mount. I'll post details as soon as I have some additional information!
The easiest way is to bolt the dish to the polar mount first, and then put the whole thing on the pole. Doing the mount first, then the dish isn't easy with a tall pole, and you'll most likely damage or distort the dish permanently trying it.
If you still insist on doing it that way, put the polar mounts elevation bolt so the mount points straight UP, like if you were at the equator or you were going to use it for a giant bird-bath.
Then, you with at least two-three friends (because of the height they lift and hold the dish steady and put it on the mount) while you bolt it all together while on a ladder or standing on the roof. Once it's on and bolted, you can raise the elevation to where it should be.
It's just much easier to do and to control if dish and mount are bolted together and put on the pole all at once... It's a horrible thing to watch a dish fall and crash to the ground while you are doing the above.
The way we did it was polar mount on the dish. without the actuator. With it swung all the way to one side. (sorta parallel to the dish) Position it so the mount opening is facing down. Then slide it up the pole and place it on. Think a gin pole would be advisable and make it a safe, easy, install with it that tall.
This polar mount is extremely heavy. I don't know if we'll be able to handle the reflector with it bolted on. I like the idea of pointing the mount straight up (like all the dishes you see in Panama City, Panama). I do understand that the reflector is fragile, we'll be very careful with it. I'm calling in two other guys to help me so we'll have enough muscle to get the job done. The last thing I want is to have an accident due to poor planning or haste. I have an actuator question. I refurbished the Von Weise. Using a power supply I ran it out to half of it's travel. That put the PM all the way to as far West as it could go. I can see that to go from H to H it's going to take far less travel than the 24" the Von Weise is capable of. Whats the proper way to set up the actuator before even connecting it to the V-Box? Although I haven't tried it, I would assume that with the actuator fully retracted the PM would be close to it's furthest East position. Some suggestions would be appreciated to insure that I get the actuator installed correctly. I read the manual on the V-Box so I know that I can set software limits after I hook up the actuator to the V-Box.
Whichever side you put the actuator, retract it fully then drive it out just a little, and adjust it in the pole side clamp to get as far in that direction you need(plus a little bit). Then extend it until it's as far in the other direction you need(plus a little bit) OR: slightly less than the point where the polar mount will 'flop over [actuator arm gets too close to the polar axis].
Remove the back cover and set the mechanical limit switch to be just actuated. (You may have to open it to extend it to your needs, it may have been adjusted short of your needs when used on domestic only satellites, subscription, BITD)
Replace back cover and go satellite hunting.
Don't rely on only software limits in the mover. They do fail. A stuck relay and damage is the result.
PLEASE LOG IN TO GET RID OF THESE ADS!
- Status
- Please reply by conversation.
Similar threads
- Replies
- 9
- Views
- 705

- Replies
- 19
- Views
- 831
- Replies
- 8
- Views
- 2K
- Replies
- 16
- Views
- 2K

Users Who Are Viewing This Thread (Total: 1, Members: 0, Guests: 1)
Who Read This Thread (Total Members: 4)
Latest posts
-
-

-
TYou Can Dial Back the Prominence of Liquid Glass in iOS 27
- Latest: TWiT Tech Podcast Network