That looks like a little less concrete than the 10' pole I removed recently with an engine hoist. I just left all the concrete on the pole when I set it, and poured some around/over the existing stuff when I set it in its new place

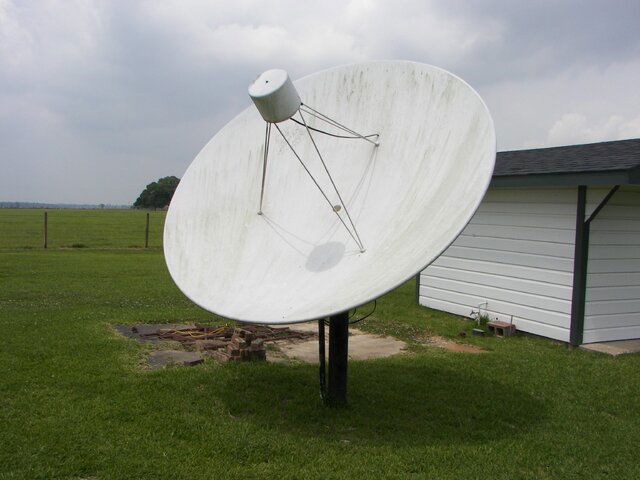
Odd looking dish.
- Thread starter swampman
- Start date
- Latest activity Latest activity:
- Replies 100
- Views 11K
You are using an out of date browser. It may not display this or other websites correctly.
You should upgrade or use an alternative browser.
You should upgrade or use an alternative browser.
- Status
- Please reply by conversation.
Yeah thats what I was thinking. Dig the hole about 4-5 inches bigger than the existing concrete. Should hold it in place. ")
I think to be extra diligent, use a hammer drill and masonry bit, and drill at least 2 and preferably 4 holes into the existing concrete and insert bolts or re-bar into them so that the new concrete has something besides the surface of the old to hold onto.
Fred
Fred
What I would do, is use my 12 lb. sledge hammer (and cold chisel, if needed) and bust the concrete off the pole. Then use the busted pieces in the "New Batch of Concrete". But that's just me..... and what I would do.
Al
Al
Good points guys. Although that step is a little down the road as I will need to move a small building out of the way first. Fred in a previous post you mentioned to remove the mount I will need to unscrew the big bolt on top of cap(just bought a socket) then the three smaller ones on the side? Because I dont think it will come off without removing top bolt. I tried swiveling the mount after removing the 3 side ones and nothing happened.
PLEASE LOG IN TO GET RID OF THESE ADS!
Hey Swampman,
That is correct.
The top bolt screws down into one of the pieces of steel welded on the inside that serves a dual purpose. It keeps the cap on straight if using the OEM pole, which you are planning, and it also servers as a real piece of steel to tighten up the side bolts without crushing the tube.
It is imperative that the pole/mast be plumb!!!
Fred
Well its plumb alright...plumb hard to get off!Hey Swampman,
That is correct.
The top bolt screws down into one of the pieces of steel welded on the inside that serves a dual purpose. It keeps the cap on straight if using the OEM pole, which you are planning, and it also servers as a real piece of steel to tighten up the side bolts without crushing the tube.
It is imperative that the pole/mast be plumb!!!
Fred
Couldnt budge it with the socket...even hitting the socket wrench with a hammer. Gonna spray more WD40 around the head. If that doesnt work, I'll try an impact wrench. But that mount WILL find a new home! I may just remove the bolt holding the mount to the 2 parallel flanges then I should be able to easily reach the cap bolt.I did remove the dish and brought it home however. Not without stripping one of the 12 bolts as I was unscrewing them. Tried different things...nothing. Had to bring my little portable power generator and a hand grinder(no electricity close by) to grind the bolt head down. Will get a replacement bolt when the time comes.
I figure, 1 out of 12 isnt bad.
I did remove the dish and brought it home however. Not without stripping one of the 12 bolts as I was unscrewing them. Tried different things...nothing. Had to bring my little portable power generator and a hand grinder(no electricity close by) to grind the bolt head down. Will get a replacement bolt when the time comes.
I figure, 1 out of 12 isnt bad.
If that is all that got damaged the dish will be fine. You can play with what is left of the bolt at home.
As far as the cap bolt, I just used a long breaker bar and socket on mine, but that was after we cut the pole off at ground level. I wasn't going to use the orignal mast. Mine is on a non-penetrating roof mount.
The impact route might be the best way to go with it. I would think that if you can sping the mount on top of the pole, you could get a cheater pipe or something and break it loose.
Fred
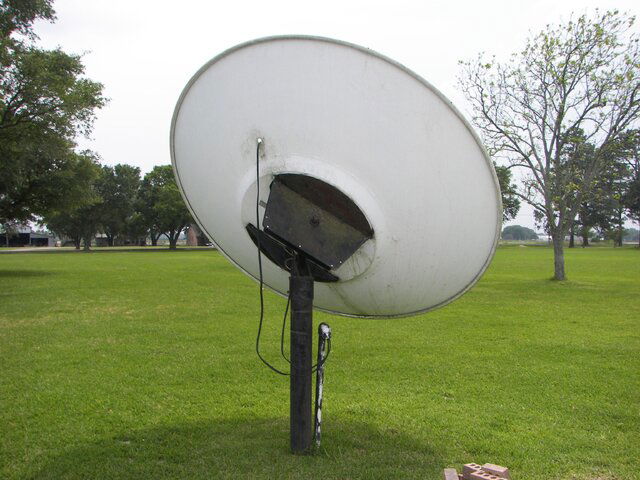
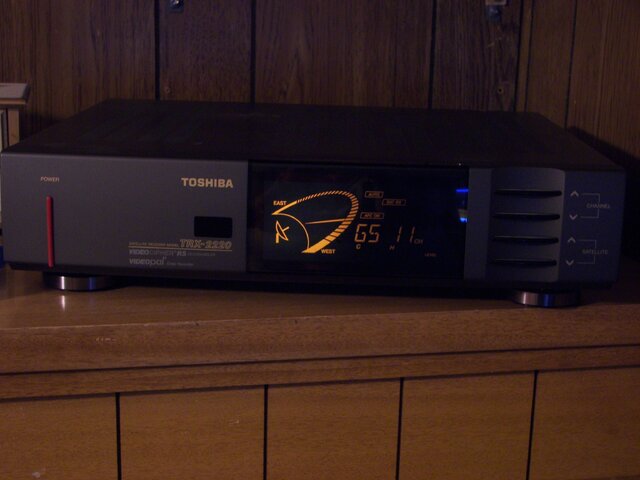
OK, so yesterday I brought the dish home. Today I have the mount home. Wow! That impact wrench worked beautifully one the cross bolt holding the mount to the two flanges! Now just the post left. Going to haul my tractor w/ front end loader to extract the post tomorrow. Thats a 14 mile haul from where the tractor is located at my Dad's house. Ahhh... but wait! Now something interesting has presented itself. Today about 1/2 mile from where the tractor is... another Birdview! And yet another solid. But this one is actually in better condition than the one I brought home already(and at least it has the feedhorn cover) ") Already talked to the lady living there and she said "sure take it". Actually I sorta know this lady , as she and my Dad use to work at the same place years ago. I asked her if she had the old receiver(I was gonna use my Coolsat and maybe a v-box to move it) so the receiver wasn't THAT important. She said it wasnt the original because it stopped working, but that "some people brought this one as a replacement." What I think is a very cool old Toshiba TRX 2220. Pics are below.
Already talked to the lady living there and she said "sure take it". Actually I sorta know this lady , as she and my Dad use to work at the same place years ago. I asked her if she had the old receiver(I was gonna use my Coolsat and maybe a v-box to move it) so the receiver wasn't THAT important. She said it wasnt the original because it stopped working, but that "some people brought this one as a replacement." What I think is a very cool old Toshiba TRX 2220. Pics are below.
It was a good day.
Already talked to the lady living there and she said "sure take it". Actually I sorta know this lady , as she and my Dad use to work at the same place years ago. I asked her if she had the old receiver(I was gonna use my Coolsat and maybe a v-box to move it) so the receiver wasn't THAT important. She said it wasnt the original because it stopped working, but that "some people brought this one as a replacement." What I think is a very cool old Toshiba TRX 2220. Pics are below.It was a good day.
Attachments
Very Cool!! 
Man you must be in Birdview heaven.
I may have to drive down to see my in-laws in a semi and come and visit you.
Fred
Man you must be in Birdview heaven.
I may have to drive down to see my in-laws in a semi and come and visit you.
Fred
PLEASE LOG IN TO GET RID OF THESE ADS!
LOL. It seems the solids were predominant down here at the time. The Lady said they bought it from the same furniture store where I worked that I mentioned in my earlier post. Man the receiver looks brand new! I just dont think the feedhorn will be setup for the corotor II like the other dish is. But can always swap it out later.
Post the pictures!!!
Can't get enough pictures of those guys.
I need to find one more to take the place of the solid I found that is going to take a year to get, and even when I get permission will be a bear to take down.
I need a spare, just because I want one, and I would like to find one to replace the dish on the 4DTV.
Fred
I didn't see the pics when I read that post.
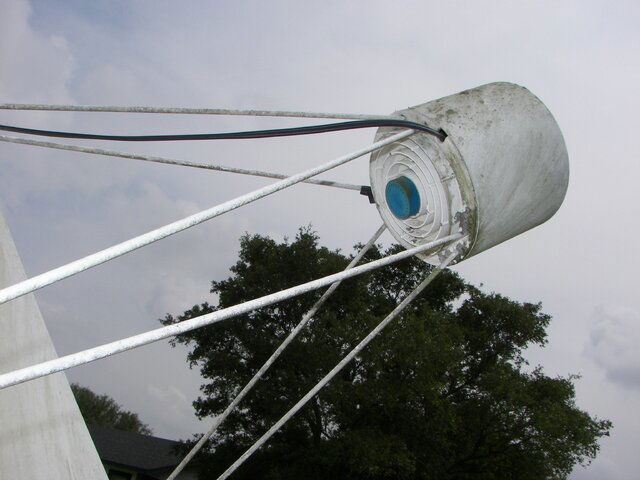
I think you lucked out again on the Co-rotor business. The third picture shows some silicone around the cap. Also the cap is Chaparral blue and is set at about the right F/D ratio. The original Birdview center didn't have a cap on it. At least mine didn't because there was nothing move-able inside.
The scalar is the original, but the center looks like it has been retro-fitted. It would also make sense with the receiver you got. The Toshiba wouldn't have worked with the original feed-horn/LNA.
Fred
It would also make sense with the receiver you got. The Toshiba wouldn't have worked with the original feed-horn/LNA.
Thats true Fred. Seems a bit unusual the these 2 dishes coming from the same retailer, would be retrofitted. Coincidence? Maybe it was something the retailer/installer did on all dishes they setup?
PLEASE LOG IN TO GET RID OF THESE ADS!
That is a distinct possibility.
As time went by, and they needed the VC-II technology to get more channels, the dealer probably went to all his customers and offered a "deal" to bring everyone up to speed.
Makes good business sense.
Fred
As time went by, and they needed the VC-II technology to get more channels, the dealer probably went to all his customers and offered a "deal" to bring everyone up to speed.
Makes good business sense.
Fred
great find i think that the toshiba 2220 is their top of the line IRD , should be a great unit. built-in timers ect , in its hay day was probably some bux involved. probably close/or better than the General Instruments 650i in performance , bells & whistles.
great find i think that the toshiba 2220 is their top of the line IRD , should be a great unit. built-in timers ect , in its hay day was probably some bux involved. probably close/or better than the General Instruments 650i in performance , bells & whistles.
From what I've been reading, it was a good one
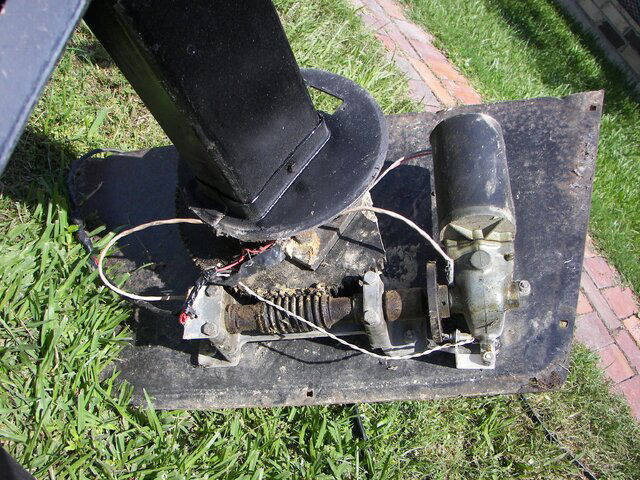
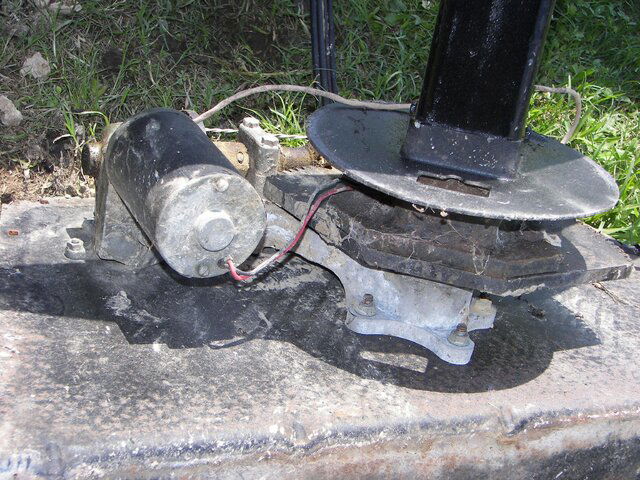
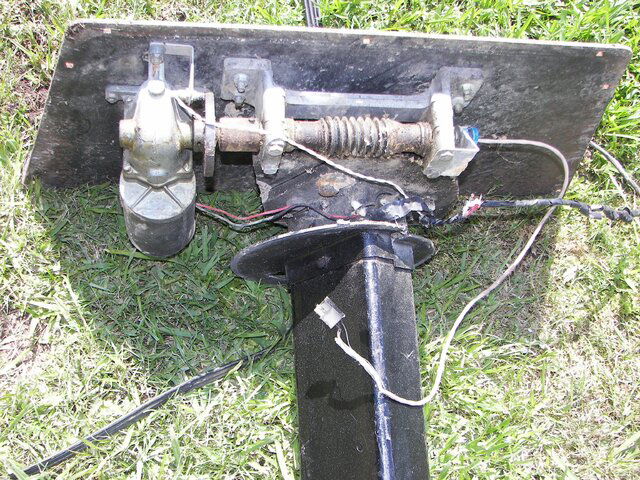
OK I finally had the time to look inside the mount. Without really knowing what it looks like, maybe someone can tell if the reed senser is installed. Had to do alot of cleaning as there were quite a few Dirt Dobler nests inside. Maybe someone has a photo of their reed sensor conversion. Here are some pics of inside the mount. In photo 3 there is a wire with a plug on the end. Can't seem to see what that would plug into?
Here are some pics of inside the mount. In photo 3 there is a wire with a plug on the end. Can't seem to see what that would plug into?Attachments
Hey Swampman,
The sensor is installed. The little carbon wheel over near the motor with the sensor hanging on the bracket with twin white wires running from it is the sensor and pulse counter.
The little blue thing on the opposite end where the wire is disconnected is the old potentiometer. I took mine off.
I would clean up the magnet wheel and the sensor so there is no grease or oil on them.
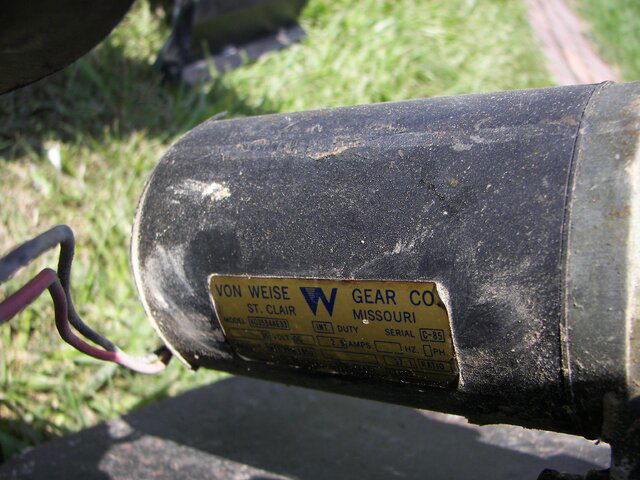
Couldn't see enough of the motor label to see the gear ratio. It is on the next line or so that is too dark to read.
I'll probably be 37:1 or 70:1. The lower number is faster, but the higher number is more accurate.
Clean everything up, put on new grease, and everything should work fine.
On mine, I knocked out the little pin that you see in the second picture if you look just over the motor and on the left side of the bearing housing and drilled it out to 5/16" and put a bolt through to eliminate slop.
You may or may not have to do that on yours. It will depend on which gear ratio you have.
Looks good!!!
Fred
The sensor is installed. The little carbon wheel over near the motor with the sensor hanging on the bracket with twin white wires running from it is the sensor and pulse counter.
The little blue thing on the opposite end where the wire is disconnected is the old potentiometer. I took mine off.
I would clean up the magnet wheel and the sensor so there is no grease or oil on them.
Couldn't see enough of the motor label to see the gear ratio. It is on the next line or so that is too dark to read.
I'll probably be 37:1 or 70:1. The lower number is faster, but the higher number is more accurate.
Clean everything up, put on new grease, and everything should work fine.
On mine, I knocked out the little pin that you see in the second picture if you look just over the motor and on the left side of the bearing housing and drilled it out to 5/16" and put a bolt through to eliminate slop.
You may or may not have to do that on yours. It will depend on which gear ratio you have.
Looks good!!!
Fred
PLEASE LOG IN TO GET RID OF THESE ADS!
- Status
- Please reply by conversation.
Similar threads
- Replies
- 8
- Views
- 1K
- Replies
- 6
- Views
- 1K
- Replies
- 12
- Views
- 1K
- Replies
- 37
- Views
- 4K

- Replies
- 27
- Views
- 3K