Phlat's Birdview Install

Status
Please reply by conversation.

phlatwound

SatelliteGuys Pro
Original poster
Lifetime Supporter
Dec 25, 2007
3,326
376
Goosapeak Junction
This thread is to document my process/progress as I go about installing a Birdview Model AP 2028, 8'-6" solid satellite dish, on our farm is SW Missouri, U.S.A.

Comments, suggestions (and help digging the pole hole through about 4' of Ozarks roots, rock and clay) are welcomed. :)

I'm hoping to have the pole concreted in by the first of the year, we'll see how that goes. :rolleyes:

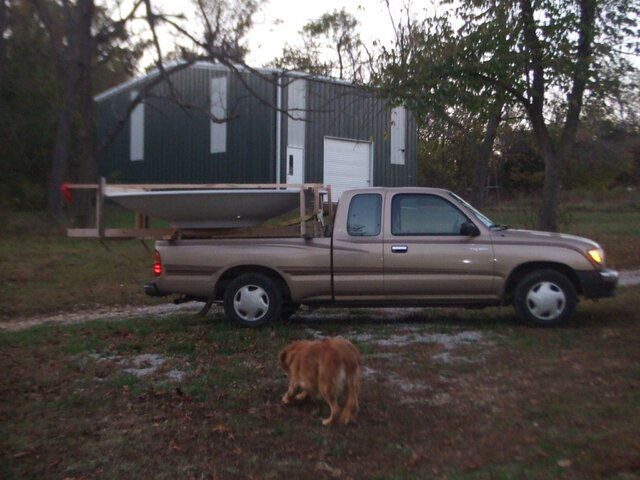
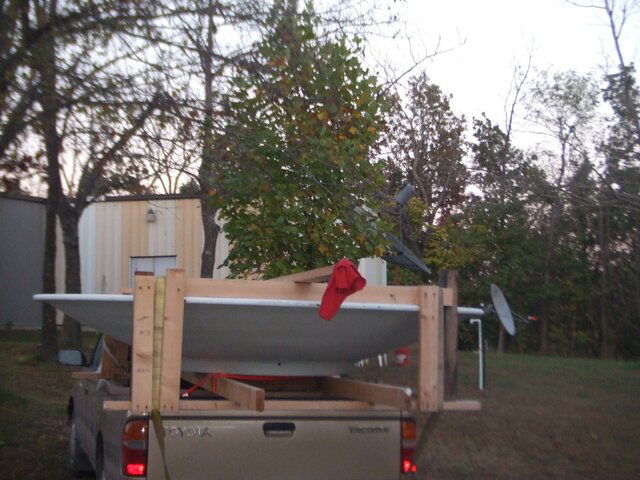
Here's the dish as it appeared upon arrival after a road trip from Linuxman's abode:
 

Attachments

  • Sat Birdview Home Champ.JPG
    Sat Birdview Home Champ.JPG
    470.8 KB · Views: 414
  • Sat Birdview Home back.JPG
    Sat Birdview Home back.JPG
    502.6 KB · Views: 324
Here's the pole setup I am planning on using. The factory Birdview pole is a 6" O.D. thinwall tubing, it fits perfectly into this piece of 6" pipe I found in my boneyard (I think it the pipe is Schedule 40). :)

Total length is about 12', I'm planning on about 4' in the ground and 7'-8' above.

Linuxman had done some modification to adapt the factory tube for use with a NRPM, so I cut one end of the factory tube off to get it into my piece of pipe.

The other end has the thread boss (on a round plate welded to the inside of the tube) for the bolt that goes down through the mount cap, and that is what holds the mount to the pole.

Anyone that gets one of these dishes needs to get at least a foot or 2 of the factory mount tube with it, you may be able to fabricate something that will work but it will save a lot of headache.
 

Attachments

  • Sat Birdview Pipe and Tube.JPG
    Sat Birdview Pipe and Tube.JPG
    164.6 KB · Views: 289
  • Sat Birdview Tube Cutoff2.JPG
    Sat Birdview Tube Cutoff2.JPG
    121.4 KB · Views: 298
I don't think you need 4 feet of footing If you can figure a way to fill that 6 inch mast with concrete, I think you can do it with 2 or 3 feet.
 
Here's some pics of the H-H mount, worm drive and sensor. I guess this one has been converted to a magnet wheel/reed sensor sometime in the past, as I think the factory method was some sort of potentiometer setup.

I am planning on fabricating a larger magnet wheel with more magnets, to increase the counting accuracy and facilitate more precise aiming of the dish.
 

Attachments

  • Sat Birdview Shaft Clearance small end.JPG
    Sat Birdview Shaft Clearance small end.JPG
    103.2 KB · Views: 291
  • Sat Birdview Shaft Clearance2.JPG
    Sat Birdview Shaft Clearance2.JPG
    117.2 KB · Views: 294
  • Sat Birdview Shaft Clearance.JPG
    Sat Birdview Shaft Clearance.JPG
    118.8 KB · Views: 302
  • Sat Birdview H-H Mount right.JPG
    Sat Birdview H-H Mount right.JPG
    127.6 KB · Views: 324
  • Sat Birdview H-H Mount left.JPG
    Sat Birdview H-H Mount left.JPG
    134.3 KB · Views: 339
I don't think you need 4 feet of footing If you can figure a way to fill that 6 inch mast with concrete, I think you can do it with 2 or 3 feet.

Ah, my first "excavation engineering" volunteer! ;)

My plan was a basically round hole, approximately 16"-18" in diameter, and 4' deep.

I would consider filling the pipe with concrete but just wouldn't be comfortable with much less than 4' in the ground. We are in tornado alley around here and I'd hate to skimp on the pole. :)
 
Most of these dishes went up 20-30 years ago, and it's very possible that you'll break off a bolt or 2 when you go to remove them from the mount.

I removed 2 broken bolts from the back of this dish, just took a center punch and punched the approximate center of the broken bolt, and drilled them out. I broke a drill bit off in one of them and had to drill a series of 1/8" holes around the broken bit and it worked.

I will probably have to go a little oversize with my new threads, I think the factory threads are 3/8", I will probably go with 1/2"-13 N.C. It looks like there is enough meat in the steel bosses that are in the dish, to allow this larger diameter thread size.
 

Attachments

  • Sat Birdview New Holes.JPG
    Sat Birdview New Holes.JPG
    33.4 KB · Views: 290
Last edited:
I'm in a windy canyon so I relate in part. I am handling the whole wind issue a little differently. I didn't honk down much on the big top bolt, nor did I tighten the square set screws hard. I did mark the location whare the mount and mast go together. I basically decided that, If it's prone to move in the wind, I'd rather have itpivot around the mast rather than twisting the mast or damaging the dish.

I figure, after the wind stops, I can always go back to the dish and line the marks back up and tighten.

Still, I've had some serious wind (40 maybe 50 mph) and it hasn't moved.

I filled my inner mast with concrete and a rebar. I cut a little port near the top of the Birdview mast and after I slipped it over my inner mast and plumbed it, I worked concrete in there until it filled up.

I think you'd do better with a shallower hole that is wider than 18" - leverage and all

I can't make it to middle America. Sorry.

Definitely a good idea to mark your pole, and I'm cool with not super-tightening the bolts also, that makes sense. I'd rather the dish moved on the mount before it really tore something up. I changed out those old square head bolts with hex heads, looks better.

One thing about digging around here, in (most) spots it can be almost solid rock, it's always at least 75% rock, very little topsoil, and what subsoil there is consists of very heavy clay....it will be a "blast" to dig.
 
Make that pole as strong as possible. You'll never have to worry about it when a bad storm hits.

Back 20 years ago, we put my dish post in the ground 4' and back filled it with concrete. Still good today. I like to make things stronger than probably necessary.
 
Sometimes you can "stretch" the hole left or right to clear the bigger rocks. For solid rock, good luck. Drill a couple of holes at the bottom of the post for rebar "anti-twist" pins. I've had good luck doing the digging with a tile spade and fishing out the loose dirt with a post hole digger. Very fast. You can locate the rocks by braille that way, and running a post hole digger as intended is young man's work.

Linuxman sure hooked you up with a great find!

The gearbox looks great, if the motor brushes don't fail it should last forever! Once it's setup, count the pulses per degreee, you may be ok.

Try a helicoil insert for the oversized hole, will get you back to 3/8". Where strength is not critical, spend the extra couple of bucks on stainless steel fasteners, and use a little antiseize on the assembly.
 
Make that pole as strong as possible. You'll never have to worry about it when a bad storm hits.

Back 20 years ago, we put my dish post in the ground 4' and back filled it with concrete. Still good today. I like to make things stronger than probably necessary.

Will do, Corrado. I've not regretted doing the same on the pole my old mesh BUD is on.....4' in the ground, dead plumb and it hasn't even needed minor tweaking in the 15 years it's been up. :cool:
 
Sometimes you can "stretch" the hole left or right to clear the bigger rocks. For solid rock, good luck. Drill a couple of holes at the bottom of the post for rebar "anti-twist" pins. I've had good luck doing the digging with a tile spade and fishing out the loose dirt with a post hole digger. Very fast. You can locate the rocks by braille that way, and running a post hole digger as intended is young man's work.

Linuxman sure hooked you up with a great find!

The gearbox looks great, if the motor brushes don't fail it should last forever! Once it's setup, count the pulses per degreee, you may be ok.

Try a helicoil insert for the oversized hole, will get you back to 3/8". Where strength is not critical, spend the extra couple of bucks on stainless steel fasteners, and use a little antiseize on the assembly.

We have karst topography around here, lots of caves, bluffs and other rock formations, mostly limestone, dolomite and sandstone. I have dug post holes for fences here on the farm, one hole I could dig to 4' deep in 10 minutes with a posthole digger....then 10 feet away we literally used a jackhammer and air drill...it's nuts. :eek:

Linuxman definitely fixed me up with a nice dish, I have looked all over my area and never came across a Birdview....there are hundreds of old BUDs within a 100 mile radius of me and I've looked at most of them in my travels.

I may try a helicoil, believe a buddy has a helicoil kit, thanks. Will definitely use antiseize, I have a tube in my shop. :up
 
Made some more progress today, enlarged the opening in the Birdview scalar to accept a Chaparral feedhorn.

Took a holesaw (2 1/4" I think) that was slightly smaller than the existing opening in the scalar, wrapped a strip of 60 grit sandpaper from an old sanding belt around the holesaw, and attached it with a couple of hose clamps.

That setup was inserted into and turned with a cordless drill, would take a little from the front of the ring, then flip it over and take some from the other side, moving the drill at a slight angle and up and down constantly.

As the opening got bigger I put some sandpaper "shims" behind the roll that was attached to the holesaw, to increase the diameter slightly.

Was really surprised that the sandpaper didn't even try to clog up with aluminum, I ended up with about 3 tablespoons of aluminum powder when the job was complete. :)

Took about 30 minutes and the only thing missing from having it done at a machine shop was the bill. ;)
 

Attachments

  • Sat Birdview Scalar Overbore.JPG
    Sat Birdview Scalar Overbore.JPG
    127.5 KB · Views: 292
  • Sat Birdview Scalar Overbore2.JPG
    Sat Birdview Scalar Overbore2.JPG
    122.3 KB · Views: 283
  • Sat Birdview Scalar Overbore3.JPG
    Sat Birdview Scalar Overbore3.JPG
    129.2 KB · Views: 307
A big congrats on the hole-reaming! - :up
Makes a lot of sense, and a lot less expense!
If you have calipers, take some measurements.
I have a CK-1, and want to know if I'll have to ream or if it'll just fit.

I'm looking at the possibility of making up a kit with magnet wheel and reed.
I see your magnet wheel is on the side where the pot went.
Others have put their home-brew wheel over between the motor and the worm gear.
Since I assume you'll eventually want to get more than 8 magnets working for you, you'll have to build one, too.
When you take off the old wheel, can you get some pictures and measurements of how it mounts?
If it's easy, I'd still prefer that side to the other end of the worm where the motor attaches.

Thanks.
 
Thanks, Anole! That method worked real well, I can't imagine getting better results. Now I need to figure out how to get a couple of set screws in there to hold the feedhorn once it is adjusted. Linuxman put his in at an angle and that works fine so I will probably go that route.

I don't have any calipers/micrometers to measure the scalar, that's why I mailed my top mount bushing to Fred for his machinist buddy to measure, but I can certainly measure and record the magnet wheel removal for you. :)

I had considered not modifying the magnet until I had intalled the dish and got it up and running, but it would be nice to work on that mount on a bench and not up in the air.

I'm not in a hurry, so we'll see how things go.......:cool:
 
You may turn out to be my beta-test-dummy. - :rolleyes:

(truth in advertizing: )
As an alternative, you could mount a second sensor on your existing wheel, if it looked like 16 pulses would do.
Not hard to do, but probably not enough pulses between birds.
 
Nice job Phlatwound!!

Do you have a picture of the hole saw with the sanding belt wrapped around it. Might be worth everyone getting a "hands-on" look at it for future reference. :)

I think perhaps the reason your sanding belt didn't clog up is because you weren't turning it fast enough for the aluminum to melt and glob up on it. If so, that is certainly the way to do it. :)
 
Thanks, Linuxman! I bet you are right about the speed being low enough not to melt the aluminum, the cordless was in low gear and about "1/3 trigger" most of the time....plus, I never ran it for more than about 15 seconds at a time.

I posted some pics of the holesaw/sanding belt setup above, but I can easily recreate that rig and take more if those don't show it well enough. :)
 
I was also thinking that this hole-making technique might be applied to a newly acquired dish before any clean-up.
And, with the scalar ring in place.
I'm nervous about removing it.
If I can transport the dish with the scalar attached, that leaves one more original adjustment unmolested.
 
Status
Please reply by conversation.

Users Who Are Viewing This Thread (Total: 0, Members: 0, Guests: 0)

Who Read This Thread (Total Members: 1)

Latest posts