Mio & Mio+ TNAP 4.1 full release (non-test) images just released at LegitFTA 9/6/2021

primestar31

SatelliteGuys Master
Original poster
Lifetime Supporter
Mar 15, 2005
14,419
16,135
Beta Omicron Delta III
Get the regular Mio images here:

Get the Mio+ images here:

Discussion here:
 
I've loaded it in Slot 2, and did a restore of my settings, and so far so good. I did have an issue where it wasn't in Expert Mode after the restore of my settings, but I was able to edit my Settings file to add Expert Mode, and that fixed me up. Not sure why it happened.

Feel free to load this in a slot, and let us know how it works for you. Afterwards, check:

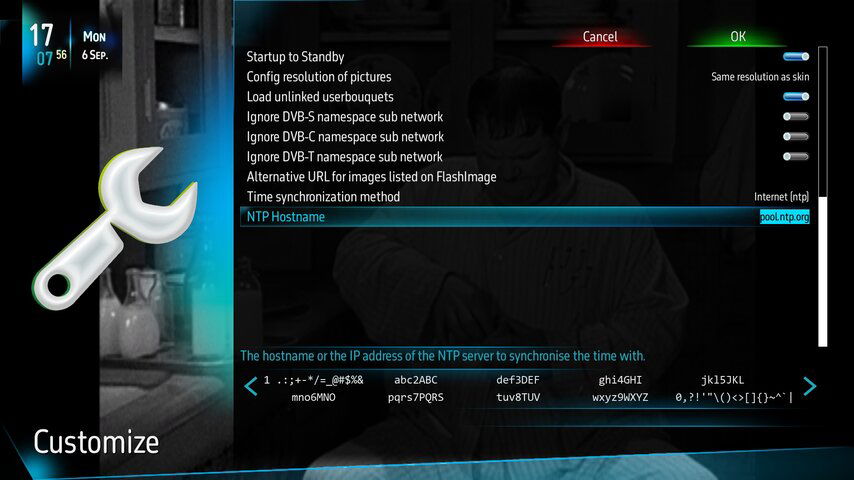
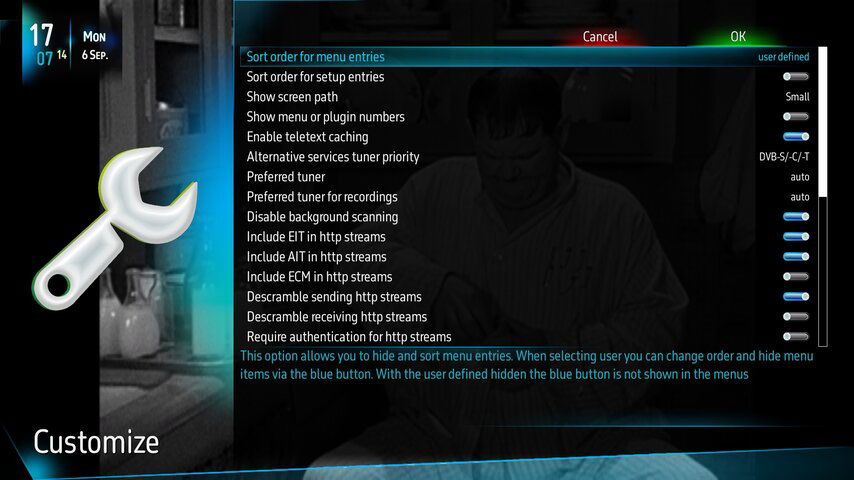
Menu > Setup > System > Customize, and make sure you are seeing all the options, such as this:

1_0_0_0_0_0_0_0_0_0_20210906170714.jpg1_0_0_0_0_0_0_0_0_0_20210906170756.jpg

See the bottom where it has Time Synchronization Method? You can use that to set NTP or Transponder, etc.
 
  • Like
Reactions: Lee60 and k.r.
Hi guys what's the process for updating the firmware? I've never used the multi slot setup before. Do I copy the zip file to a USB drive or unzip it and copy the osmio4kplus folder to the USB drive?

Thanks,
Alan
 
Hi guys what's the process for updating the firmware? I've never used the multi slot setup before. Do I copy the zip file to a USB drive or unzip it and copy the osmio4kplus folder to the USB drive?

Thanks,
Alan
Get a USB drive that's at least 1Gb. Download the zipped Multiboot file to it, do NOT unzip it.

Here are the steps needed to flash:
(1) Install a usb drive with the image you want to flash into the receiver USB port.
(2) In the receiver's menus, Navigate to Flash image (Menu--->Setup--->Flash image).
(3) Highlight the image you want to Flash and press the OK button on the remote.
(4) In the drop-down box, highlight the image you want to Flash and press the OK button on the remote.
(5) A slot menu will appear onscreen. Each slot will be listed twice. Select the slot you wish to flash that has with backup beside it. Press the OK button on the receiver's remote control to start the flash process.

Leave the receiver alone once the flash process starts, and it will automatically restore your settings and plugins.

For an automatic reinstall of settings and plugins, do nothing else. Go have a cup of coffee or do something else for 5-10 minutes. The receiver will automatically flash the image.

If you want a clean install, perform the same steps, except select an image slot that has without backup beside it. It should be noted that if there are any valid backups on the usb drive, then they will be automatically installed if the user does nothing.

Check the NTP settings in the post above, and make sure they are set right. Once it's all complete, make sure you remove the USB drive when it's finished.
 
Thanks for the really fast reply Mike. I started with a 16 GB USB stick that is empty, and copied the multiboot zip file to it. I went through the menu process as you described, and I selected slot 2 with backup. When I try to proceed, I receive this error message:

Could not find suitable media - Please remove some downloaded images or insert a media with sufficient file space and try again.

What's this trying to tell me? It thinks the USB stick is full? Or can't read it?

Thanks again for your help,
Alan
 
Thanks Corrado, I admit I'm completely lost. I'm attaching a picture of my system information. Notice the Detected HDD value. I have no idea why it shows 0.0 bytes left on my USB stick. It's virtually empty. On Windows it appears with 14.8 GB free.

P1010890.JPG


I appreciate any help,
Alan
 
What file format is the flash drive? FAT32, NTFS? I have had issues with exFAT formatted drives being recognized by some devices.

In the past I've just had the images found on the root of the drive and not in the downloaded images folder
 
Thanks Corrado, I admit I'm completely lost. I'm attaching a picture of my system information. Notice the Detected HDD value. I have no idea why it shows 0.0 bytes left on my USB stick. It's virtually empty. On Windows it appears with 14.8 GB free.

View attachment 153568

I appreciate any help,
Alan
I see you have TNAP 4.0 installed. to install TNAP 4.1 leave your flash drive in and go to the plugin menu press the green button expand extra and download tnap 4.1 flashimage 1.1
after install mio will reboot now go to menu> setup> flash image you will see Tnap 4.1 osmio4kplus_20210906_multiboot.zip click file choose a slot without backup. It will download and flash. You will need to set that slot up from scatch.
 
Thanks Corrado, I admit I'm completely lost. I'm attaching a picture of my system information. Notice the Detected HDD value. I have no idea why it shows 0.0 bytes left on my USB stick. It's virtually empty. On Windows it appears with 14.8 GB free.

View attachment 153568

I appreciate any help,
Alan

What file format is the flash drive? FAT32, NTFS? I have had issues with exFAT formatted drives being recognized by some devices.

In the past I've just had the images found on the root of the drive and not in the downloaded images folder
Sorry for the later reply, we left the house right after I posted the first one.

Make SURE you are flashing the REGULAR MIO file ( NON + marked ) IF you have a regular Mio, and the + (Plus) file IF you have a Mio+

My drive was 16Gb and was set to Fat32, and I formatted it that way on my laptop & I didn't even turn off my receiver before flashing. I plugged the drive in cold, did what I outlaid above, and flashed it into slot 2. All went fine for me. The TNAP zipped file was on the ROOT of the drive, all by itself. The image UNPACKS itself on that drive before installation, so, if you have anything else on there, it's possible it could fill it up.

Maybe reformat your drive as Fat32, copy the file back to it, and try again.
 
Last edited:
  • Like
Reactions: Titanium
Guys thank you all for your help. I was able to successfully flash to TNAP 4.1. It seems the receiver is quite fussy about the format of the USB drive that's being used. I have a newer 16 GB drive that was pre-formatted as NTFS. I guess it wasn't recognized successfully. I reformatted it as FAT32 and it still wasn't recognized. By that, I mean the UI reported zero bytes free when there were GB free.

I dig out an old 2 GB USB drive that was formatted as old FAT, and it worked fine. The flashing process worked normally. I'll have to remember that for future releases.

Anyway I'm up and running, thanks again for the forum's help,
Alan
Let us know how it works out for you. Did you restore your settings? I flashed mine yesterday, and so far it's been flawless. Including finally keeping perfect NTP time without going wonky, even in Suspend Mode!

Thank you to all the people that tested the Beta images, and provided input that discovered and got MANY things tweaked/corrected before this full release version.

Don't forget to now check and run the Software Update function. I did, and it downloaded and installed a few more things. Menu>Setup>Software Update> OK
 
  • Like
Reactions: Lee60 and Titanium
I too have been running 4.1 as it was being tested. Just a few minutes ago I did the online flash of 4.1 to slot 1 with backup. I have left the last test version in slot 2 just incase I screw something up. And to be extra safe I already made a backup with the plugin BackupSuite. :cool:
 
  • Like
Reactions: primestar31
I've loaded it in Slot 2, and did a restore of my settings, and so far so good. I did have an issue where it wasn't in Expert Mode after the restore of my settings, but I was able to edit my Settings file to add Expert Mode, and that fixed me up. Not sure why it happened.

Feel free to load this in a slot, and let us know how it works for you. Afterwards, check:

Menu > Setup > System > Customize, and make sure you are seeing all the options, such as this:

View attachment 153562View attachment 153563

See the bottom where it has Time Synchronization Method? You can use that to set NTP or Transponder, etc.
Those are the screens showing under "customize" in my receiver
 
  • Like
Reactions: primestar31
I've loaded it in Slot 2, and did a restore of my settings, and so far so good. I did have an issue where it wasn't in Expert Mode after the restore of my settings, but I was able to edit my Settings file to add Expert Mode, and that fixed me up. Not sure why it happened.

Feel free to load this in a slot, and let us know how it works for you. Afterwards, check:

Menu > Setup > System > Customize, and make sure you are seeing all the options, such as this:

View attachment 153562View attachment 153563

See the bottom where it has Time Synchronization Method? You can use that to set NTP or Transponder, etc.
Nope. Not getting any of that.
 
Nope. Not getting any of that.
You aren't seeing any of the full options as I showed above?

In your Settings file ( root>etc>enigma2 ) look for a line with this:

config.usage.setup_level=expert

If it is not expert change it to expert, or save a copy of the Settings file to your pc, then with Notepad++ add that line at the bottom of the settings file, and then do the init 4 with Putty, save the file back to root>etc>enigma2, replacing the one that is there. Then do the init 3 to restart.

You should now have all the options as I showed above.

P.S. I had the same problem with mine not showing Expert Mode, and had to do the above instructions posted by Megatron817 at LegitFTA to fix it.
I had to do init 2 first, then edit the file with vi, added the line, then init 3 and now I have the menu.
 
  • Like
Reactions: primestar31
I had to do init 2 first, then edit the file with vi, added the line, then init 3 and now I have the menu.
Yeah, odd that both you and I had the same issue. I seem to remember that happened to me when I upgraded to TNAP 3.2 also. Nobody else has reported it as of yet, so that's why I mentioned it above.

By the way, my NTP time has been rock-steady ever since I loaded this version, AND even in Suspend Mode! Cyberham, Megatron817, and I provided info to El Bandido, and with that input, he was able to figure out why we had the issues with NTP time, and change the test versions until it was finally fixed for good and all.
 
Last edited:
Top