Raydx Dish Update

Status
Please reply by conversation.

Lone Gunman

SatelliteGuys Pro
Original poster
Mar 19, 2010
3,201
866
southeast
Raydx Dish Update:

Well, it’s been a couple of months since I brought this dish home so I guess it’s time for an update.

After I got that 3 to 4“ post adapter made and mounted the dish I installed a spare DMX741 LNBF and started tweaking on it and have gotten mixed results tuning it since.

To start with that 18“ Super Jack dish mover that was on it wouldn’t let the dish go East past 78W (my due south) so I had to put my spare 24“ Von Weise actuator on instead. I still had problems with how that cast aluminum mount is made so I had to make an adapter plate for the actuator stationary end mount to get the dish travel like it needed to be.

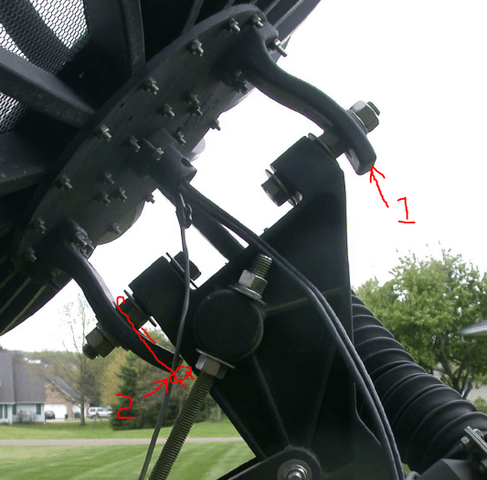
With the actuator mount problem fixed I think I might be able to get back to 30W but then that presented a new problem as it seems that the declination is off enough that I can’t get the ends of the arc to come in like they should? After looking at this polar mount I’ve come to the conclusion that it’s a piss poor design and it seems to be missing some critical parts to make it work correctly. So it looks like I’m going to have to either leave it like it is, or make the parts to fix what’s wrong with it.

I must admit that after working with this polar mount that it’s a PITA. The reflector itself seems to be a really good design and that button hook LNBF mount is pretty much in the center of the dish but that polar mount is just pure junk! As noted in a previous post, the large mesh on this dish doesn’t seem to inhibit Ku reception as the Ku satellites that I can get on with it will lock the same TPs that I’m getting on the Winegard system, which I consider to be my “gold standard” since it works better than any other I’ve used.

So now that baseball is done I’ve got to make a decision as to whether or not I want to put the time into fixing this polar mount to where I think I can work with it. Wish I could find some pictures of another one of these so I could see how it looks compared to what I have here. Can anyone help with that?

I’ll post some pictures of what I see as a major problem and what I did on the actuator mount later.
 
Thanks Magic! From that link I was able to find a phone number for an offshoot business that one of those guys started there in Ocala, Fl after the satellite dish business went belly up. I'll try to call him tomorrow and see if the guy (John Pearce) is still around. If so, he may be able to provide some info.
 
  • Like
Reactions: Magic Static
This is a picture of the mount plate I made for the Von Weise Actuator on this Raydx. Notice the two bolts that hold that silver plate in place? Those are the original actuator mounting holes, one of which is too close to the dish arm preventing it from coming back to 139W and the other was too far away, which wasted about 3 inches of actuator stroke. Where it's mounted in my homemade plate the dish is on 139W and only has about a quarter inch of West movement before the actuator hits the West limit. That way I can get almost all the stroke of the actuator back East. Where it's mounted also prevents the tube from hitting anything on the polar mount as the dish tracks Eastward. The way it's set I have pretty much all of the 24" stroke in use and I do believe I may be able to get back to 30W with this one.

That 24" stroke may be a problem for this Vbox 7 I've got connected to that Von Weise as there's 1099 counts from limit to limit?? Not sure this will work as the counter never shows me a negative or positive number when it crosses over 1000?? It just goes back to 000 and starts the count all over again. That Von Weise mover has the 8 magnet wheel in it. I also have a 4 magnet wheel that I may have to use when it's all said and done.

rdxmntplate1.jpg
 
Last edited:
Here are a few pictures of the declination setup on this polar mount. Notice in the first picture that there are two 3/4“ stainless bolts holding it together at the pivot point along with various hex nuts and flat washers. Notice also that where the hex nuts are there’s a regular steel star type lock washer that has dug into the aluminum and this is where I believe the problem is.

The way those cast aluminum pieces are made that come off the back plate on that dish they have a radius that would indicate to me that there is “suppose” to be a piece in there that matches that radius instead of those nuts and steel star lock washers. Both the top and bottom bolts have to be loosened to change the declination angle but with those lock washers dug into that cast aluminum I got a feeling it’s going to be a bitch getting that thing to move in small enough increments to make those declination adjustments that are needed to fine tune any setup.

I think I can make some 3/4“ aluminum blocks with a 3/4 x 10 threaded hole in’em then grind and file the back side so it matches the radius in those dish mounts. That way they can slide easily with the bolts slightly loosened and make things a whole lot easier to work with.

Ennywho, I’ll try to contact the guy that worked with this company years ago to see if he remembers any of the particulars on this polar mount and report back with any info he can provide.

rdxdecl1.jpg rdxdecl2.jpg rdxdecl3.jpg
 
The steel lock washers certainly look out of place. I could see them being used between lock nuts but they would be redundant. Not sure I might see nylon bushings in the stationary part. If so the bolts should be tightened in the moving part which could be why the lock washers were installed there. In my opinion the locks should not be used, or at least not used between two moving parts where they would wear into the surface loosening the bolts causing play. Looks like a really strong mount though.

edit: I see the slots in the upper and lower dish-side brackets now (found my glasses). If you replace the lock washers with fairly thick and wide flat washers you might still be able to do some fine adjustments if you leave the nut a bit loose...

Will have to look around Ocala next time I am down that way, I have family living in that area. Maybe there are a few of these in the area yet.
 
My first AJAK I recovered was put up by someone who was not the sharpest knife in the drawer for sure. I was scratchin' my head on that for a while too.
 
Just spoke with John Pearce down in Ocala, Fl about this dish but he says that it's been so long that he can't remember much about them. He did tell me that he thinks he may have an old service manual he may be able to find and he was serious enough about that that he asked for my name and phone number so that sounds promising.
 
  • Like
Reactions: . Raine and Cham
Just spoke with John Pearce down in Ocala, Fl about this dish but he says that it's been so long that he can't remember much about them. He did tell me that he thinks he may have an old service manual he may be able to find and he was serious enough about that that he asked for my name and phone number so that sounds promising.
See if this helps. It is the installation/adjustment info for a Raydx dish. Also, A photo of my dish which I have been using since I installed it in 1984. The mount/pole clamp is a second generation, beefed up clamp which Raydx sent me after the original clamp split during a violent storm. In the photo you will see a block which I made to raise the actuator mount and align the actuator rod with the actuator mount arm on the dish itself. The only other change which I made was to add three guy wires from the rim of the dish to the feedhorn assembly to center the feedhorn. The weight of the feedhorn plus the lnb's was a little much for the buttonhook. Back a number of years ago when I wanted to add Ku I was concerned about the size of the open areas in the mesh. I was told that if you cannot get a lead pencil through the mesh, it will be ok. It has been a great dish for c and ku .

Joe
 

Attachments

  • Raydx Mount 2.pdf
    37.8 KB · Views: 209
  • Raydx_Photo.pdf
    232.8 KB · Views: 194
@ chc59, this is exactly what I needed to see!!!! :clappingTHANKS A MILLION!!

This info definitely confirms my suspicions that this is a piss poor design as yours is setup almost exactly like mine. Declination on Cband only dishes wasn't much of an issue years ago because of the limited number of satellites that were available but now, with stuff all across the arc in both C and Ku those "ball park" declination settings just don't cut it. This makes the 3rd dish I've moved here from within a few miles of my house that the declination was off on and all were originally Cband only.

I may just try to adjust it and see how that works before I go to the trouble of making parts to try to fix it.

Again, thanks a bunch for taking the time to post this for me. This is what I love about this board!!!
 
[QUOTE="

This info definitely confirms my suspicions that this is a piss poor design as yours is setup almost exactly like mine. Declination on Cband only dishes wasn't much of an issue years ago because of the limited number of satellites that were available but now, with stuff all across the arc in both C and Ku those "ball park" declination settings just don't cut it. This makes the 3rd dish I've moved here from within a few miles of my house that the declination was off on and all were originally Cband only.

I may just try to adjust it and see how that works before I go to the trouble of making parts to try to fix it.

[/QUOTE]

Lone Gunman,

I don't have a Raydx but, looking at the pix chc59 posted, I can see where declination adjustment could be a real PITA. One solution to aid your declination adjustment might be as follows:

Drill & tap the upper slotted arm and install a jack screw to adjust the D3 dimension. (Location 1 in attached)
Fabricate a U-bolt and strap, not unlike a muffler clamp, to straddle the lower bolt/slotted arm to adjust the D2 dimension. (Location 2 in attached) Another option for the lower arm might be to, instead of the U-bolt, clearance-drill the end of the arm and drill & tap the lower pivot bolt to accept a pull screw. In either case, gravity is your friend.

My guess is these mods would be less work than trying to get your Dec. well set with the factory means of "adjustment".
 

Attachments

  • Raydx Mount Mod.PNG
    Raydx Mount Mod.PNG
    130.6 KB · Views: 216
capned thanks for the suggestions as these aren't something that I was considering. Will rethink what I want to do with it now though.
 
No problem, Lone Gunman.

Another thing that would probably be a big improvement would be to replace the 2 hex screws being used as the hour pivot, with a partially threaded stud of suitable size. In the pic, it appears those 2 screws are not on the same axis, which would cause a bind/undue wear in the elevation casting. Replacing those with a single stud as the hour shaft should eliminate that issue and should also reduce/eliminate any change in your Dec setting when the nuts are tightened. If you can find a stock stud of the correct size, this should be an easy and relatively inexpensive improvement: http://www.grainger.com/content/cat_405_threadedrods?page=9

I agree that losing the star washers is a good idea. Replacing those with USS flat washers might work well. Put the smooth side of the washers facing the slotted brackets and use a screw & nut to form the radius of the slotted brackets before assembly.
 
Nice thought but you can't run threaded rod against the bronze bushings that the assembly pivots on. FYI, those bushing holes appear to have been machined on the same setup in person, ie, they're in line with each other.

I was originally thinking of replacing the hex nuts with some 2" square x 3/4" thick T6 aluminum blocks threaded 3/4 x 10 with a radius on the blocks to fit into the radius of the slotted brackets. Those would give me more surfaces to work with to try to make it a fine adjustment type thingie also, which is my major concern with the whole deal.

As I said, right now I'm just brain storming and trying to come up with something that's simple but effective. No, haven't gotten there yet though. :oldwink
 
Nice thought but you can't run threaded rod against the bronze bushings that the assembly pivots on. FYI, those bushing holes appear to have been machined on the same setup in person, ie, they're in line with each other.
Agreed, but using a partially threaded stud where the center, unthreaded portion, rides in those bushings is what I was suggesting. Not unlike having the unthreaded "shank" of those two screws riding in those bushings but without having to rely on the cast surface of the slotted declination brackets for both ends to be on the same axis; unlikely. The idea is to find/make a stud of the correct diameter (3/4?) with an unthreaded length (center) slightly shorter than the length across those two bushings. Yes, no doubt those bushing bores are, or at least intended to be, on the same axis.

As a retired machinist and machinery builder/engineer, I have a fair grasp of this stuff... it appears you do too. :) Anywhoo, just tryin to help.
 
As a retired machinist and machinery builder/engineer, I have a fair grasp of this stuff... it appears you do too.

Yup, retired Journeyman Industrial Maintenance Machinist with State Certification here along with being a jack leg Race Car builder, home builder, computer repair shop owner and most anything else I need to do except brain surgery! :oldwink Most of what I know though came from a need to know as I'm cheap and like to know how to do stuff for myself.

We'll get there with this dish though but since I'm retired and already have two systems up and running I'll take my time with it. Good winter project, hey!

Thanks for your suggestions
 
Status
Please reply by conversation.

Users Who Are Viewing This Thread (Total: 0, Members: 0, Guests: 0)

Who Read This Thread (Total Members: 1)