for magnets, check out burglar alarm supplies. They have packages of 1/4 inch round by 1 inch bare magnets. If you can't find a supply house, check out an installer - not sales - but the tech.
Birdview reed sensor kit
- Thread starter bryan.lynch
- Start date
- Latest activity Latest activity:
- Replies 87
- Views 16K
You are using an out of date browser. It may not display this or other websites correctly.
You should upgrade or use an alternative browser.
You should upgrade or use an alternative browser.
- Status
- Please reply by conversation.
Well I have a proto-type up and running.
I spent a good bit of time yesterday and today trying to track down the parts I needed.
Finally found some 1/4" magnets at Michaels (an arts and crafts store). They are pretty strong, and also a little more expensive.
I couldn't find any reed switches except at Gateway Electronics in St. Louis. The ones I found weren't what I wanted, but it is working. They were bare switches in glass casings. I had to solder wires to them. I bought 4 of them, and am now on my third one. Course they were only $0.50 each.
The mini-cd is going to work out ok. I have 12 magnets on this one right now being held in place by double-sided tape. I tried to put them right next to each other, but the tape wouldn't hold. Kept jumping off and moving next door.
When I do the final and use epoxy, they will hold. Probably do 12 and let them dry, then put in the other 12.
I will probably end up trying to order a reed switch from digi-key to get the kind I want.
I chose brass as the fitting and nuts with an aluminum holder. Trying to avoid anything that will cause the magnets to be drawn away from their focus.
The 37:1 extra motor I got didn't work at all. The 110:1 motor works fine, so I went out and took the motor off the dish itself, and it works fine. I am using my old Drake analog receiver to do the test. It counts 12 pulses per revolution.
So far so good.
I spent a good bit of time yesterday and today trying to track down the parts I needed.
Finally found some 1/4" magnets at Michaels (an arts and crafts store). They are pretty strong, and also a little more expensive.
I couldn't find any reed switches except at Gateway Electronics in St. Louis. The ones I found weren't what I wanted, but it is working. They were bare switches in glass casings. I had to solder wires to them. I bought 4 of them, and am now on my third one.
The mini-cd is going to work out ok. I have 12 magnets on this one right now being held in place by double-sided tape. I tried to put them right next to each other, but the tape wouldn't hold. Kept jumping off and moving next door.
When I do the final and use epoxy, they will hold. Probably do 12 and let them dry, then put in the other 12.
I will probably end up trying to order a reed switch from digi-key to get the kind I want.
I chose brass as the fitting and nuts with an aluminum holder. Trying to avoid anything that will cause the magnets to be drawn away from their focus.
The 37:1 extra motor I got didn't work at all. The 110:1 motor works fine, so I went out and took the motor off the dish itself, and it works fine. I am using my old Drake analog receiver to do the test. It counts 12 pulses per revolution.
So far so good.
Magnets !
Okay, I think I found your stinkin' magnets!
DealExtreme: Rare Earth/RE Magnets
They may come from China and take two weeks, but look at the prices!
...including shipping, too!
I found reference to the site over on the Aussie satellite site.
They seemed to be pretty pleased with delivery of products.
Was thinking the 8mm 20-pack might be about right.
That's what, about 1/3rd of an inch?
edit: and quite thin at under 1mm thick...
Is that small enough?
It's a big site and I haven't fully explored it yet.
Wonder if they have reed switches, too?
Maybe get a cheap red laser pointer for aligning your LNB to the dish?
Oh, my... the green lasers have really come down in price, haven't they?
Last edited:
Success and failure!
I started trying to assemble a finished product this afternoon.
Removed all the double sided tape and tried out the epoxy. I had bought the set in 30 minute kind because I was afraid of the instant set. Thought it might be too quick. I haven't tried to use any epoxy since the early 70's, I wasn't impressed with it then, and am still not.
I couldn't even get the magnets to hold on while spacing them out for 12. I thought I could wait and go back to put the other 12 in. Got mad, wiped off the epoxy and got out the contact cement. It worked better, but even after 2 hours of drying, I passed the wheel near a solid metal object and 6 magnets jumped off.
What glue should I get for holding 24 magnets on this disk?
The instant set epoxy, or just plain old Super Glue?
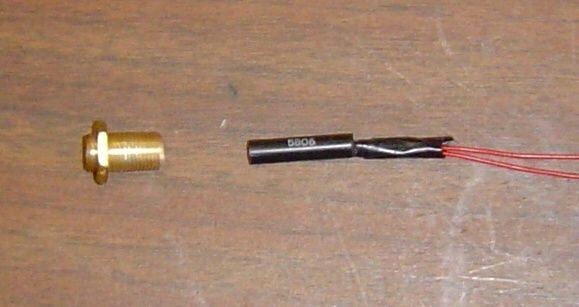
I did have one stroke of good fortune. I went out to the warehouse where I have all my dish stuff piled, and there was a "Burr" actuator head there, no arm, just the motor. I took it apart and found a nice reed sensor switch assembly that just fits into my brass tube.
Edit: Oh yeah, it does work. I tested it.
My advice on the magnet wheel, if you can find one, buy it pre-made. I couldn't find one other than the ones Bryan.Lynch found above.
If anyone finds one on the internet, please post it here. 3 inch - 3-1/4 inch diameter for a 1/2" shaft with at minimun 24 magnets/poles. Somebody has to make them because I am sure the guy who puts together the kit gets them somewhere.
Here is a pic of the reed-sensor switch assembly. If you have a problem making out the numbers, they are 5806. No other markings on it.
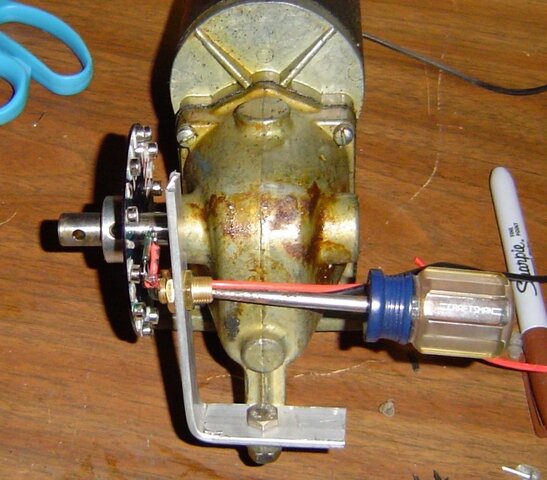
Edit: I forget to post a picture of the proto-type:
I started trying to assemble a finished product this afternoon.
Removed all the double sided tape and tried out the epoxy. I had bought the set in 30 minute kind because I was afraid of the instant set. Thought it might be too quick. I haven't tried to use any epoxy since the early 70's, I wasn't impressed with it then, and am still not.
I couldn't even get the magnets to hold on while spacing them out for 12. I thought I could wait and go back to put the other 12 in. Got mad, wiped off the epoxy and got out the contact cement. It worked better, but even after 2 hours of drying, I passed the wheel near a solid metal object and 6 magnets jumped off.
What glue should I get for holding 24 magnets on this disk?
The instant set epoxy, or just plain old Super Glue?
I did have one stroke of good fortune. I went out to the warehouse where I have all my dish stuff piled, and there was a "Burr" actuator head there, no arm, just the motor. I took it apart and found a nice reed sensor switch assembly that just fits into my brass tube.
Edit: Oh yeah, it does work. I tested it.
My advice on the magnet wheel, if you can find one, buy it pre-made. I couldn't find one other than the ones Bryan.Lynch found above.
If anyone finds one on the internet, please post it here. 3 inch - 3-1/4 inch diameter for a 1/2" shaft with at minimun 24 magnets/poles. Somebody has to make them because I am sure the guy who puts together the kit gets them somewhere.
Here is a pic of the reed-sensor switch assembly. If you have a problem making out the numbers, they are 5806. No other markings on it.

Edit: I forget to post a picture of the proto-type:

Last edited:
Anole and I talked for a good while on the phone today about the problem with the wheel and the magnets coming off.
We had come to the conclusion that if I could get the sensor to read it from the back side of the disc I could glue another disc on the other side and sandwich the magnets in the middle.
It read from the disc side as long as it was close, but the disc wobbles as much as an 1/8" or more out of true which throws the disc out too far to read from that side.
I don't think it is the disc. I think it is the locking collar the disc is glued to. So I need to go to town tomorrow and find a better locking collar. While I am at it, I might as well try a different backing for the disc. One that will hold the magnets better.
We talked about maybe an 1/8" - 1/4" aluminum plate and drilling holes around the outside edge for the magnets to sit in. That would give the added embedded magnet more holding power and allow the glue to work a little better. I could also expand out to the 3-1/4" size that Al measured his kit wheel standard size for the disc.
But I have to find a locking collar to attach whatever disc I end up with to allow it to run true.
Any suggestions as to what to make the wheel out of?
I found a piece of aluminum I can use in the warehouse. 
It is definitely the locking collar that is the problem. Laid it on a flat surface sideways, and thickness is off enough to be visible with naked eye. Probably 1/32 of an inch. Translate that out to 3 inches and you have an 1/8" wobble.
Any other suggestions on what to use for the magnet holding disc?
How about Lexan/Lucite/some other thermoplastic or acrylic for the disc? If you had a piece it could be cut to size with a hole saw. Can you cure your locking collar with a little touch of a lathe, dremel or grinder? I'm really enjoying following this effort, very cool.
:up
:up
How about Lexan/Lucite/some other thermoplastic or acrylic for the disc? If you had a piece it could be cut to size with a hole saw. Can you cure your locking collar with a little touch of a lathe, dremel or grinder? I'm really enjoying following this effort, very cool.
:up
We talked about using some plexi-glass or plastic of some kind. The problem with plastic is that if it isn't cut, just right, or drilled just right, it cracks/shatters and you get to start over. If you go with the more forgiving plastic, it might not be rigid enough with the heat in the Summer. The only reason I was trying the mini-cd, is because it was already cut to size with correct size hole in the middle.
As far as truing up the existing locking collars, I don't have a lathe or a grinder. The best I have is a Dremel with a grinding wheel, but just don't have the precision measuring tools to make sure it is square. I will take these with me, and if I can't find what I am looking for will take these by a machine shop and have them squared up.
I don't know what kind of tolerances you need to hold for thickness, I was thinking of the "plastic" being about 3/16"-1/4" or so, it would be a lot more workable than the thinner stuff but possibly too thick for your needs. I'm sure you've thought of all the obvious ones: plastic, metal, wood, fiberglass...how about carbon fiber...or unobtanium?!?!?!
Carry on!
Well I worked it all out with 1/16" aluminum sheets after getting a new batch of locking collars. Ones that are true. 
I started with one plate trying to drill down to where the bit just stuck through to leave a hole for glue to get out, and an edge for the magnet to set on, but ended up going all the way through with 3 or 4 and then decided to just drill all the way through and put an alum backing plate on.
I decided on hot glue because it sets up quickly and with the little holes to help keep the magnets from jumping around it worked out much better. I pre-heated the aluminum (per Anole's email instructions) to keep the glue from setting up too fast, but by the time I was half way through, they were quite uneven, but I went ahead and tried it.
I was getting a consistent 14 counts out of the 24 magnets, and couldn't figure out what the problem was. I called my neighbor over to give me his opinion. He started testing to see which way they were facing either pulling or pushing. He said it didn't matter except when they are in such close proximity as these are.
Sure enough there were 10 pushers and 14 pullers, so that equals 24. All I have to do is gently heat those up and turn them over to fix that problem.
To fix the uneven problem, he suggested to set the whole wheel on a sheet of aluminum foil in a flat pan with magnets down. Put a nice heavy weight on the other side like an iron skillet. Put them in the oven with the heat at about 140 degrees and the glue would heat up and the magnets would level out. Take it out, let it cool and then use a hair dryer to remove the aluminum foil.
Then trim away the excess glue and put on a thin layer of epoxy over the magnets and allow it to puddle onto the wheel making a casing that will hold everything in place no matter what the temperature or moisture of the atmosphere.
Here are some pics of where I am now.
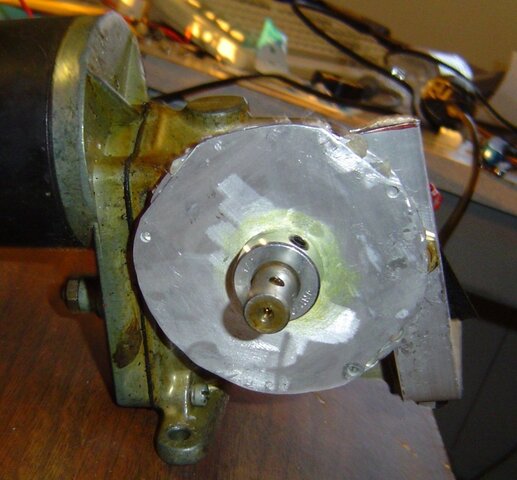
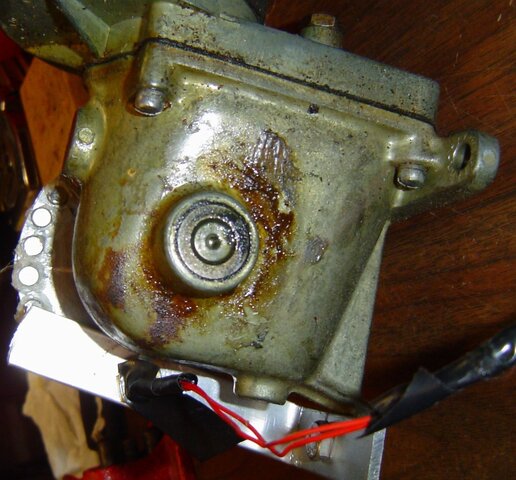
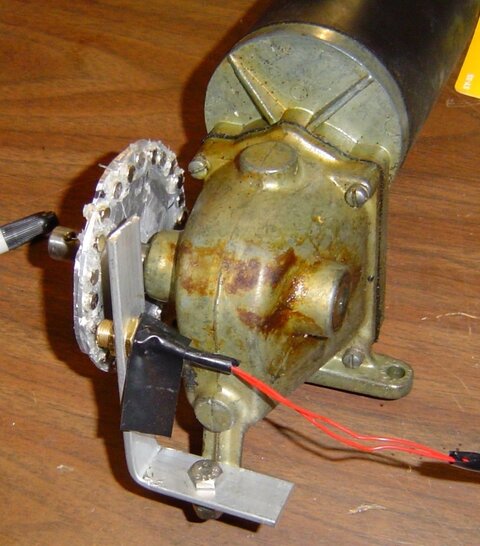
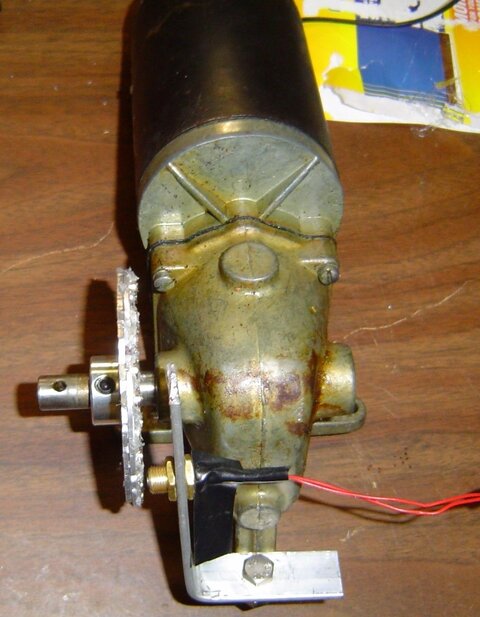
I am real close to having a finished working product.
I started with one plate trying to drill down to where the bit just stuck through to leave a hole for glue to get out, and an edge for the magnet to set on, but ended up going all the way through with 3 or 4 and then decided to just drill all the way through and put an alum backing plate on.
I decided on hot glue because it sets up quickly and with the little holes to help keep the magnets from jumping around it worked out much better. I pre-heated the aluminum (per Anole's email instructions) to keep the glue from setting up too fast, but by the time I was half way through, they were quite uneven, but I went ahead and tried it.
I was getting a consistent 14 counts out of the 24 magnets, and couldn't figure out what the problem was. I called my neighbor over to give me his opinion. He started testing to see which way they were facing either pulling or pushing. He said it didn't matter except when they are in such close proximity as these are.
Sure enough there were 10 pushers and 14 pullers, so that equals 24. All I have to do is gently heat those up and turn them over to fix that problem.
To fix the uneven problem, he suggested to set the whole wheel on a sheet of aluminum foil in a flat pan with magnets down. Put a nice heavy weight on the other side like an iron skillet. Put them in the oven with the heat at about 140 degrees and the glue would heat up and the magnets would level out. Take it out, let it cool and then use a hair dryer to remove the aluminum foil.
Then trim away the excess glue and put on a thin layer of epoxy over the magnets and allow it to puddle onto the wheel making a casing that will hold everything in place no matter what the temperature or moisture of the atmosphere.
Here are some pics of where I am now.


I am real close to having a finished working product.
I was thinking of putting your little disc with hot-melt glue into the toaster oven for an hour of light baking. 
But, then I remembered that those magnets may lose some of their suck at about 80º Centigrade.
So, double check my facts, and see what that is in ºF, and proceed accordingly.
I was thinking if the aluminum plate was nice 'n hot when you shot it with hot glue and pressed the magnet in place, that would work.
But regardless, it looks like you're well on the way to success.
I asked my Radio Shack manager about end-actuated reed switches.
He said they used to carry 'em.
We haven't checked the catalog yet, but if they're $2..$5, that might still be attractive.
I was thinking of putting your little disc with hot-melt glue into the toaster oven for an hour of light baking.
But, then I remembered that those magnets may lose some of their suck at about 80º Centigrade.
So, double check my facts, and see what that is in ºF, and proceed accordingly.
I was thinking if the aluminum plate was nice 'n hot when you shot it with hot glue and pressed the magnet in place, that would work.
But regardless, it looks like you're well on the way to success.
I asked my Radio Shack manager about end-actuated reed switches.
He said they used to carry 'em.
We haven't checked the catalog yet, but if they're $2..$5, that might still be attractive.
80 C = 176 F, so I will be careful to not go that high.
Yes, if we can find the end type sensors for that price. My neighbor looked at the Digi-key catalog while he was here and said I had found the right ones with end flappers for about your Radio Shack price, but if we can get them through the Rat Shack, we wouldn't have to pay shipping.
I'm off to put them in the oven. They are all singing the same tune now.
They are in a nice toasty oven at 150F for about an hour. Then pop them out and let them cool and remove excess glue.
Then a nice coating of epoxy ( I hate that stuff ) to solidify over night and it should be done.
Then a nice coating of epoxy ( I hate that stuff ) to solidify over night and it should be done.
Not knowing the melt temperature of either the traditional nor low temp glue, I looked it up.
Here's what I found:

edit: not that it applies here, but I use a hot-melt caulking in what I assume is a standard temp gun, to make somewhat flexible strain reliefs for connectors.
I "pot them" with the stuff. Not unlike RTV, I guess.
Pretty wierd - I think it came about by buying out the entire stock of sticks some guy had at a swap meet.
I thought they were regular glue... and was very pleased to discover what they really were.
Here's what I found:
That contact glue you started out with, is looking better every day.Wikipedia said:Glue guns come in a low-temperature and a high-temperature (hot-melt) version.
Low-temperature glue guns heat up to about 250º F (120º C), and are well suited when high temperatures are undesirable, for lace, cloth, children's crafts, etc.
High-temperature guns heat up to around 380º f (195º c) and produce a stronger bond.
edit: not that it applies here, but I use a hot-melt caulking in what I assume is a standard temp gun, to make somewhat flexible strain reliefs for connectors.
I "pot them" with the stuff. Not unlike RTV, I guess.
Pretty wierd - I think it came about by buying out the entire stock of sticks some guy had at a swap meet.
I thought they were regular glue... and was very pleased to discover what they really were.
Mine is the very low temp version.
I was touching the hot glue tonight to re-seat the magnets, and yes it burned a little when touched with the bare fingers, but no blisters etc, so I think mine melts at about 140 degrees.
I think you are right about the contact cement. If I was to start over, and thank God I am not, I would just drill the holes and contact cement them into the holes, make sure everything worked, and then coat over them with the epoxy like I am going to do anyway.
Much easier to work with.
Well the oven trick didn't work so I guess in the morning I will dig them all back out, clean off the hot glue and contact cement them in the holes.
It was pretty easy to dig out the 10, so the rest shouldn't be a problem and the holes will help keep them from jumping around. Later I can put on the layer of epoxy.
It was pretty easy to dig out the 10, so the rest shouldn't be a problem and the holes will help keep them from jumping around. Later I can put on the layer of epoxy.
That's too Bad Fred...... I'm glad you're not the kind to give up, so the rest of us can read of a solution for your Adventure..!! I'lll be sure and stay tuned tomorrow... Same Thread, Same Adventure......
Thanks for the encouragement Al!
As I look at it this morning, I may just dig out the tallest ones. I am going to check and see if they all work first as is.
If they all work, I really don't need to do anything but remove the excess glue and put on the epoxy. It won't look as nice as it would if they were all at an even height, but what the heck. If it works, who cares.
After digging around getting the excess hot glue off, most of the tallest ones came loose, which is of course what I wanted. I took out two other tall ones which made the whole row that was left at an even height.
I then made sure all the hot glue was removed and laid out the magnets to be put back in with the proper side up for gluing. I chose a tooth pick to apply the glue on the magnets and then broke the tooth pick in half to put the glue in the holes.
After a suitable drying time apart as per the instructions, I put the magnets in the holes.
Now I have a nice even height on all and am waiting for them to set up.
If you drill the holes and use the contact cement, that is certainly the way to go. The holes help keep the magnets intact while waiting for drying.
- Status
- Please reply by conversation.
Similar threads
- Replies
- 9
- Views
- 2K
- Replies
- 2
- Views
- 2K
- Replies
- 22
- Views
- 5K
- Replies
- 3
- Views
- 2K

