... Now, my present dish is on a five foot length ( above ground) of 3.5 inch OD pipe, which is the correct size for the paraclipse...do I cut it off or use the whole thing?
Are there any of those lockdown screws farther up the pole mount ? My polar mount only has four bolts all within two feet of the bottom. However, the mount fits snugly over the pole, and I would recomment at least a four foot pole.
(I am one of those guys who always wants to "overbuild") My thinking is that the longer pole will provide more stability for the mount. That dish can get some pretty good wind load.
For a while i had some problems obtaining the plastic strips for my dish. So, what i did was go to a flooring supply store (the one for installers of carpet etc). They have a vinyl material that is called "T" cap which snaps in to aluminun moldings on floors where resilient flooring terminates and changes to carpet. Those moldings are called snap track. "T" cap comes in twleve foot lengths and fits the groove perfectly.
Look at number 930 on the folllowing link
Burke - Transistional Mouldings

Care and Feeding of a 12 foot Paraclipse...
- Thread starter stogie5150
- Start date
- Latest activity Latest activity:
- Replies 233
- Views 38K
You are using an out of date browser. It may not display this or other websites correctly.
You should upgrade or use an alternative browser.
You should upgrade or use an alternative browser.
SatelliteGuys Fund Raiser
100%
- Total amount
- $905.00
- Goal
- $350.00
Donation ends:
- Status
- Please reply by conversation.
... Now, my present dish is on a five foot length ( above ground) of 3.5 inch OD pipe, which is the correct size for the paraclipse...do I cut it off or use the whole thing?
Are there any of those lockdown screws farther up the pole mount ? My polar mount only has four bolts all within two feet of the bottom. However, the mount fits snugly over the pole, and I would recomment at least a four foot pole.
(I am one of those guys who always wants to "overbuild") My thinking is that the longer pole will provide more stability for the mount. That dish can get some pretty good wind load.
For a while i had some problems obtaining the plastic strips for my dish. So, what i did was go to a flooring supply store (the one for installers of carpet etc). They have a vinyl material that is called "T" cap which snaps in to aluminun moldings on floors where resilient flooring terminates and changes to carpet. Those moldings are called snap track. "T" cap comes in twleve foot lengths and fits the groove perfectly.
Look at number 930 on the folllowing link
Burke - Transistional Mouldings
Cool! I have a flooring guy next door to me so he'll know what I need. I'll just print that page...and ask him. I am going to get back with you when I get to doing the mesh because I KNOW I am gonna have questions...
")
The setscrews are ONLY at the bottom, up about two feet. I didn't think there would be any reason NOT to use the whole length of pipe I have...my pipe is 5'3" from the ground. I might grease the pipe up a bit in case I ever need to take it apart again....LOL
The setscrews are ONLY at the bottom, up about two feet. I didn't think there would be any reason NOT to use the whole length of pipe I have...my pipe is 5'3" from the ground. I might grease the pipe up a bit in case I ever need to take it apart again....LOL
Last time I used schedule 40 galvanized pipe for the mounting pole. Originally they had a black metal pipe and it was the same story as yours. The pole was only about three feet long and it had seized to my mount and took some serious torqueing of the pole to finally break it loose.
Next time I am going to get schedule 80 or better and make sure it too is galvanized if at all possible.
Aside from stoutness in the higher schedule, it will also resist denting when tightening the lock down bolts. Those little dents make it real hard to hold a position when repeaking a dish.
As far as the mesh goes, I have hints for that too. I hope you can find some. By the way I used stainless stel fishing leader to make new hooks to clip the mesh in. Plenty fishing wire out here..... cheap.....(for maui that is)

Ok MauiGuy, explain how the plastic pieces fit with the mesh. does the mesh sit on top of the ribs and then you slide the plasic piece in? I took another look and the pieces on the ribs of the dish themselves are pretty much intact, but I need to slide them out and straighten the mesh out to preserve the shape as much as possible. How should I go about sliding them out? Shoot WD40 down the ribs and hope they will slide out?
Now, on the very outer rim of the dish, what holds the mesh taut? it all sags and looks nasty on this dish, there is nothing out there supporting the last six inches of mesh to the outer edge.
As far as tying the mesh down, I'd like some detailed instructions....you said you used leader material, did you just put it through the mesh and around the rib and twist? I have mesh from an old Winegard 10 foot dish so I have material to make the patch panels. The preforation will not be the same and neither will the color, but hey, beggars cannot be choosy, right?
The chain on the motor, do you reccomend I take if off and soak it to make sure its pliable, or should I just oil the crap out of it for a few days running and give it a shot? I'll take some closeup pics of it if you wanna see it closer. I am going to make a jig so I can stand up the motor/pole inside my shop, so I have the electricity and tools handy (and a FAN, its 96 in the shade right now!).
That's all for now.
PLEASE LOG IN TO GET RID OF THESE ADS!
Ok MauiGuy, explain how the plastic pieces fit with the mesh. does the mesh sit on top of the ribs and then you slide the plasic piece in? I took another look and the pieces on the ribs of the dish themselves are pretty much intact, but I need to slide them out and straighten the mesh out to preserve the shape as much as possible. How should I go about sliding them out? Shoot WD40 down the ribs and hope they will slide out?
Now, on the very outer rim of the dish, what holds the mesh taut? it all sags and looks nasty on this dish, there is nothing out there supporting the last six inches of mesh to the outer edge.
As far as tying the mesh down, I'd like some detailed instructions....you said you used leader material, did you just put it through the mesh and around the rib and twist? I have mesh from an old Winegard 10 foot dish so I have material to make the patch panels. The preforation will not be the same and neither will the color, but hey, beggars cannot be choosy, right?
The chain on the motor, do you reccomend I take if off and soak it to make sure its pliable, or should I just oil the crap out of it for a few days running and give it a shot? I'll take some closeup pics of it if you wanna see it closer. I am going to make a jig so I can stand up the motor/pole inside my shop, so I have the electricity and tools handy (and a FAN, its 96 in the shade right now!).
That's all for now.
The ONLY way to get the plastic out is to have it slide out of the outboard end of the truss.
This is not always easy. I just removed some the other day from a smashed dish, and about six of them came out really easy. I had one that I tried to heat a little, and melted it. And some just break.
My method was to try some pliers and grab the end and pull. I also had some success using a screw driver (or other sort of "punch") and tapped on the inboard end using a light hammer to start the thing moving. I used silicone spray, but not sure if it was all that effective.
The climate on my part of Maui is really wet, so I am aware of the possible corrosion isssues.
One note on this is that breaking them out is not a particularly good solution because you will wind up with the little retaining part still in the groove.
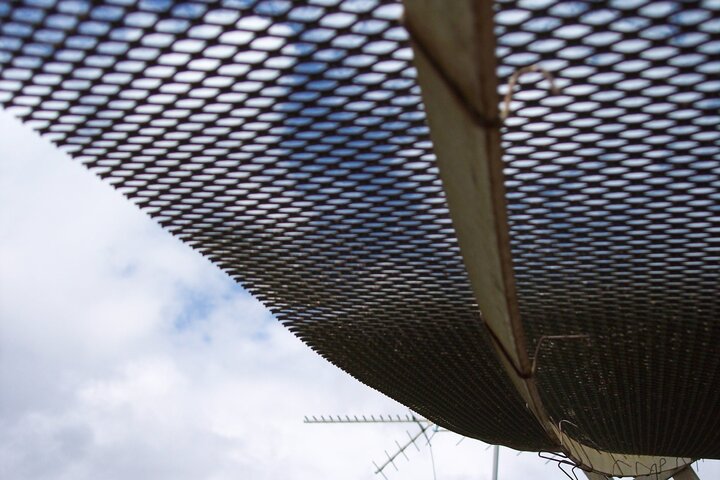
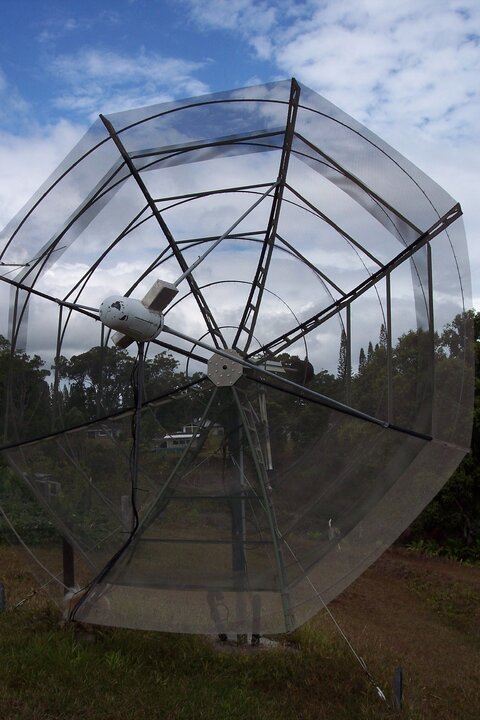
INSTALLING THE MESH
For simplicity purposes I am going to refer to that Paraclypse manual that I uplinked last week. Once you have the dish assembled, and true, then you install the inner section of the mesh first. It is supposed to sit snugly between the little ridges that hold the plastic strips.
Then, I crawled behind the dish, and had my son in front of the reflecting surface. He would push the little "J" hook thru the mesh from the front, and i would then use linemans pliers to pull the mesh taught to the reinforcing ring, and then bend it to hold in place. (see figure 22, 23 and 24 on page 17 of that manual on the paraclypse.
The little diagram in figure 22 tells you about where to start with the clipping. ( I had sat down one weekend and made a gazillion of the clips before we went out to install the mesh.) it is a tedious procedure, but if you put those clips in about every three inches or so, the surface will look great.
With all of the dishes I have been able to scrounge, I was fortunate to have fairly decent mesh to deal with. On one panel that was sort of bent and warped, I sat down and bent it slightly over my knee etc to make it "sort of smooth". Then instead of installing it like it had been originally installed, I reversed it. In other words, I put the reflecting side toward the back of the dish, so that when the clips were installed it would be pulling "new" material to the rings, instead of material with a memory. (hope you follow me on that one)
I will enclose a page from another paraclypse manual to give you the "actual size of the J clip, but I just made them good and long so I could grab and pull them with pliers.
If I have the opportunity today, I will try to borrow a digital cam and get some shots of the clips as they are installed.
BY the way, if you look at that figure 24 on page 17 of that manual, you can note how they show the pliers being used. I did NOT use mine that way. I firmly grabbed that clip and pulled the mesh tight against the rib and then bent the hook shaft around the support ring.
One more thing on the mesh. After you have clipped the tthe rings closest to the center of the dish, you must leave the outer most ring unattached because when you install the larger (or outer) mesh section it is supposed to go slightly under the inner portion of the mesh. This ensures a smoother surface.
Take your time that mesh can make a real drinking man out of you.
INSTALLING THE PLASTIC
When I re-installed the plastic strips I sprayed the "base of the T" with silicone. I then carefully placed the material on the rib and GENTLY started tapping with a small rubber mallet. It should snap in easily. If it does not, it may be because the material is not aligned with the groove. I broke a few pieces playing around.
THE EDGES
Paraclypse made some great dishes. However, they did not do much about the edge of the mesh. In your case, your outer edge is part of the large outer section of mesh which makes replacing it a little cost prohibitive. There is no solution to the edge problem.
Having said that this is what I have done to prevent damage to my dish. First I made sure that if the dish is disconnected from my actuator, the edge cannot touch the ground. So my pole is about seven feet long. Now, this next point may sound stupid, but it seems to be true. When installing your mesh put in a lot of clips. Do not skimp. The fewer the clips the looser the mesh is, and that allows it to bend.
The edge will never be as strong as we would like, but it is stronger with clips about every two to three inches...
I am attaching a scan of the measurements of the mesh panels that are used on a typical 12 dish in case you can find some "expanded aluminun". Also a scan from a different manual showing the actual size of the "J" clips, along with one that I made....
I see in one manual it says to install the outer mesh first. Then the other manual says install the inner mesh first. Go figure...
CHAIN
My CD mount also had a rusty chain. I sprayed some lithium grease on it, to sort of protect it because I have yet to install it. One day, I went out to the garage with an old Houston tracker IRD, and a small TV, and hooked it all up. I then used the tracker to move the mount left and right just to see how it would go. It seemed to work ok. I heard no strange noises, and every thing was smooth. I did note one thing about that mount. When I looked to see how the tensioner works with the chain, it just seemed to me that it could have been made stronger, or maybe out of stainless material. I worry that it could break if I tried to remove the chain.
FYI, the tensioner in discussion is on Page 9 of the manual, and is listed as item 34.
Hope this helps and I apologize for being long winded.
Attachments
Last edited:
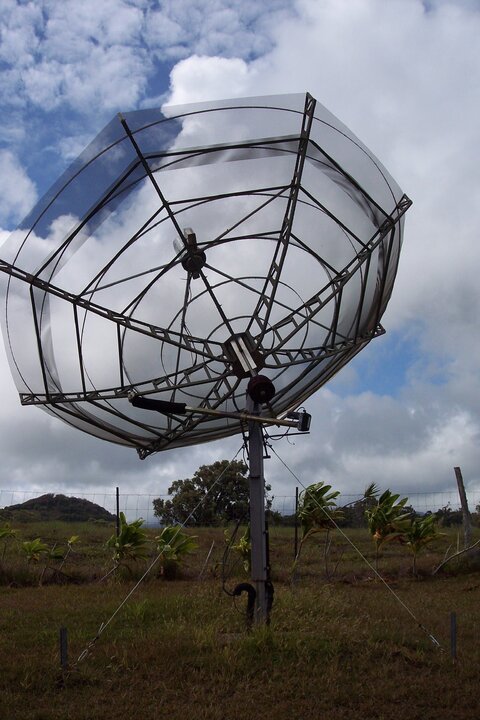
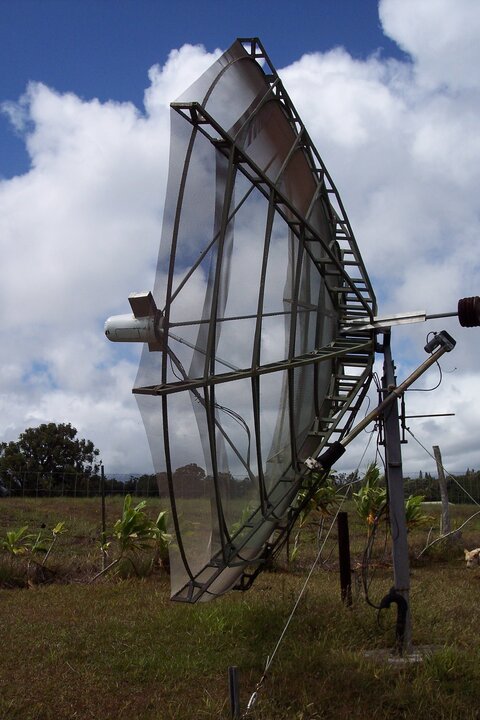
Ok I have attached some photos of my dish to provide a little clarification of information I have posted previously.
In picture 1, you can see that my mount does not touch the ground. I did this in order to keep the dish from touching the ground when I flop it down for LNB service or feedhorn adjustments. In addition I live on the slope of a hill and wanted to get jussstt a little higher to see a little farther to the east. My eastern most satellite is AMC-2. ( the dish is pointed at G1 in this photo).
In picture #2 you can see some of the "J" clips I have installed on the outer ring of the dish. Note that some of them seem to be clipped to the ring sort of right to left, while the others are clipped sort of left to right. I did what ever felt the best when I was attaching the mesh. Sometimes it is difficult to bend them all the same way.
Picture #3 shows a few things. The most important part was that when pointing to Amc -3 it is not close to the ground, and I can assure you that when I disconnect the actuator for replacement etc, the dish edge does not contact the ground at all. Also you can see the bottom of the mount as a rust line just above the curved section of ABS pipe that holds the wires. In the background you can see the original pipe the installers used to set up my first paraclypse dish with the same type of mount. It was a twelve foot dish and this is a fourteen.
Picture #4 In this picture you can see some green plastic retaining strips. You also see black ones. The black stuff is the flooring material I described last night. The feed poles I fabricated from steel conduit when I was building this dish because my old dish was still in service and I did not want to take it apart to use the quad poles off of it while I had this one on the ground. All that means is that I have a spare set in case these ever fail.
In case anyone asks, the box shaped ears on the feedhorn cover are there because I removed the elbow from both the ku and C band side of the feedhorn. Thos little boxes provide some weather protection for the LNB's. I did this because I was trying to maximize every bit of signal I could get out of the dish. My cable run to the house is about two hundred feet.
All GREAT info! Thanks!
I wonder though could I just use regular tie wire, either galvanized or stainless? Those sharp ends sticking down...I could see me getting gouged in the head cutting the grass underneath the dish...
I went today and bought some replacement bolts for it...65.00 worth...and that wasn't even enough for the whole dish, just most of it...
All GREAT info! Thanks!
I wonder though could I just use regular tie wire, either galvanized or stainless? Those sharp ends sticking down...I could see me getting gouged in the head cutting the grass underneath the dish...
I went today and bought some replacement bolts for it...65.00 worth...and that wasn't even enough for the whole dish, just most of it...
I suppose you could use a regular (stainless) tie wire. You would have to pay particular attention to the tightness. The mesh has to be tight against the support rings, but the wire cannot be twisted so tight as to cut thru the mesh.
I emphasize the stainless stuff to keep corrosion at a minumum. Regular steel tie wire would cause problems I think.
Speaking of stainless stuff, I now have a bucket full of the stainless nuts and bolts from the dishes I have salvaged.
In some respect I agree with you about the sharp ends of the "J" hooks. When I got done attaching my mesh, I looked like I had tried a self sacrifice.
PLEASE LOG IN TO GET RID OF THESE ADS!
Last edited:
Reason why I said that is I cannot find any stainless tie wire..its all galvanized or aluminum. You said you used leader material....just how did that work, most stainless leader is at least somewhat pliable. 
The current ties that are on the dish now are rusted...you'll see when I get the dish insde my shop where I can take some pics, tomorrow I hope.
The current ties that are on the dish now are rusted...you'll see when I get the dish insde my shop where I can take some pics, tomorrow I hope.
Back in the early 80s when I was in Alaska installing a number of Paraclipse 12-footers and some 14-foot knock-offs such as the GOLDEN EAGLE made near Portland, OR...there was often a need to make additional J clips. Solution was to purchase a roll of galvanized fencing wire...it came in 17 AWG. Use a 1/2 inch pair of pliers to twist and form the wires into a J shape.... A 14 footer typically took 800 or more clips to secure properly, so we cut straight pieces to length after having an educated guess about how long they needed to be...and made a pile of them.
Then you make the J twist and squeeze them into shape. Great way for 2 people and a bottle of wine to kill an evening!
Then you make the J twist and squeeze them into shape. Great way for 2 people and a bottle of wine to kill an evening!
Back in the early 80s when I was in Alaska installing a number of Paraclipse 12-footers and some 14-foot knock-offs such as the GOLDEN EAGLE made near Portland, OR...there was often a need to make additional J clips. Solution was to purchase a roll of galvanized fencing wire...it came in 17 AWG. Use a 1/2 inch pair of pliers to twist and form the wires into a J shape.... A 14 footer typically took 800 or more clips to secure properly, so we cut straight pieces to length after having an educated guess about how long they needed to be...and made a pile of them.
Then you make the J twist and squeeze them into shape. Great way for 2 people and a bottle of wine to kill an evening!
Damn Mike....that sounds like a BEAR.....
I can get galvanized wire all day long here..not much stainless....although I MAY have a line on some stainless TIG welding rods of the correct diameter..
Very cool story! Only C-Band story I have is, I stacked my two smashed 10 footers on top of each other over the weekend. They got destroyed when a tree fell on them in May. 
I did pull down the 90cm, scrubbed it down, and put the new motor on it. I don't have it tracking 100% yet as I only worked with the mosquitoes at Saturday night. Too damn hot on Sunday at 97 degrees! But it's really sad when you can eye ball it set the adjustments and walk in the door and find out you are dead on G-11. Dragging the TV and cheapo SatPro receiver out tonight to fine tune it. The neighbors just look and stare but don't dare to ask.
Keep us updated... love the pics!
Very cool story! Only C-Band story I have is, I stacked my two smashed 10 footers on top of each other over the weekend. They got destroyed when a tree fell on them in May.
I did pull down the 90cm, scrubbed it down, and put the new motor on it. I don't have it tracking 100% yet as I only worked with the mosquitoes at Saturday night. Too damn hot on Sunday at 97 degrees! But it's really sad when you can eye ball it set the adjustments and walk in the door and find out you are dead on G-11. Dragging the TV and cheapo SatPro receiver out tonight to fine tune it. The neighbors just look and stare but don't dare to ask.
Keep us updated... love the pics!
pssst........need a 7 1/2 foot cband dish? I know someone that is gonna have one laying on the side pretty soon...even has a new 18 inch actuator on it...
PLEASE LOG IN TO GET RID OF THESE ADS!
Reason why I said that is I cannot find any stainless tie wire..its all galvanized or aluminum. You said you used leader material....just how did that work, most stainless leader is at least somewhat pliable.
The current ties that are on the dish now are rusted...you'll see when I get the dish insde my shop where I can take some pics, tomorrow I hope.
I went in to the local fishing store. There are a couple types of leader material. One is a braided type that most fishermen use out here today. But they still had the old type. of solid stainless wire.
When I was a kid in Florida we use number 8 and 15 wire for fishing. If I recall correctly #15 was the heavier stuff. In fact I think back then the old guys were calling it piano wire.
I do not have a piece of the packaging to give you any clues. The actual clip I made was scanned in on that one page I sent, so you could try to match that wire size up.
By the way I saw Mike's post and i am thinking I would have probably stabbed my self many more times if I was making clips will "sipping" wine....
Don't offer him a dish! He's had that Paraclipse for a year and not done anything with it!pssst........need a 7 1/2 foot cband dish? I know someone that is gonna have one laying on the side pretty soon...even has a new 18 inch actuator on it...
Now, if it was a Paraclipse that got crushed in a tree-fall, he should've told us so we could hold a service for it. -
Not sure what I had...but I do know one thing. I didn't have the place to put on my current property. I nabbed the two dishes in the neighborhood so I could put one up when I move.
I don't need a C-Band dish right now though")
And yes I did do something with it. I propped it up with a wagon and watched Outdoor Channel 2 HD for a week or two. Does that count?
I don't need a C-Band dish right now though
And yes I did do something with it. I propped it up with a wagon and watched Outdoor Channel 2 HD for a week or two. Does that count?
Safety wire at a "screw" store... Tacoma Screw around here, is stainless and should work. If you have an aircraft surplus store they should have the wire and the twisting pliers also. (Boeing Surplus had a lot the last time I was in there.)
Good luck with this project, stogie, a nice true-and-tuned 12 footer should be an excellent signal gatherer. :up
And thanks to Mauiguy for the great tips and pics.
And thanks to Mauiguy for the great tips and pics.
PLEASE LOG IN TO GET RID OF THESE ADS!
- Status
- Please reply by conversation.
Similar threads
- Replies
- 6
- Views
- 724
- Replies
- 12
- Views
- 1K

- Replies
- 5
- Views
- 4K
- Replies
- 19
- Views
- 832