stogie5150's Birdview install

  • WELCOME TO THE NEW SERVER!

    If you are seeing this you are on our new server WELCOME HOME!

    While the new server is online Scott is still working on the backend including the cachine. But the site is usable while the work is being completes!

    Thank you for your patience and again WELCOME HOME!

    CLICK THE X IN THE TOP RIGHT CORNER OF THE BOX TO DISMISS THIS MESSAGE
Status
Please reply by conversation.
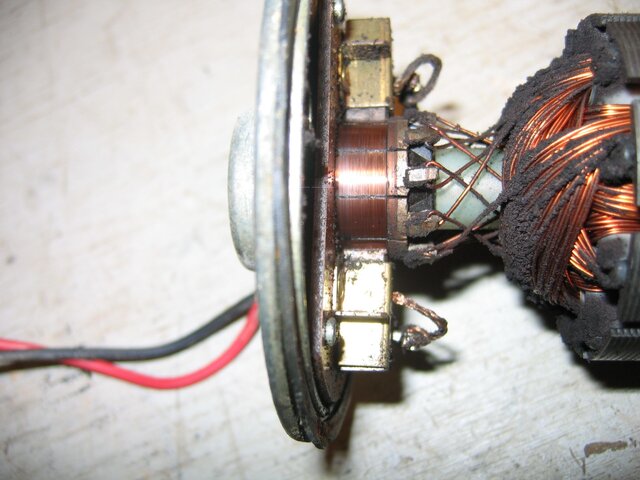
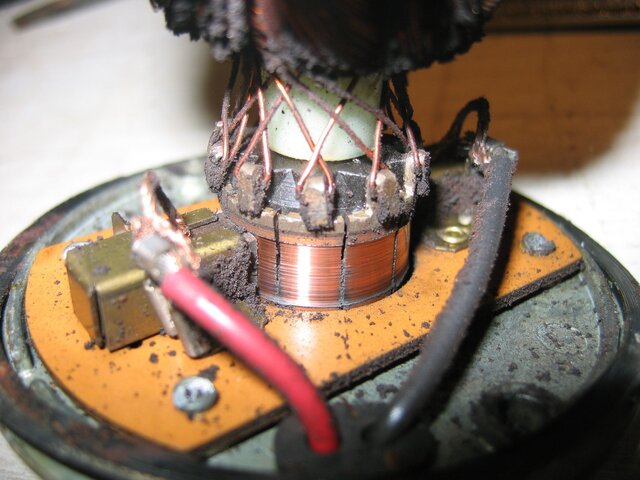
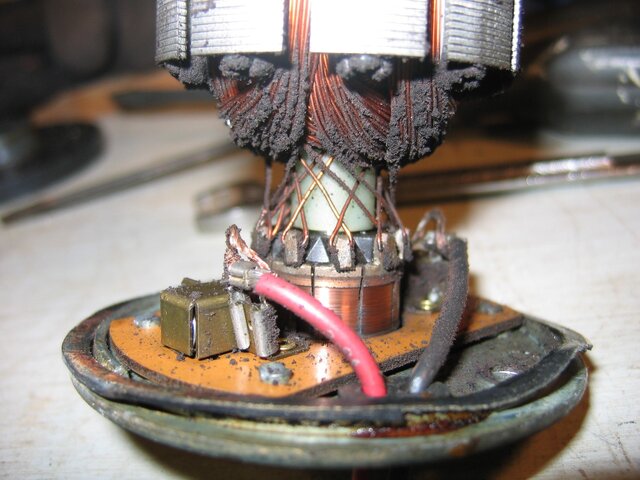
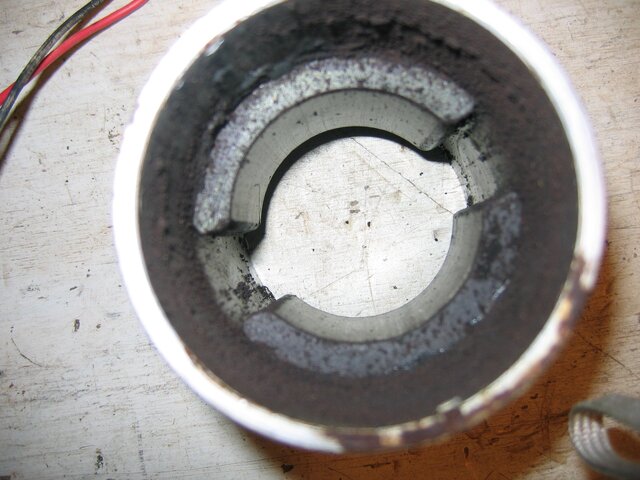
Pull the brushes out by unscrewing the black plastic caps on the wire lead end of the motor, pay attention to the curvature of the brushes so they go back in with the same orientation. You should be able to read the numbers on the bearings, and get replacements if they're pitted or corroded. Other wise, just clean and regrease. With small motors, grease is like a womans make-up, a little is way better than too much. Several on-line bearing houses to choose from. Im surprised it has real bearings instead of bushings, sign of a good quality motor. Take a photo of the commutator, it looks like a bunch of little copper barrs around one end. If it's not gouged or burnt black, it's probably a good armature. I've rebuilt hundreds of small motors, and have some assorted brushes if you need them, 3/8" or longer is ok, less than that replace them.

Are the brushes captive? right now I have the end of the motor that the wires come out of held in place with a u bolt hoseclamped to the motor housing. What do I have to watch for when I pull that cap off? Remember I am TOTALLY ignorant here, I know NOTHING about the guts of a motor. ZERO. I don't know what brushes look like or where they go. :confused:
 
If you do not have 2 Round plastic caps on the out side, I would Push the middle part toward the end cap, the magnets will try to suck it back, you have to push it all the way thru.
You would be able to get a better look at how the brushes go.
 
Well after 15 minutes of frantic googling I now know what brushes are....
So...I took a deep breath...and....
 

Attachments

  • IMG_1756.JPG
    IMG_1756.JPG
    461.3 KB · Views: 169
  • IMG_1757.JPG
    IMG_1757.JPG
    569.9 KB · Views: 177
  • IMG_1758.JPG
    IMG_1758.JPG
    605.5 KB · Views: 197
  • IMG_1759.JPG
    IMG_1759.JPG
    665.7 KB · Views: 191
Definately a good cleaning is in order.

The surface that those brushes turn against looks pretty worn
That is designed to wear, like break drums, can be "turned" at an Electric Motor repair place. I've never done it at home.
Brushes and Bearings can be replaced.
At least it came apart without breaking.
 
Stogie,

The commutator looks a little worn, this is normal, don't worry about it, should be fine for a long time. Turning and undercutting them is a specialty business that requires some skill and experiance. When you clean up the armature and commutator, do not use any solvent that will eat the insulating varnish on the windings. Isopropyl Alcohol, a toothbrush and compressed air should work just fine. Dont break any of the wires crimped to the commutator. Carefully inspect the insulators between each commutator segment and VERY carefully remove any metal bridging adjacent segments with a toothpick, or an exacto knife, you dont want to raise any burrs that will eat your new brushes up in no time. If you do raise a burr, a very delicate hand and a jewlers file can knock it down. With an ohmeter check each segment to the shaft to make nothing is shorted to ground. Each individual winding had it's terminal ends 180 degrees apart, check each winding too for opens. If everything checks out after cleaning and lubricating, test assemble it without brushes and see if it spins smoothly with no binding or rubbing. If it rubs or binds, find out where and correct. Then with new brushes installed reassemble and with an ohmmeter on the power leads, spin the motor and check for, smoothness and grounds again. If good, hook it up to a power supply or battery and see how it runs. It will go like a bat out of hell with no load so don't run it too long without the gearbox attached.


That is WAY above my paygrade. I think I can handle the cleaning part, the bearing under the cap is nice and smooth, I don't think I have any problem with that. I was just going to blow it out real well, clean the motor housing real well and put it back together, because while I have a meter, I don't know where to put it to check for all those things you said.

I think this might be a case of me knowing my limitations and not messing with something I have no business messing with. :) I DO greatly appreciate you taking the time to try and help, though. :up
 
OKAY, its back together. It has a little roughness to it, but it now jumps when I put 36v to it, and it doesn't trip the breaker in the mover box.

I can tell you this, I DO NOT have the steady hand NOR the patience to mess with electric motors. The brushes fell out when I was trying to put it back together, and it took me an hour of fiddling to get them back in the holders and back on the shaft. I almost let my short temper get the best of me and threw the whole thing in the woods. :D

Monday I'll put it back on my dish and see how it does. But I still am not going to stop looking for new ones for those of us that might need one.
 
Monday? What's this "Monday" stuff. 2hrs of daylight left!

But not two hours of patience left. LOL

As I have gotten older I have realized that sometimes you have to just walk away and come back to it later. In this case later is tomorrow. :D

Its gonna be in the 70's all week here so the weather will be nice. :cool:
 
But not two hours of patience left. LOL

As I have gotten older I have realized that sometimes you have to just walk away and come back to it later. In this case later is tomorrow. :D [/qoute]

With age comes wisdom............nothing gained from smashing it.;)

Its gonna be in the 70's all week here so the weather will be nice. :cool:

I'm 90 miles North of Grand Forks, blizzard missed us this weekend...it'll be -20 or so tomorrow morning at 5:30 when I feed and water the aminals. Hope it works out without too many hassles. Then comes the fun part...aiming..then TV!:hungry:
 
Last edited:
Got cables rerouted for the Primestar dish around noon today. It was 75 then, a record high, now it is 29 and isn't supposed to get above freezing again till next Saturday.

Good Luck Stogie, with these temps, my Cband dish is going to stay down for a while longer.
 
I have a little preliminary success to report....I put the motor back on and it works fine, no issues.

SOOOOO, being the impatient type that I am, I reached in the old pile o'stuff and got the original servo feed that came off of it, removed the servo motor, and adjusted the feed, Iceberg style, to Horizontal polarity, and slapped it in the scalar.

Fellas, lemme tell you somethng. I spent DAYS with the Paraclipse, and the first satellite I hit today, my true south satellite, G17, absolutely blew the Paracilpse away! Jewelry TV is usally about 93-94 SQ on my Paraclipse, on this Birdview it was pegged out..98 sq with no bounce. I was STOKED!

It still wasn't aligned properly, as I went west it slowly lost signal, so I would need to adjust the dish a bit so I grabbed my 3/4 wrench---


....and it started raining. :D

SO close, yet so far. But I can confirm that it DOES still collect signal. :D
 
hip hip hoorah... hip hip hoorah.... another Birdview has survived surgury and is now in recovery. We can all rest better now, especially stogie!
I predict the Birdview will recover completely and be at over 100%....
hip hip hoorah....!!
 
As a fellow Birdview dude, your success doesn't surprise. I had a solid aluminum dish before, but the Birdview blew it away and got me all the satellites I hoped to get.

When I get the energy I will be tweaking it for aim and getting better lnbs. That should allow me to pick up the moons of Jupiter.

Congrats on the success! Don't end the thread. Tell us what cool new stations you get over the next month or so.
 
Well I got my CK-1 yesterday and started installation this morning. ( yesterday was out because my router on my computer went Tango Uniform and I spent all day trying to figure out why I didn't have internet...grrrr... another thing I'll need to buy...) Anyway, after a bit of tuning, its coming together.

A couple notes for you future B-view Guys...

1) Linuxman was NOT kidding when he said the B-view could see each SIDE of a signal! I tweaked the C-band first, then I settled on AMC6 to switch over to Ku. I can bump the dish a little each way and it gets different TP's on the satellite at different strengths. At one dish position I can get the NBC mux on Ku, but not the scrambled weather channel feed. But bump the dish and I can get the Weather channel but not the NBC mux..sheese this thing is touchy!

2) After reading Linuxman's past threads, I am going to check, and you should too, the centering of the LNB in the scalar. I thought it was close, but after reading his notes on how crucial it was I wanna check more closely.


I came in to get a bit of lunch, I'll have numbers later. :)


EDIT:

Well, I don't have any numbers for you. Getting both was an exercise in futility. Tweak the C, and the KU was hosed, and vice Versa. I am going to start from scratch and check all my angles, I think the declination may be off for Ku band, I know C-band is a big fat signal to hit next to Ku.

Just for instance, the Fox Mux on G17 C band is 94Q on the Coolsat, and G17 Ku the TXCN mux was 65Q. Not good.

Another issue, is the VERY loose fit of the CK-1 in the Birdview Scalar. Its almost impossible to get it halfway straight and level with the scalar/dish. I need to look at this closely, Because to get Ku the LNB has to be canted a bit, straighten it out and the Ku, what little I have, goes bye-bye. Maddening.

Least I have a hobby...LOL
 

Attachments

  • IMG_1761[1].JPG
    IMG_1761[1].JPG
    1.1 MB · Views: 162
Last edited:
one thing i noticed while i was up with the bsc621 was this same effect. And i eventually tuned for the best of both at one spot.... the next time ( when i get back out there ) i will tune it for best Ku-band and then give it a bump or two and see if C-band will fall in ( at its best signal). of course this is just my thoughts. and of course if it will hold true for tracking the arc and hold the higher signal.

although it would be ideal to get both best reception at one point.... its not a kill all situation if
your planning on tuning the system with v-box / g-box because you can select a seperate satellite location for c-band and ku.
 
Status
Please reply by conversation.

Users Who Are Viewing This Thread (Total: 0, Members: 0, Guests: 0)

Who Read This Thread (Total Members: 1)