Yes you did so I put in that frequency in the frequency spot and 200000 in the Sr spot on the meter ok I think I'm getting the feel for it just don't understand the meter settings I'm learning that the DBuV being high doesn't really mean anythingI think I gaveOk that above, but....
12152 H 20000

New FTA user
- Thread starter admarvelous
- Start date
- Latest activity Latest activity:
- Replies 223
- Views 19K
You are using an out of date browser. It may not display this or other websites correctly.
You should upgrade or use an alternative browser.
You should upgrade or use an alternative browser.
SatelliteGuys Fund Raiser
100%
- Total amount
- $885.00
- Goal
- $350.00
Donation ends:
- Status
- Please reply by conversation.
12152 H 20000
Be sure that the polarity is set to Horizontal for this transponder.
Yes you did so I put in that frequency in the frequency spot and 200000 in the Sr spot on the meter
Be sure that the polarity is set to Horizontal for this transponder.

Yes I set it to horizontal the dBuV reading just throws me off cause it like at 82dBuv but 0 dB or signal quality I'm getting a carpenters level to make sure I'm angled right12152 H 20000
Be sure that the polarity is set to Horizontal for this transponder.
How would you use a carpenter level to determine if the dish angle is correct? This is an offset dish so the face of the dish is not aimed at the actual elevation look angle. On a typical offset dash, the face of the dish is aimed between 22 and 26° lower than the actual look angle up to the satellite. If you know the offset angle of the dish, you can add the carpenters level angle (measured on the face of the dish) to the offset angle to equal the elevation angle to the target satellite. Probably best if you start by using the stamped elevation angles on the mount. These sometimes can be a few degrees off, but is a good starting point. The stamped angles on the mount will only be as accurate as the pole is plumb and level that you're mounting the dish on.
I'm sure you've read my advice to others, but here is a quick summary of how to aim your dish:
With a compass, identify the approximate compass angle for the target satellite and identify a landmark in the far distance like a tree or telephone pole that you can reference for an approximate position for the satellite.
Set the dish elevation angle for the target satellite. Lightly tighten the nuts on the elevation mount.
Point the LNBF support arm towards the landmark that you identified as in alignment with the target satellite.
Set the LNBF skew rotation angle to the approximate angle. I see that your skew angle for 97w is 10°, so set it initially straight up and down (12 o'clock) will be close enough to identify and lock onto the 97w satellite.
Connect your satellite meter to the LNBF and power on the meter.
Select the target satellite and select an active transponder from the list or enter in the transponder parameters.
While closely watching the signal quality meter reading, SLOWLY pan the dish east and west approximately 15° on either side of the landmark. If no signal quality reading is detected, increase or decrease the dish elevation angle in 1° increments and slowly repeat the pan east and west on either side of the landmark. The dish elevation may be up to 77 to 10° above or below the stamped reading. Some dishes are very poor quality and the stamping is way off.
Repeat until the signal quality meter reading is found.
Optimize the signal quality meter reading by panning east and west, adjusting the elevation angle up or down, adjusting the LNBF skew clockwise or counterclockwise and by sliding the LNBF towards or away from the reflector.
Perform a blind scan on the satellite to find active transponders and channels. Now you're ready to watch free TV. Enjoy!
How do you know if the dish is poor qualityHow would you use a carpenter level to determine if the dish angle is correct? This is an offset dish so the face of the dish is not aimed at the actual elevation look angle. On a typical offset dash, the face of the dish is aimed between 22 and 26° lower than the actual look angle up to the satellite. If you know the offset angle of the dish, you can add the carpenters level angle (measured on the face of the dish) to the offset angle to equal the elevation angle to the target satellite. Probably best if you start by using the stamped elevation angles on the mount. These sometimes can be a few degrees off, but is a good starting point. The stamped angles on the mount will only be as accurate as the pole is plumb and level that you're mounting the dish on.
I'm sure you've read my advice to others, but here is a quick summary of how to aim your dish:
With a compass, identify the approximate compass angle for the target satellite and identify a landmark in the far distance like a tree or telephone pole that you can reference for an approximate position for the satellite.
Set the dish elevation angle for the target satellite. Lightly tighten the nuts on the elevation mount.
Point the LNBF support arm towards the landmark that you identified as in alignment with the target satellite.
Set the LNBF skew rotation angle to the approximate angle. I see that your skew angle for 97w is 10°, so set it initially straight up and down (12 o'clock) will be close enough to identify and lock onto the 97w satellite.
Connect your satellite meter to the LNBF and power on the meter.
Select the target satellite and select an active transponder from the list or enter in the transponder parameters.
While closely watching the signal quality meter reading, SLOWLY pan the dish east and west approximately 15° on either side of the landmark. If no signal quality reading is detected, increase or decrease the dish elevation angle in 1° increments and slowly repeat the pan east and west on either side of the landmark. The dish elevation may be up to 77 to 10° above or below the stamped reading. Some dishes are very poor quality and the stamping is way off.
Repeat until the signal quality meter reading is found.
Optimize the signal quality meter reading by panning east and west, adjusting the elevation angle up or down, adjusting the LNBF skew clockwise or counterclockwise and by sliding the LNBF towards or away from the reflector.
Perform a blind scan on the satellite to find active transponders and channels. Now you're ready to watch free TV. Enjoy!
PLEASE LOG IN TO GET RID OF THESE ADS!
So are you saying even tho the dish pointer may say one angle that the angle could be higher or lower than that of their readingHow would you use a carpenter level to determine if the dish angle is correct? This is an offset dish so the face of the dish is not aimed at the actual elevation look angle. On a typical offset dash, the face of the dish is aimed between 22 and 26° lower than the actual look angle up to the satellite. If you know the offset angle of the dish, you can add the carpenters level angle (measured on the face of the dish) to the offset angle to equal the elevation angle to the target satellite. Probably best if you start by using the stamped elevation angles on the mount. These sometimes can be a few degrees off, but is a good starting point. The stamped angles on the mount will only be as accurate as the pole is plumb and level that you're mounting the dish on.
I'm sure you've read my advice to others, but here is a quick summary of how to aim your dish:
With a compass, identify the approximate compass angle for the target satellite and identify a landmark in the far distance like a tree or telephone pole that you can reference for an approximate position for the satellite.
Set the dish elevation angle for the target satellite. Lightly tighten the nuts on the elevation mount.
Point the LNBF support arm towards the landmark that you identified as in alignment with the target satellite.
Set the LNBF skew rotation angle to the approximate angle. I see that your skew angle for 97w is 10°, so set it initially straight up and down (12 o'clock) will be close enough to identify and lock onto the 97w satellite.
Connect your satellite meter to the LNBF and power on the meter.
Select the target satellite and select an active transponder from the list or enter in the transponder parameters.
While closely watching the signal quality meter reading, SLOWLY pan the dish east and west approximately 15° on either side of the landmark. If no signal quality reading is detected, increase or decrease the dish elevation angle in 1° increments and slowly repeat the pan east and west on either side of the landmark. The dish elevation may be up to 77 to 10° above or below the stamped reading. Some dishes are very poor quality and the stamping is way off.
Repeat until the signal quality meter reading is found.
Optimize the signal quality meter reading by panning east and west, adjusting the elevation angle up or down, adjusting the LNBF skew clockwise or counterclockwise and by sliding the LNBF towards or away from the reflector.
Perform a blind scan on the satellite to find active transponders and channels. Now you're ready to watch free TV. Enjoy!
As long as the post is plumb and level in all directions, the DS-2076 elevation stamp will be very close to accurate.
Dish Pointer app/website calculated angle is correct, but the mechanical variation in the dish assembly may make the actual elevation angle setting slightly higher or lower than the stamping. Don't trust that the dish angle is perfect just because the dish angle stamp is aligned. A fraction of a degree high/low/east/west and you will receive nothing! You will find that the aiming is very critical. The slightest movement and the signal will go from great to gone!
Dish Pointer app/website calculated angle is correct, but the mechanical variation in the dish assembly may make the actual elevation angle setting slightly higher or lower than the stamping. Don't trust that the dish angle is perfect just because the dish angle stamp is aligned. A fraction of a degree high/low/east/west and you will receive nothing! You will find that the aiming is very critical. The slightest movement and the signal will go from great to gone!
Plumb meaning the dish pole is 90 degreesAs long as the post is plumb and level in all directions, the DS-2076 elevation stamp will be very close to accurate.
Dish Pointer app/website calculated angle is correct, but the mechanical variation in the dish assembly may make the actual elevation angle setting slightly higher or lower than the stamping. Don't trust that the dish angle is perfect just because the dish angle stamp is aligned. A fraction of a degree high/low/east/west and you will receive nothing! You will find that the aiming is very critical. The slightest movement and the signal will go from great to gone!
PLEASE LOG IN TO GET RID OF THESE ADS!
Measure all sides near the top of the pole to be sure the bubble level is perfectly centered. Every degree that the level bubble is off is a degree that your mount elevation adjustment setting will be off.
So far these are the readings I've been getting don't know if their good bad or close to finding the satAs long as the post is plumb and level in all directions, the DS-2076 elevation stamp will be very close to accurate.
Dish Pointer app/website calculated angle is correct, but the mechanical variation in the dish assembly may make the actual elevation angle setting slightly higher or lower than the stamping. Don't trust that the dish angle is perfect just because the dish angle stamp is aligned. A fraction of a degree high/low/east/west and you will receive nothing! You will find that the aiming is very critical. The slightest movement and the signal will go from great to gone!
Attachments
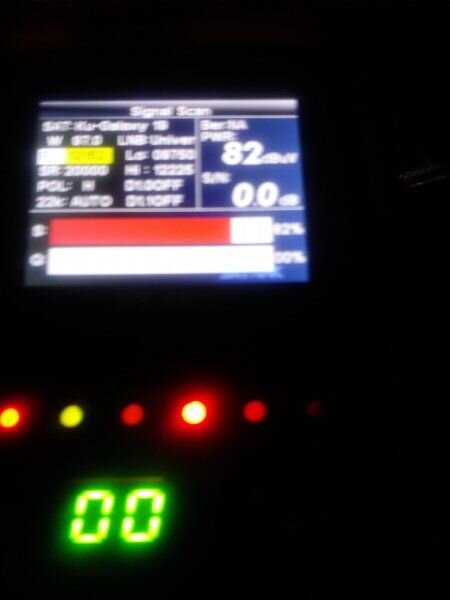
The photo is blurry, but it appears that you have the LNB high frequency set incorrectly. For a universal LNB, the Low LO is 9750 and the high LO should be 10600. With this incorrect setting, the meter would never lock onto the satellite.
Could you change and provide a focused photo of the screen?
Could you change and provide a focused photo of the screen?
New settingThe photo is blurry, but it appears that you have the LNB high frequency set incorrectly. For a universal LNB, the Low LO is 9750 and the high LO should be 10600. With this incorrect setting, the meter would never lock onto the satellite.
Could you change and provide a focused photo of the screen?
Attachments

New New setting with correctionsThe photo is blurry, but it appears that you have the LNB high frequency set incorrectly. For a universal LNB, the Low LO is 9750 and the high LO should be 10600. With this incorrect setting, the meter would never lock onto the satellite.
Could you change and provide a focused photo of the screen?
PLEASE LOG IN TO GET RID OF THESE ADS!
Attachments
The LNB type needs to be set to "Universal", then the 22KHz will no longer be greyed out and instead be set to "Auto".
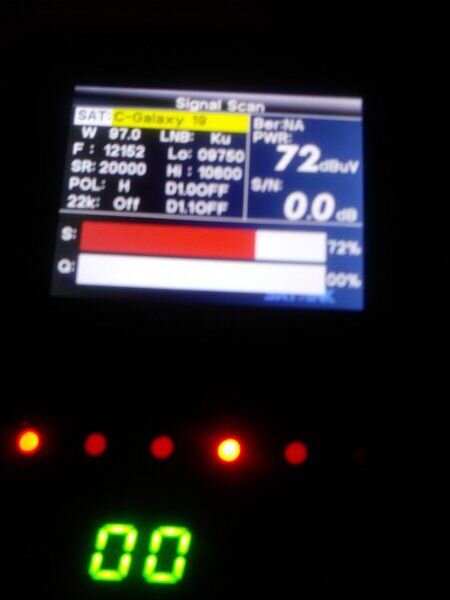
The Satellite is selected to C-band 97w and not the KU 97w satellite. This is why it is displaying 3.xxx - 4.xxx C-band frequencies instead of the correct 11.7xx - 12.2xx KU-band transponder frequencies in the pre-programmed transponder list.
On your meter, the SN will change from "0.0dB" to a higher number and the SQ reading will display a percentage when the meter locks onto an active transponder. Right now, the meter is only displaying "PWR: 72dbuV" indicating that it is connected to a powered LNB.
It doesn't appear it is doing auto on the 22kHz setting, so you need to turn 22k on.
The LNB type needs to be set to "Universal", then the 22KHz will no longer be greyed out and instead be set to "Auto".
Here is what your setting screens should look like for 97w ku on the WS-6933 admarvelous.
Screen 1:
Screen 2:
")
Ok I set it now I'm going to try to find the SatHere is what your setting screens should look like for 97w ku on the WS-6933 admarvelous.
Screen 1:
View attachment 134988
Screen 2:
View attachment 134989
I have a question I put the Satellite dish were the old directv was on the roof should move the dishHere is what your setting screens should look like for 97w ku on the WS-6933 admarvelous.
Screen 1:
View attachment 134988
Screen 2:
View attachment 134989
PLEASE LOG IN TO GET RID OF THESE ADS!
- Status
- Please reply by conversation.
Similar threads
- Replies
- 86
- Views
- 5K
- Replies
- 34
- Views
- 1K
- Replies
- 9
- Views
- 1K
- Replies
- 0
- Views
- 925